Documentation
Everything you need to set up, run, and get the most out of JewelTag — from first login to your hundredth sale.
Platform Overview
JewelTag is built around four connected modules that share the same underlying item and customer records. Anything you scan at intake follows the piece through pricing, sale, and any future repair — without re-entering data.
PIN Login & Staff Switch
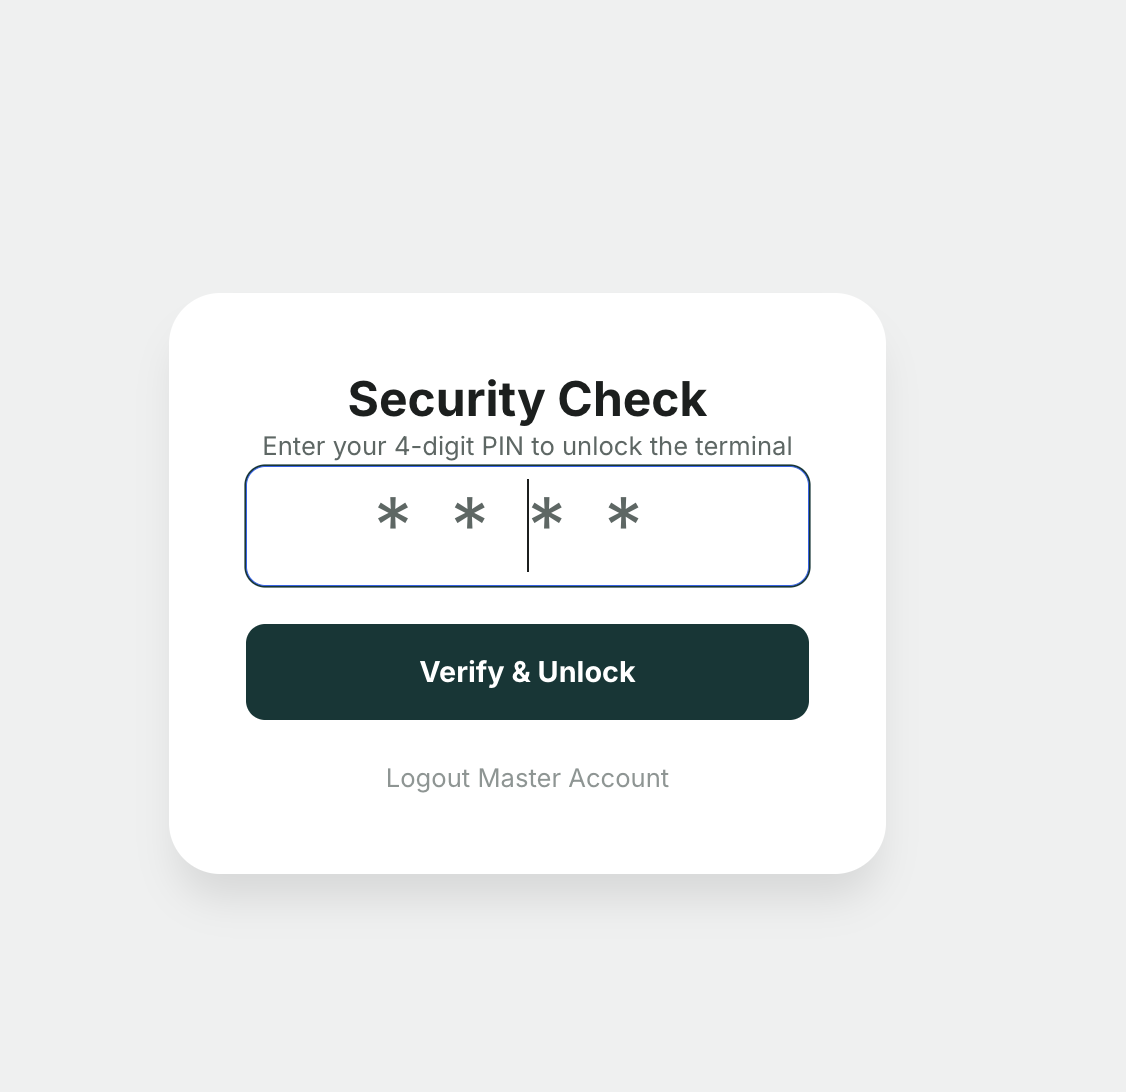
JewelTag uses a two-layer authentication system. The store owner logs in with their email and password once — after that, individual staff members use a 4-digit PIN to identify themselves at the counter without fully logging out.
/admin/login won't see the PIN screen. The owner must log in first, then staff tap Switch Associate from the user menu top-right.
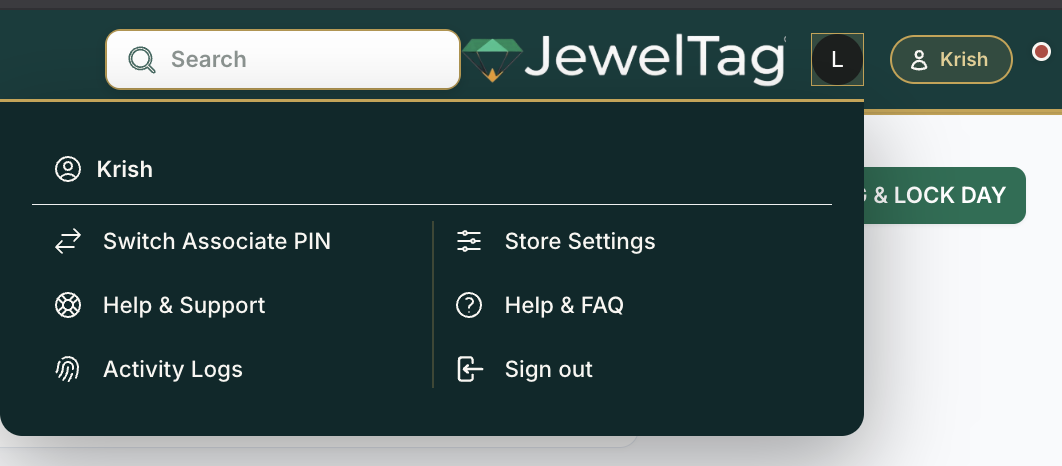
Steps to switch staff mid-shift
- Click your name / avatar in the top-right corner of the admin panel
- Select Switch Associate PIN
- The new associate enters their 4-digit PIN
- All subsequent sales and repairs are attributed to the new associate
Quick Start Guide
Most stores take their first sale on day one. Follow this order:
Staff Accounts & Roles
Every staff member gets their own account so sales, commissions, and repairs are correctly attributed. Roles control what each person can see and do.
| Role | Access |
|---|---|
| Superadmin / Owner | Full access — settings, all reports, user management, deletion requests. |
| Administration | All reports, settings, no system-level changes. |
| Sales Associate | POS, customer profiles, repair intake. No settings or financial reports. |
| Bench / Repair | Repair queue and status updates only. |
Store Settings
Under Settings → Store configure the fields that affect every transaction — tax rate, default currency, store address on receipts, and logo. The timezone here controls how dates display in all reports.
Adding Inventory Items
Each inventory item holds up to 62 fields — but most are optional. At minimum you need a barcode, cost price, and supplier. Everything else (certifications, stone weights, RFID) can be added later.
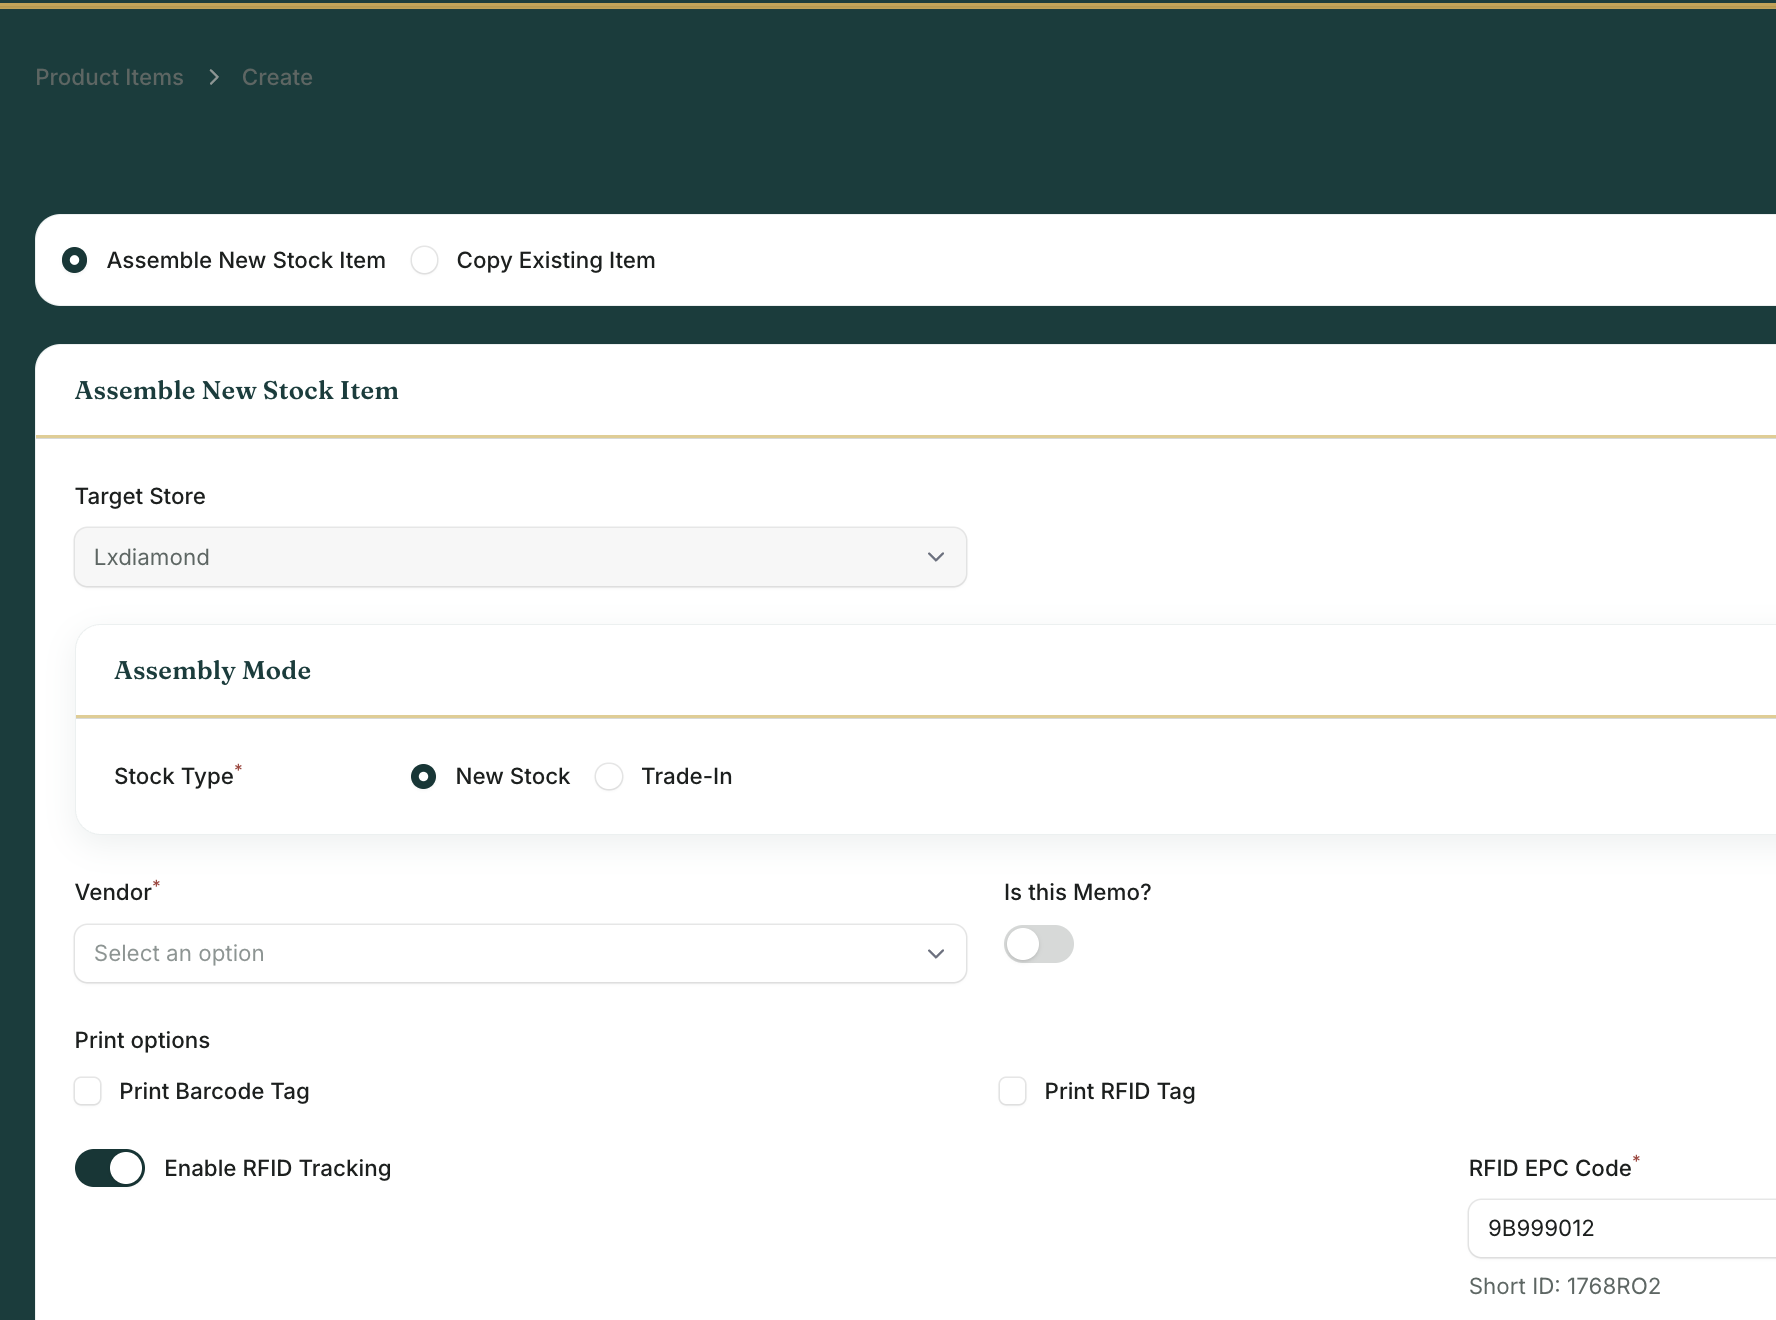
Field groups explained
Department, sub-department, category, supplier code, custom description, primary image
Shape, color, clarity, cut, polish, symmetry, fluorescence, measurements, diamond weight, is_lab_grown
Certificate number (GIA/IGI/AGS), certificate agency — prints on customer receipts
Metal type, purity, gross weight, stone weight, metal weight, size
Cost price (hidden from sales staff), retail price, web price, markup %, discount %
Status (in_stock/on_hold/sold/inactive), is_memo, is_trade_in, RFID code, barcode, serial number
CSV Bulk Import
barcode, cost_price, supplier_id, department, category, retail_price, metal_type, status
RFID & Barcode Setup
JewelTag supports both barcode scanning and RFID. Barcodes work on all plans. RFID (the rfid_code field on each item) is available on Pro and above.

Zebra ZD621R Label Printer
Your Zebra printer connects over the local network at 192.168.1.60 by default. Update the IP under Settings → Hardware if your network differs.
Diamond Certifications
Attach GIA, IGI, AGS, EGL, or HRD certification details to any inventory item via Certificate Number and Certificate Agency fields. These print on customer receipts and appraisal documents automatically. The cert stays linked to the item's history even after it sells.
Memo / Consignment Inventory
Items received on memo from a vendor are flagged is_memo = true and linked to a Memo Vendor. The memo_status field tracks lifecycle:
| Status | Meaning |
|---|---|
on_memo | In your store, not yet owned — vendor can recall it |
sold | Sold — you owe the vendor; reconcile under Memo Inventory |
returned | Physically returned to vendor; closes out the memo line |
Multi-Store Stock Transfers
Move items between locations via Inventory → Stock Transfers. Items stay linked to full history across all stores.
- Go to Inventory → Stock Transfers → New Transfer
- Select source store and destination store
- Scan or search items to include
- Submit — items move to In Transit status
- Destination store confirms receipt — status becomes Completed
Inventory Audits
Run a physical count audit under Inventory → Inventory Audits. JewelTag compares your counted quantities against the system's expected stock and generates a variance report — showing shrinkage, overages, and unaccounted items.
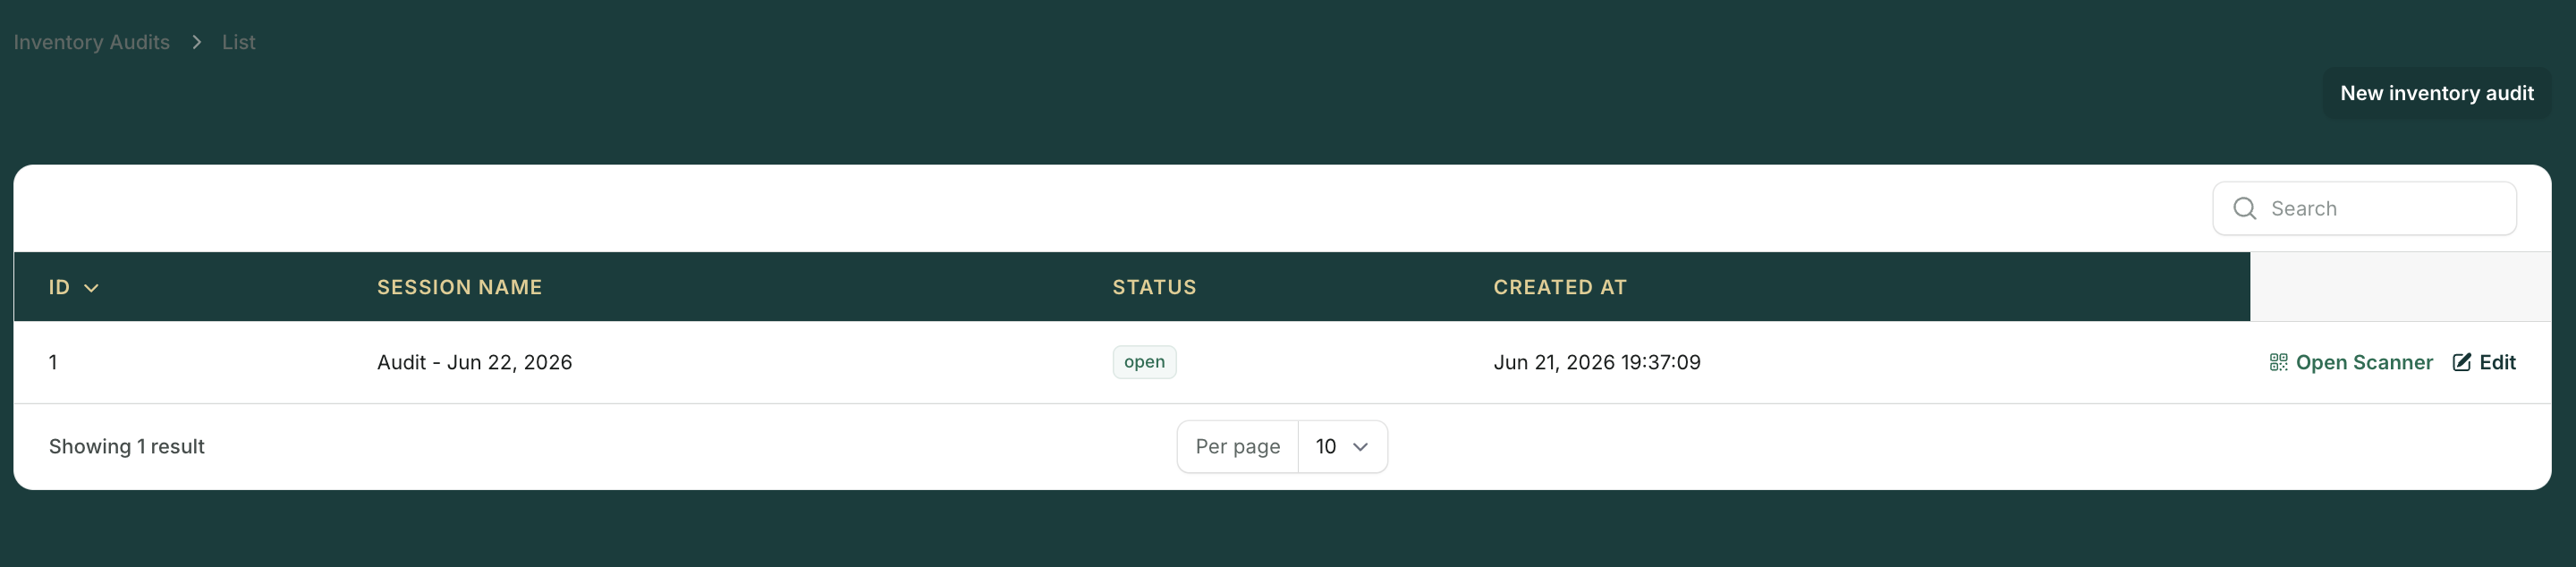
How an audit works
- Create a new audit — it snapshots expected counts from the database
- Scan or enter actual counts for each item or location
- Submit — the system calculates variance per item (
audit_itemstable) - Review the variance report — investigate any unexplained differences
Restocking & Purchase Orders
When new stock arrives from a supplier, record it under Inventory → Restock. Each restock entry logs the supplier, quantity, cost, and receipt date — creating a permanent purchase history in the restocks table.

Supplier Management
Manage your vendors under Inventory → Suppliers. Every inventory item links to a supplier via supplier_id — so your cost reports and restock logs always show which vendor each piece came from.
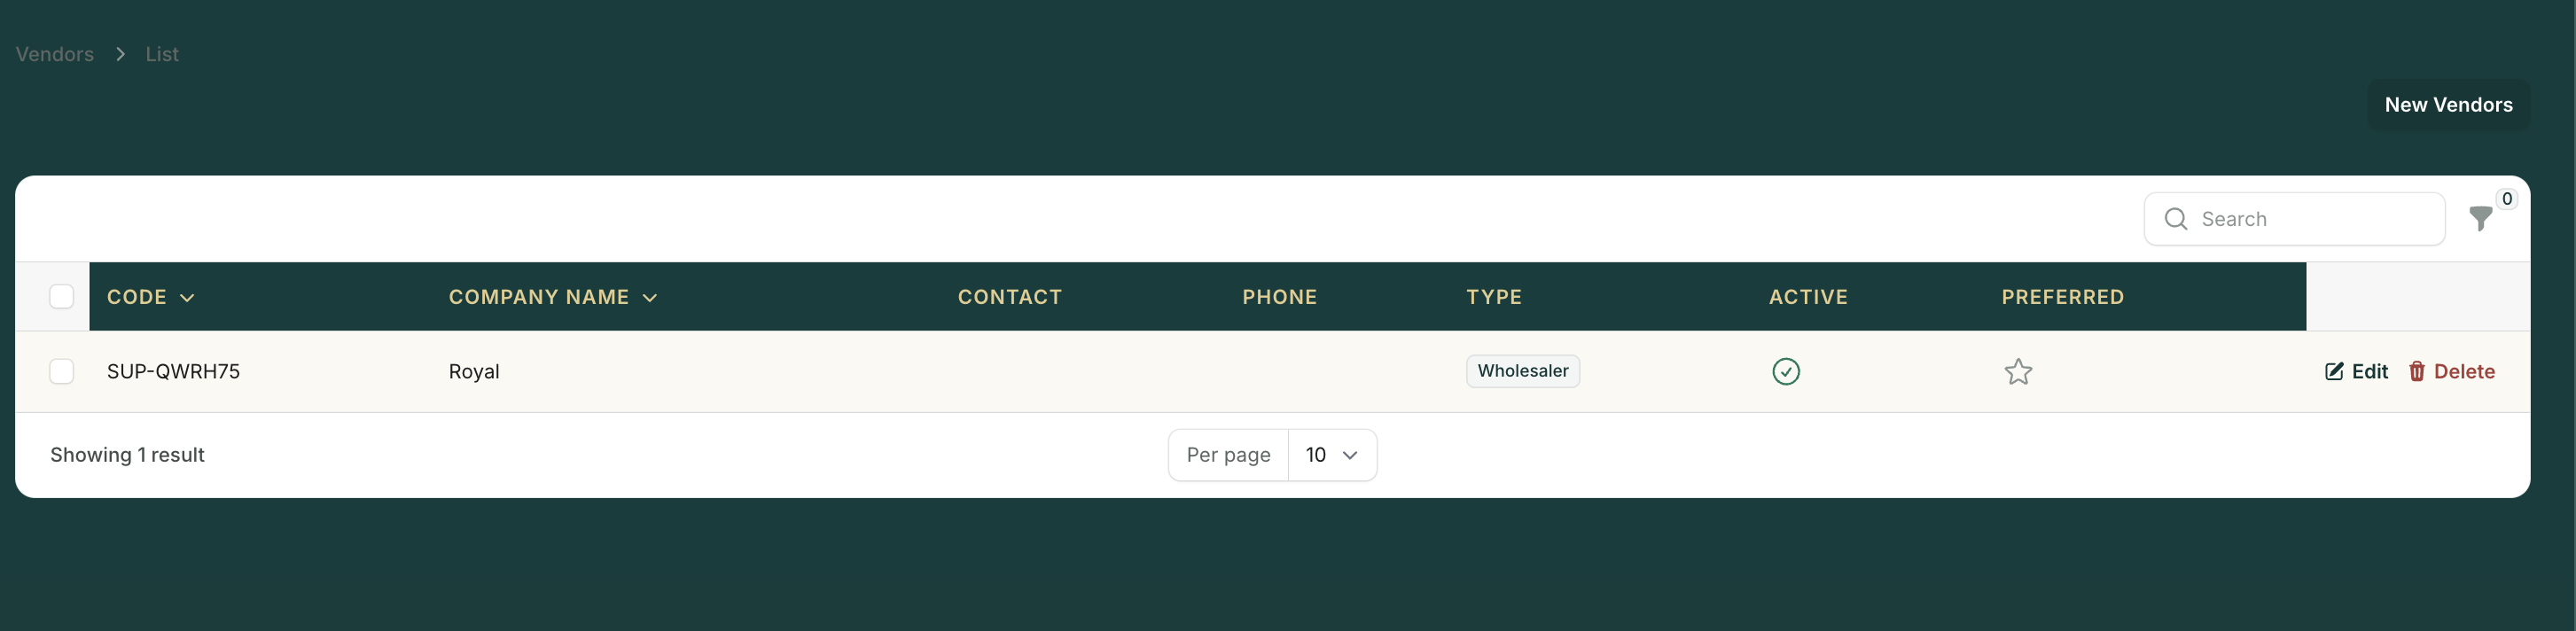
supplier_id for every row.
Archived Stock
Items can be archived rather than deleted — archiving removes them from active inventory counts and reports without permanently losing their history. Access archived items under Inventory → Archived Stock.
Shopify Sync
JewelTag pushes inventory items to Shopify and keeps stock counts in sync both ways. Synced items store shopify_product_id and shopify_inventory_item_id on the item record.
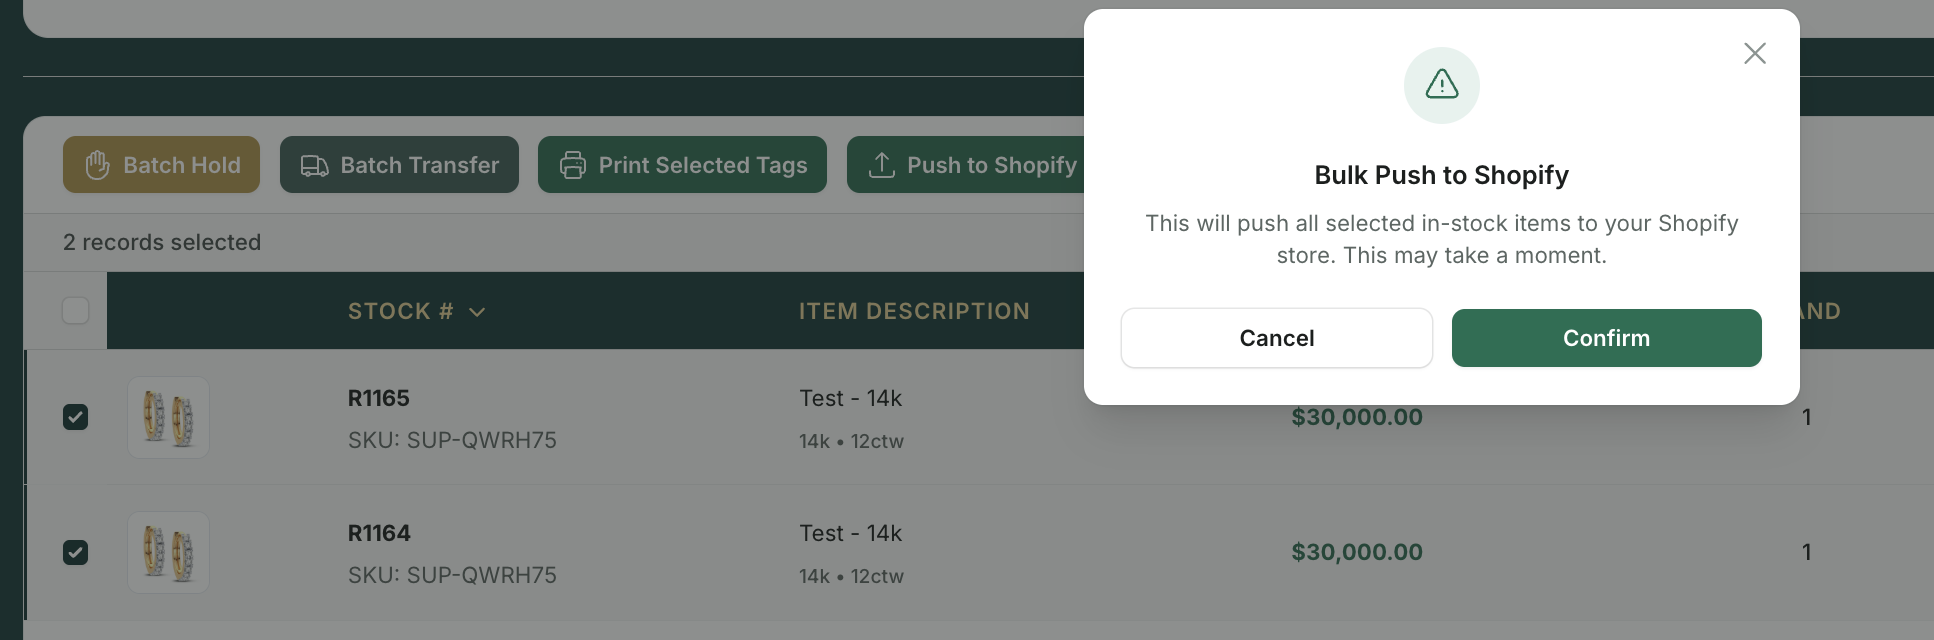
Required Shopify scopes
write_products · write_inventory · read_locations
jeweltag-instore Shopify tag automatically. If the push fails, check the browser console — the most common cause is an oversized image.
Making a Sale
Go to Sales → New Sale. Scan or search items to add to cart, attach a customer, choose a payment method, and complete. Inventory moves from in_stock to sold the moment the receipt prints.
Split Payments
Pay with multiple methods in one sale (e.g. $500 card + $200 cash). The split section is collapsed by default — click the toggle to expand it.
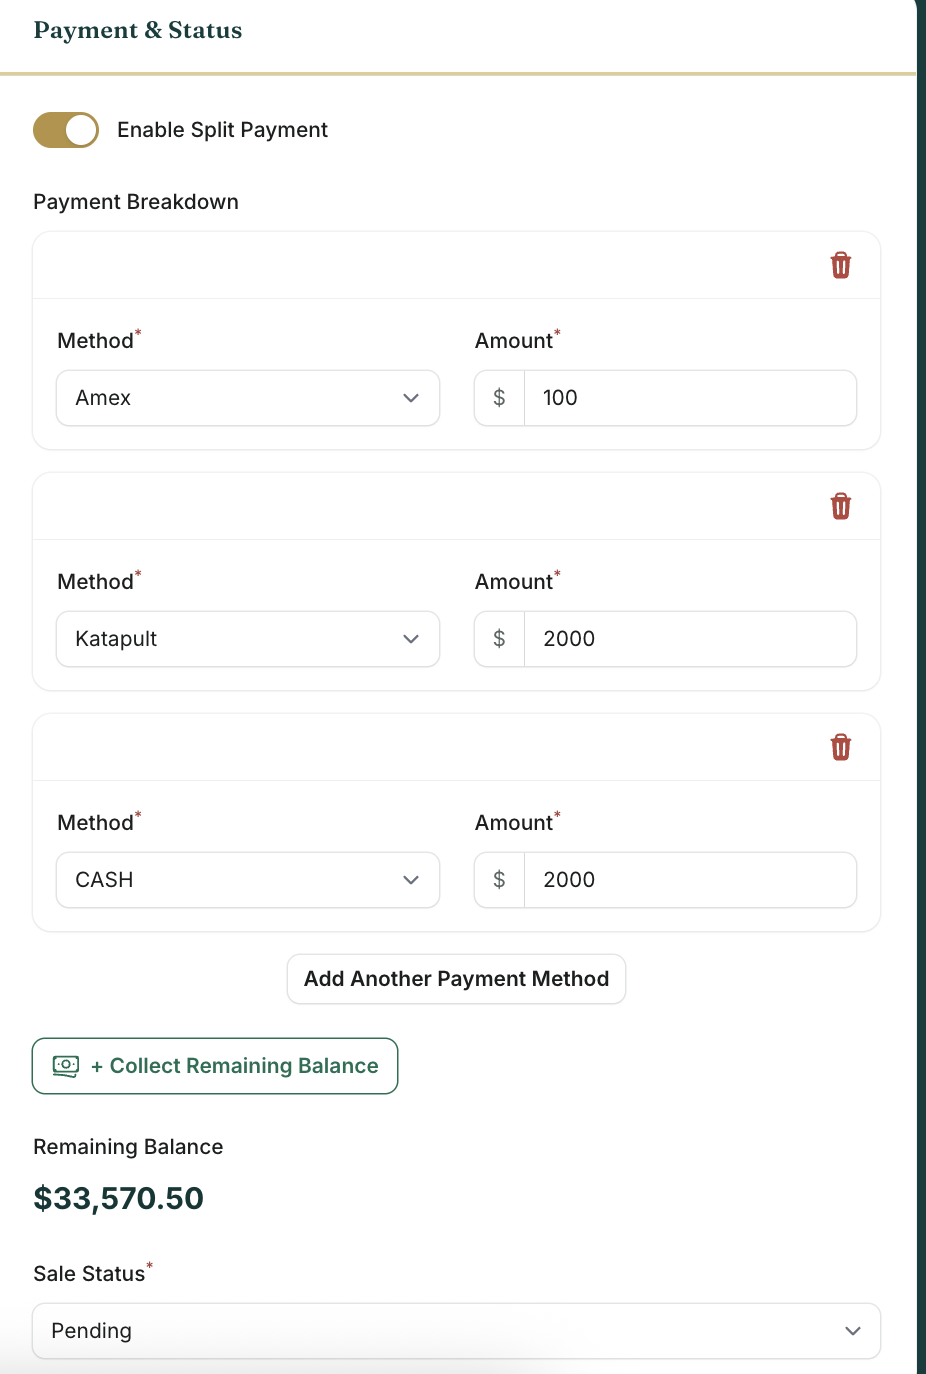
Trade-Ins
Enable the Trade-In toggle on a sale to reveal trade-in fields. The value entered subtracts directly from the balance due.
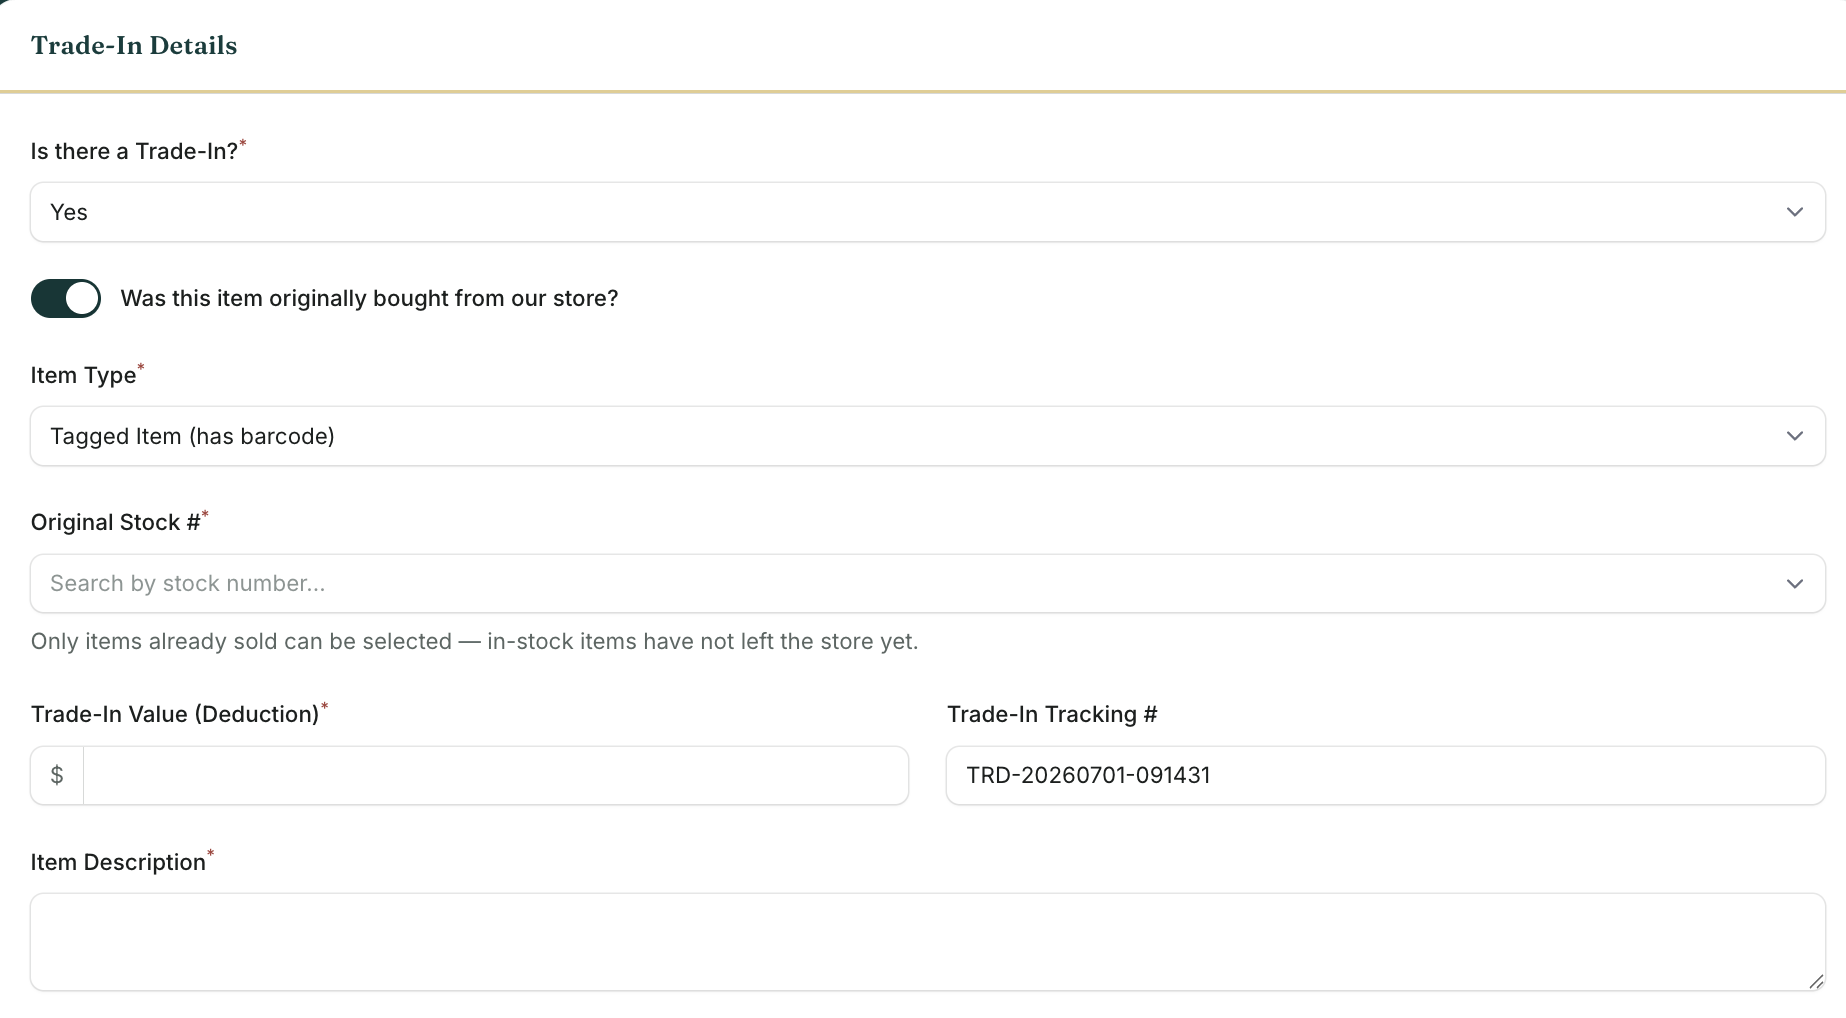
| Field | Purpose |
|---|---|
trade_in_value | Amount credited — reduces balance due |
trade_in_description | Description of traded piece (e.g. "14K yellow gold ring, 4.2g") |
trade_in_receipt_no | Auto-generated receipt number — keep for records |
Add the traded-in piece to inventory as a new item with is_trade_in = true to track its origin.
Trade-In / Scrap Gold Calculator
The Trade-In Check page is a standalone scrap gold and trade value calculator — separate from the sale form. Use it at the counter to quickly estimate what a customer's piece is worth before committing to a purchase price.
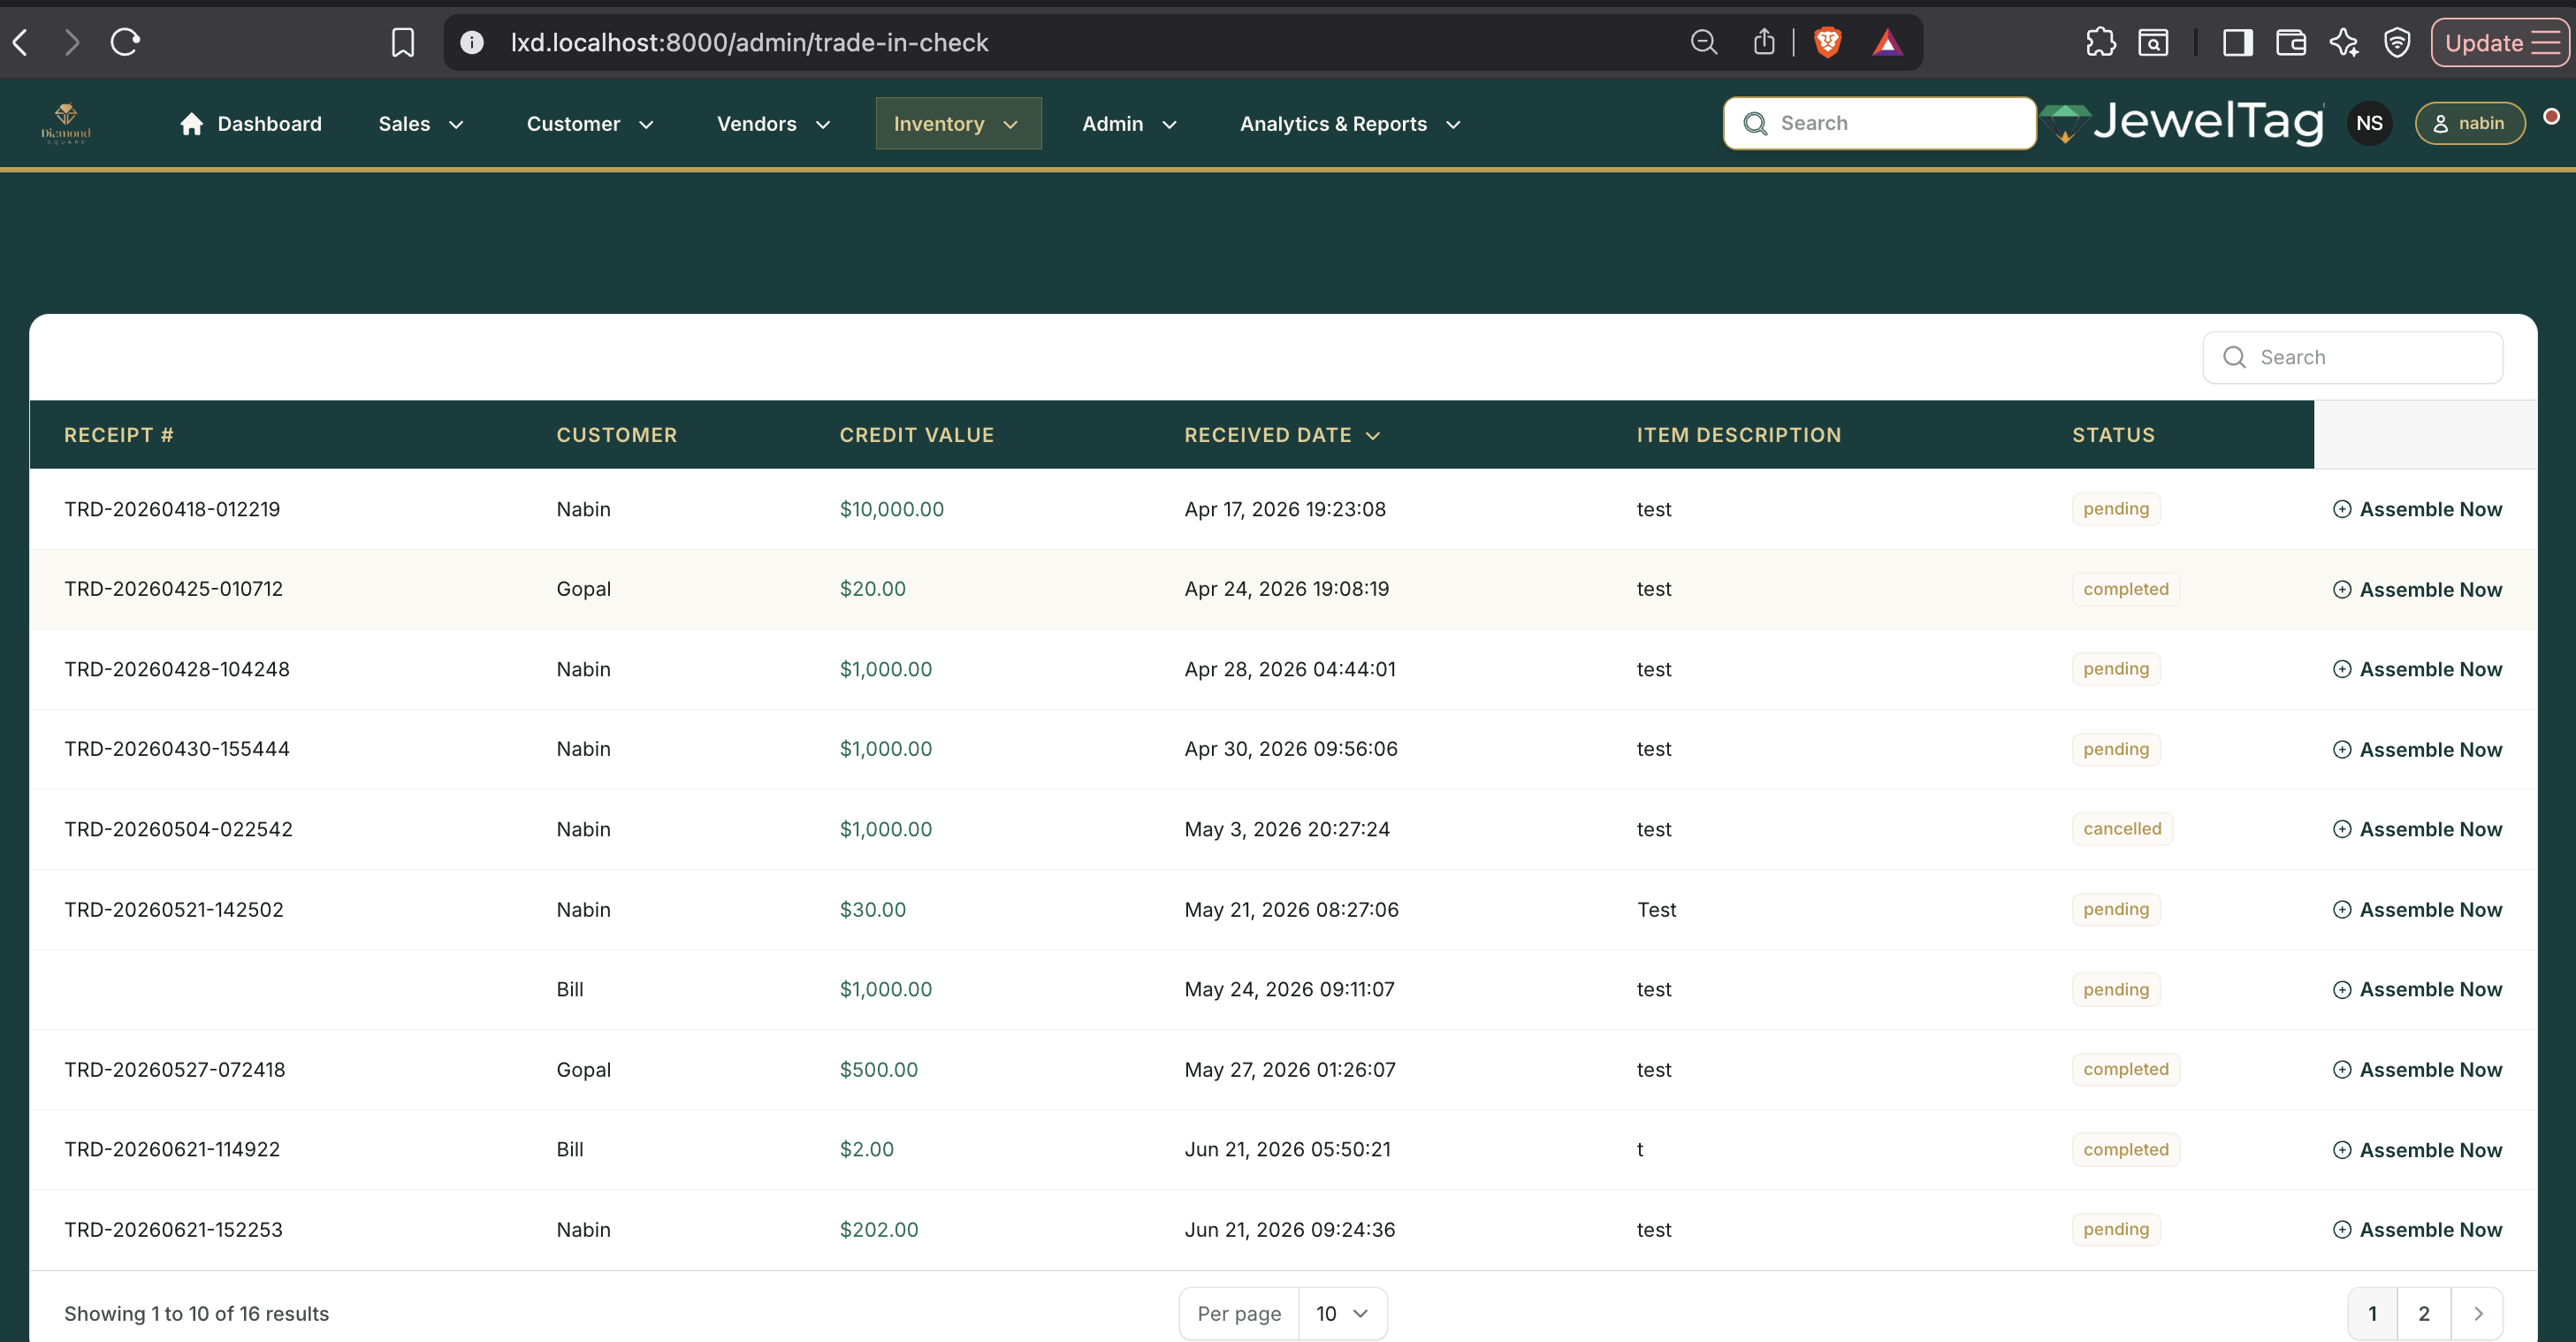
The calculator uses live metal spot prices. It does not create any record — it's purely for estimation. Once you agree on a price, enter the trade-in on the actual sale form.
Special Jobs (Repairs Within a Sale)
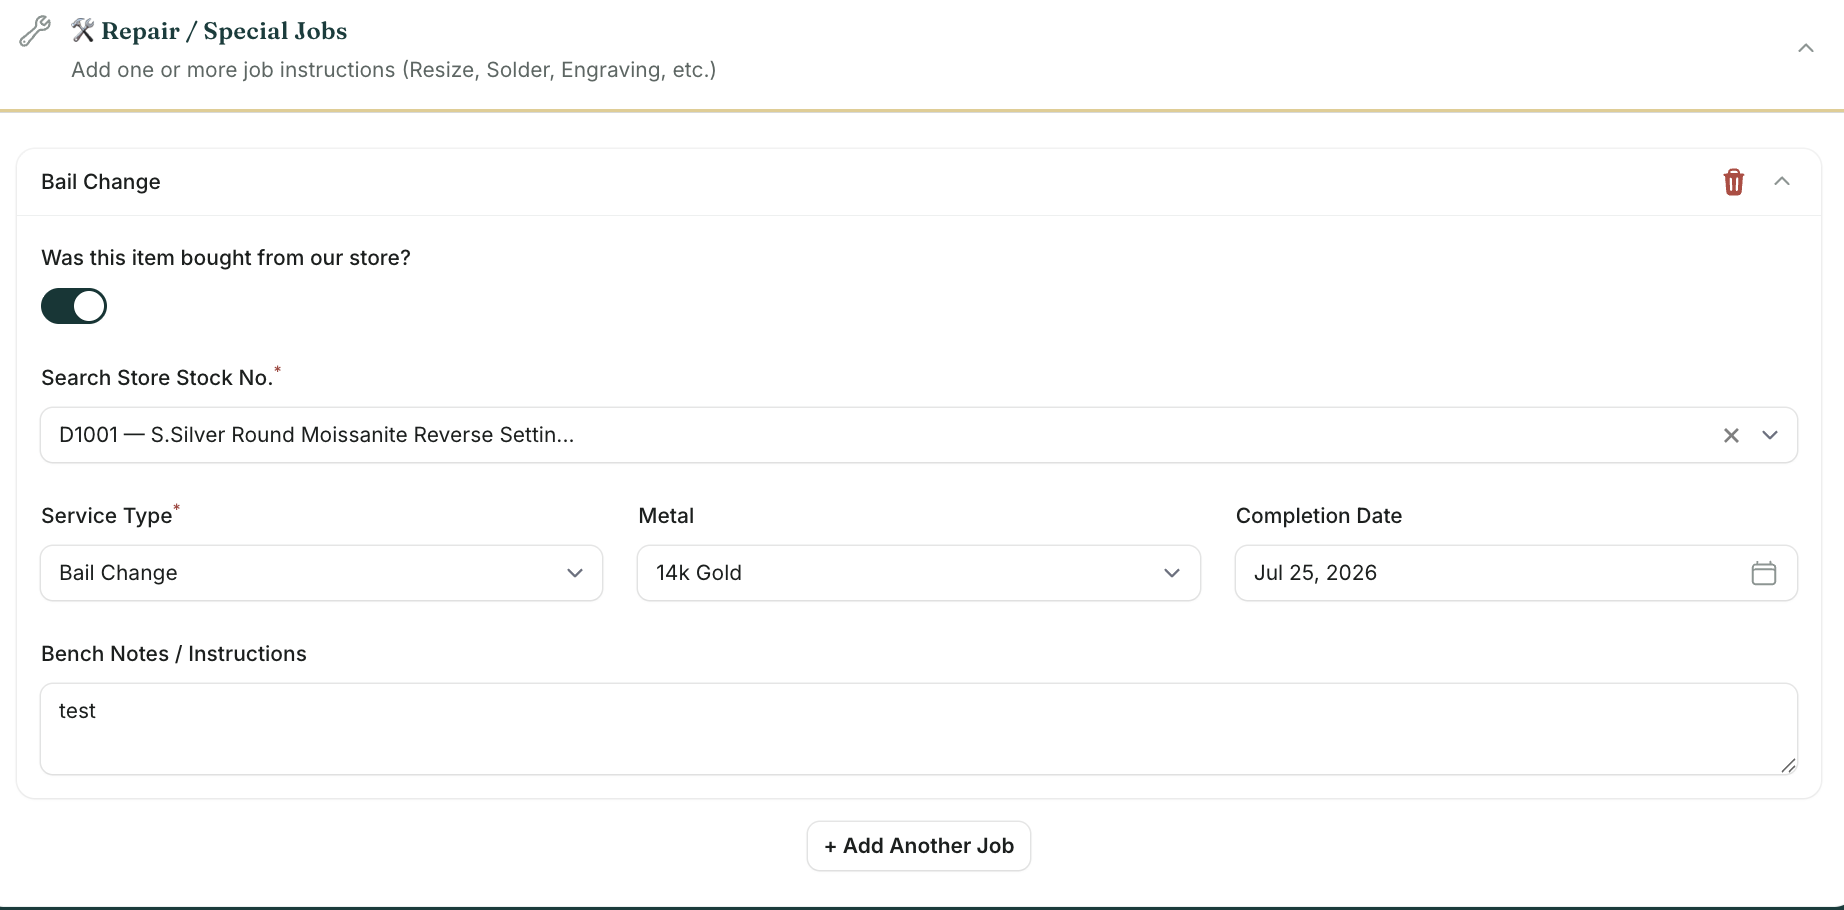
A Special Job is a repair billed as part of a sale — e.g. sizing a ring at purchase. It appears as a receipt line item AND creates a repair work order automatically.
Layaway (Laybuy)
Layaway holds an item for a customer with a deposit, paid off over time. The item immediately becomes on_hold via held_by_sale_id — it won't appear as available stock.

Laybuy number format
Plans are numbered LB-YYYYMMDD-HIS (e.g. LB-20260609-143022). The timestamp ensures uniqueness even for same-day plans.
Recording a payment
- Open the plan from Sales → Layaways
- Click Record Payment
- Enter amount and method — creates a row in
laybuy_payments, updateslast_paid_date - When
balance_duehits zero the plan auto-closes and item moves tosold
If a customer cancels
Mark the plan Cancelled — the item returns to in_stock automatically. Process any deposit refund manually from Sales → Refunds.
Commission Tracking
When multiple staff share a sale, each person's split percentage is stored in the sales_person_list JSON field. The My Sales Report uses this to calculate per-associate earnings for any period.
Processing Refunds
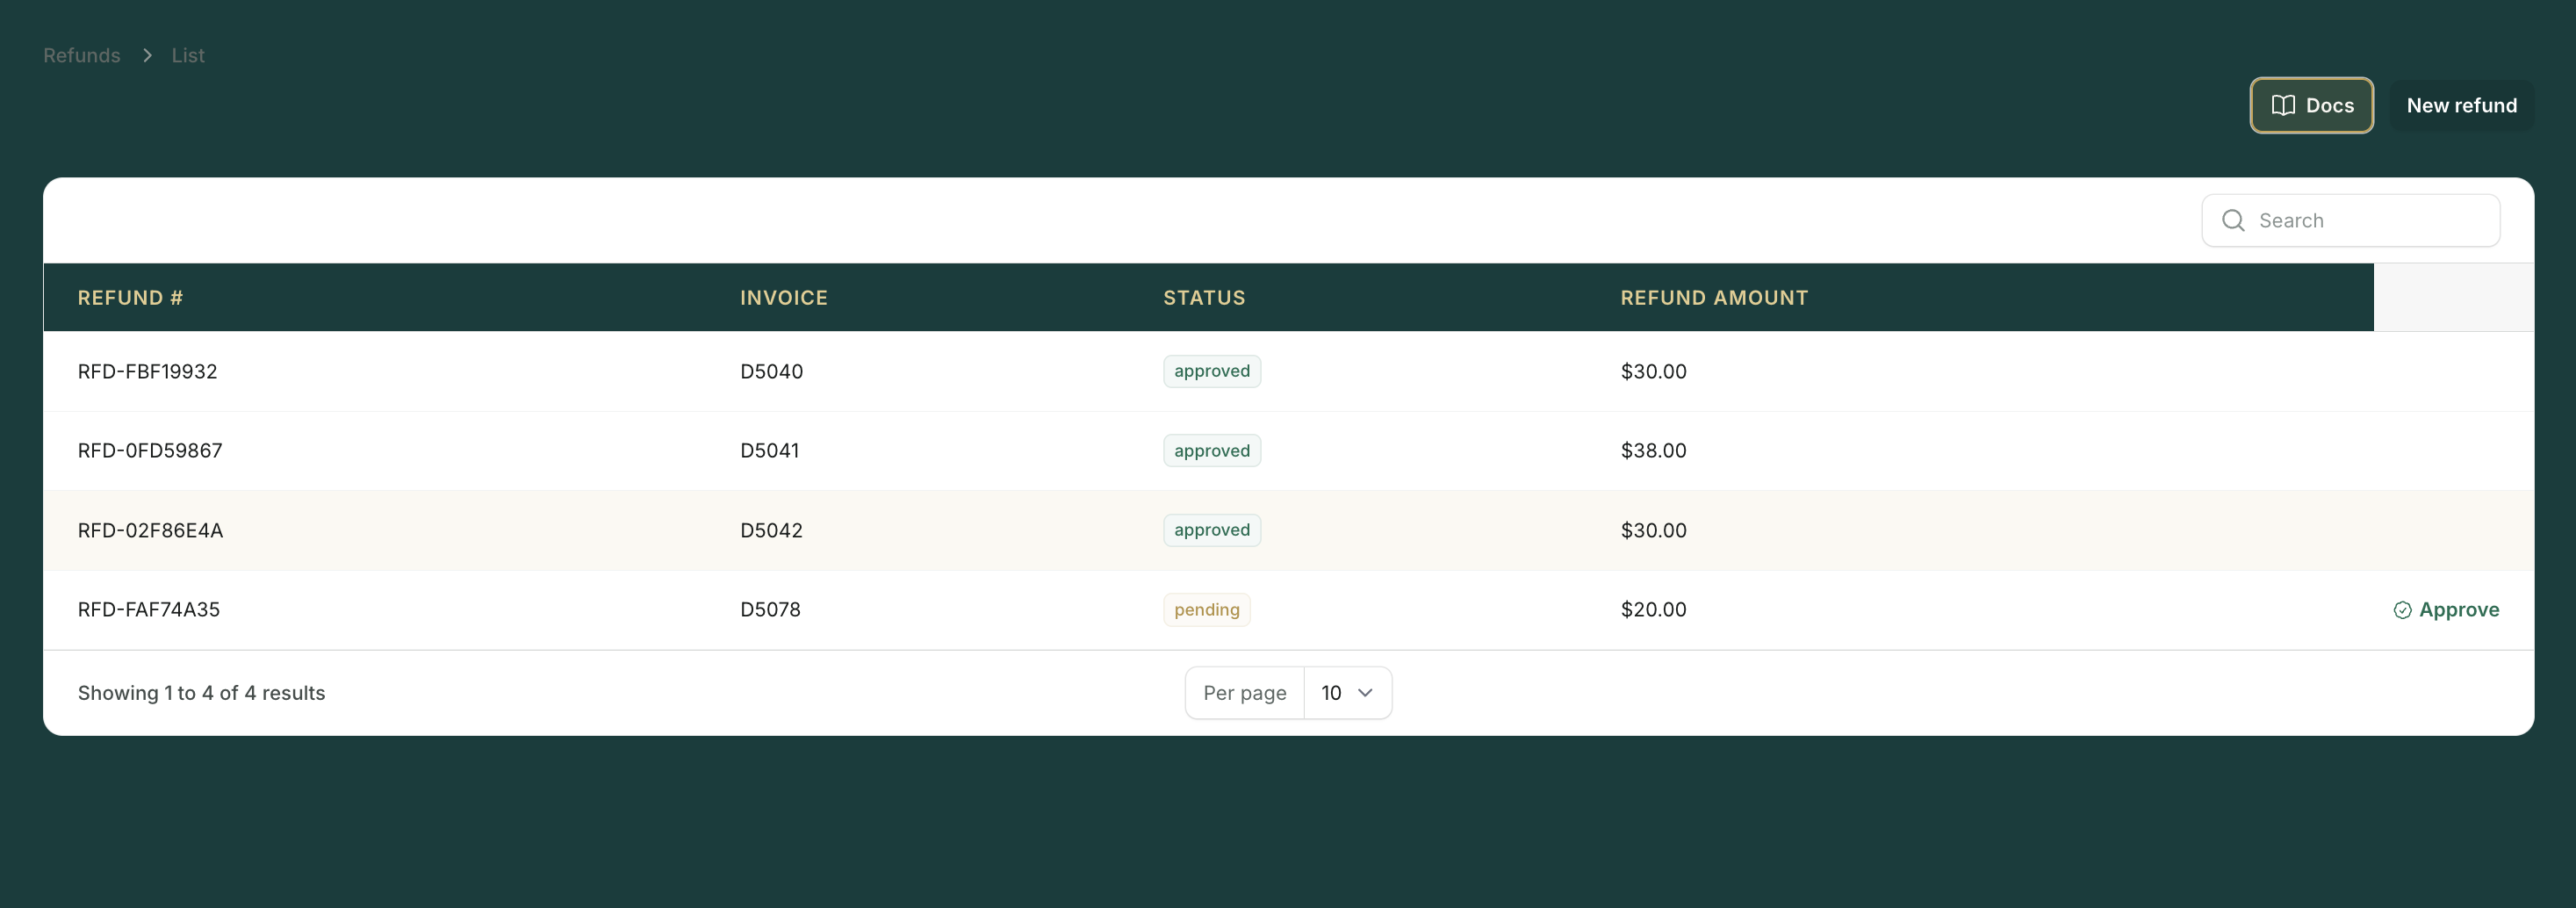
Process refunds under Sales → Refunds → New Refund. Link the refund to the original sale, specify the amount and reason, and confirm. The refund is recorded in the refunds table and appears in your daily closing totals as a deduction.
in_stock.
Refund reasons tracked
Always enter a reason — refund patterns by staff member and by reason are visible to admins in the sales audit trail and help identify training gaps or policy issues.
Sale Edit Requests
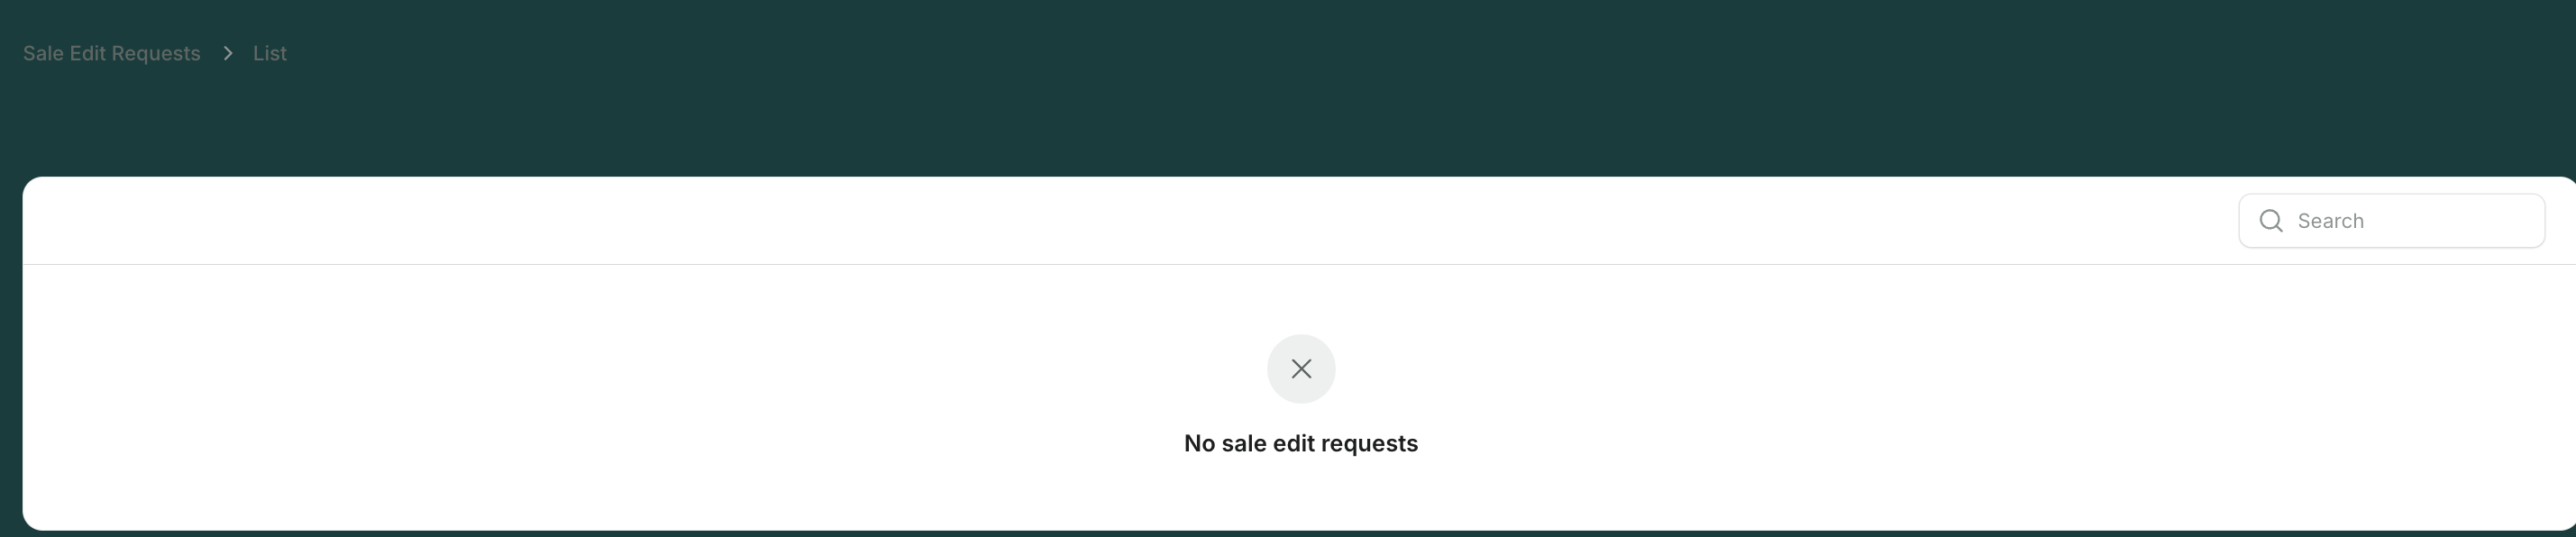
Once a sale is completed, it cannot be edited directly. Staff submit a Sale Edit Request explaining the change needed — an admin reviews and approves or rejects it. Every request and decision is logged permanently.
Deposit Sales
A Deposit Sale is a partial payment collected upfront for a future purchase — different from a Layaway (which holds a specific item) and different from a Custom Order deposit (which is tied to a production order). Deposit sales are tracked in the deposit_sales table and appear in the Deposit Sales Report.
Creating Custom Orders
Custom Orders are for pieces that don't exist yet — commissioned from scratch or special-ordered from a vendor. They live in their own pipeline separate from regular sales.
The three date fields — all different
| Field | Meaning |
|---|---|
due_date | Date promised to the customer |
expected_delivery_date | When you expect the vendor to deliver to you — earlier than due_date |
follow_up_date | When staff should next contact the customer with a status update |
Order Stages — The Pipeline
Every custom order moves through six stages. The Pipeline Report groups all orders by stage so you can see at a glance what's stuck and what's overdue.
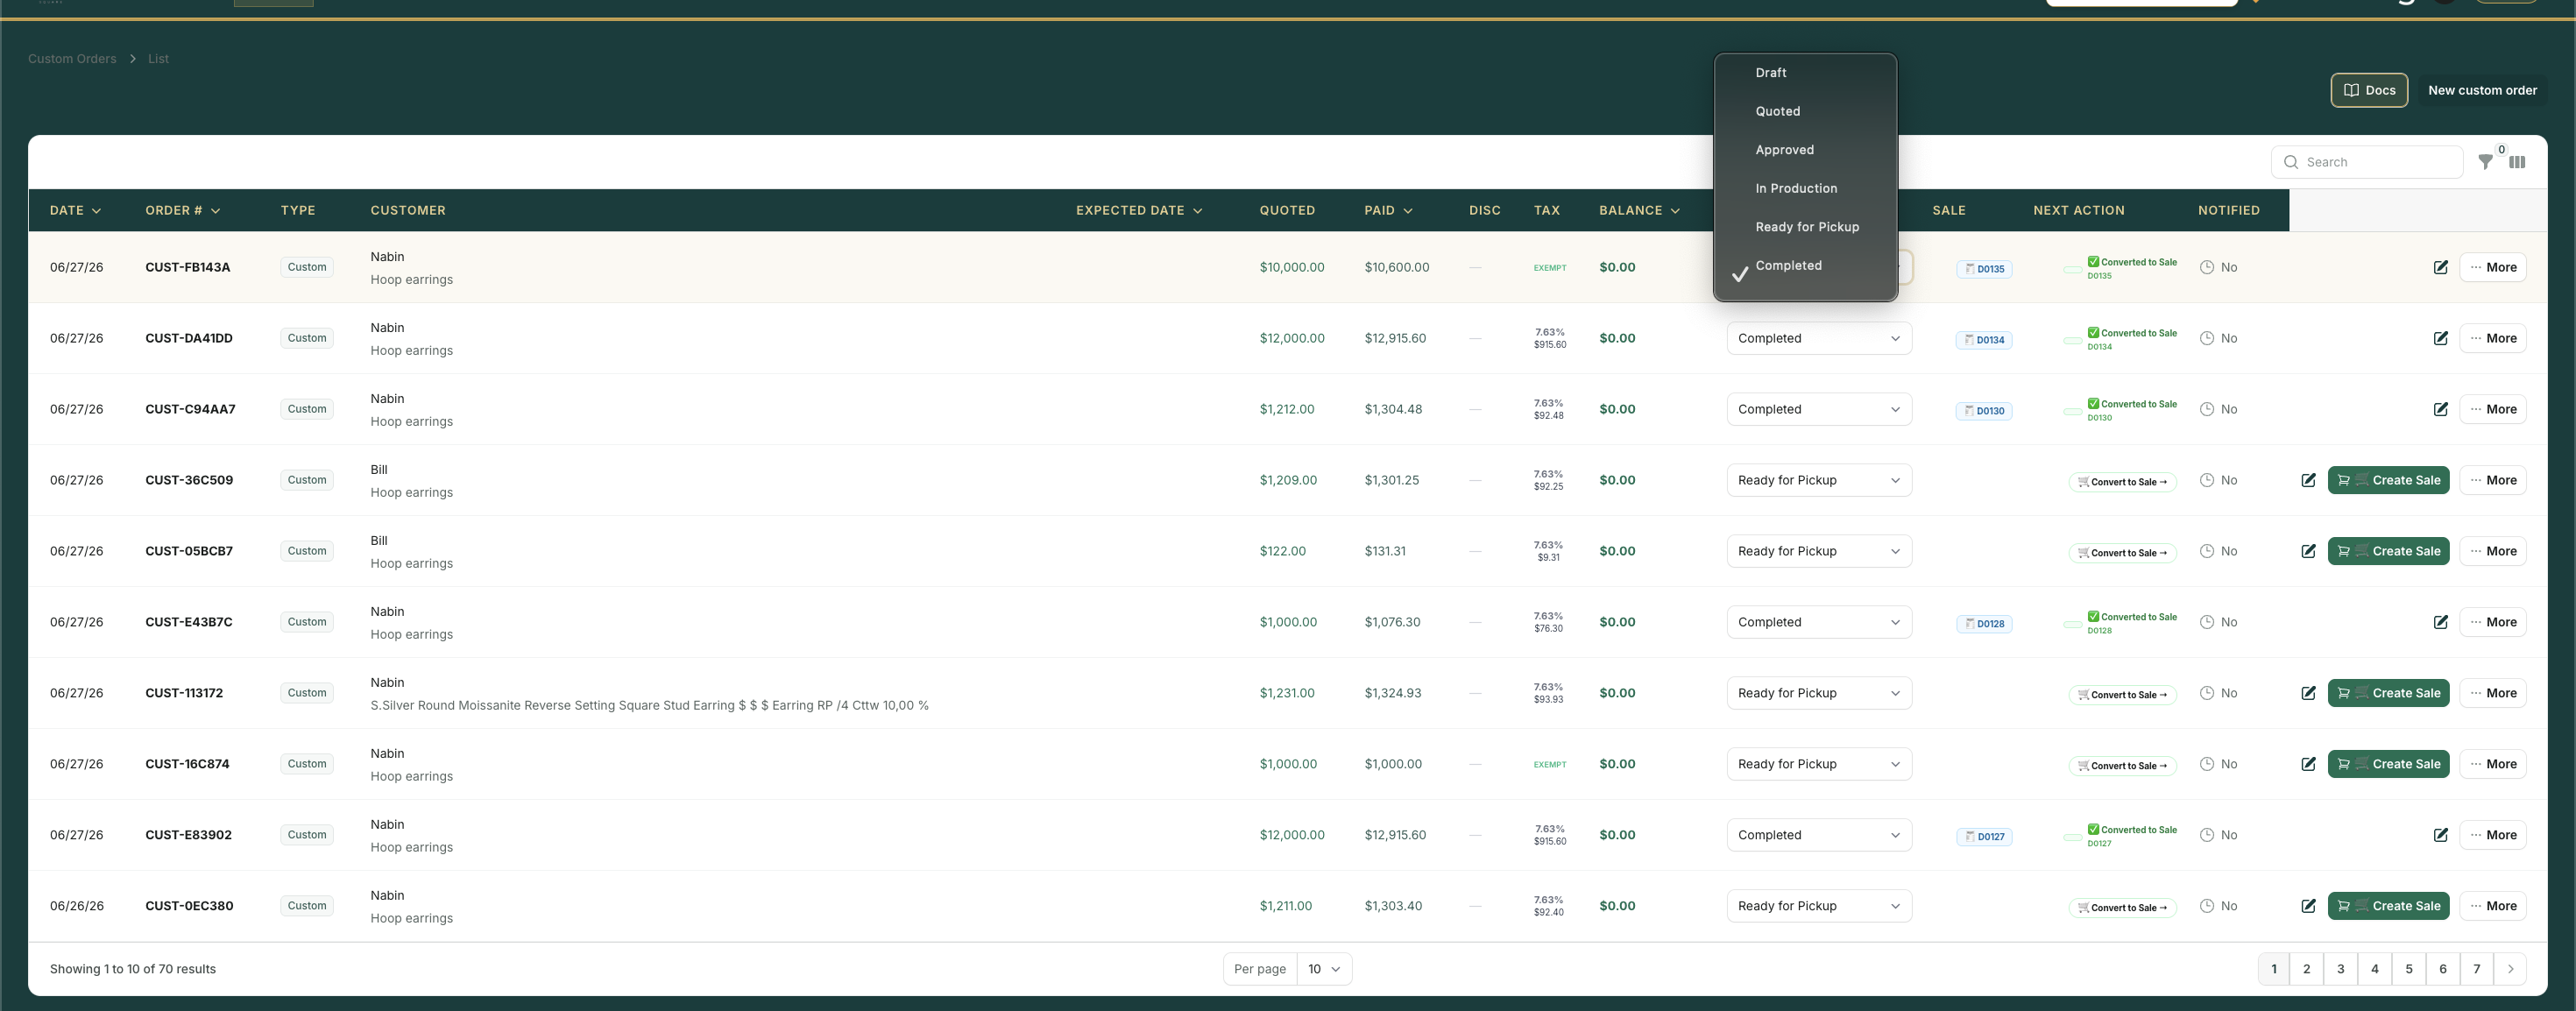
| Stage | Meaning | Who acts next |
|---|---|---|
| Draft | Created, not yet quoted | Sales staff |
| Quoted | Price given, awaiting approval | Customer |
| Approved | Approved, deposit collected | You / Vendor |
| In Production | Order placed with vendor / bench | Vendor / Bench |
| Ready for Pickup | Piece received, customer notified | Customer |
| Completed | Paid in full and collected | — |
Deposit → Sale Conversion
When the customer collects and pays the balance, convert the order to a full sale. This is the most error-prone step for new staff.

- Open the order (status must be Ready for Pickup)
- Click Convert to Sale
- Review: quoted price, deposits paid, balance due
- Collect balance, select payment method, complete
- A linked sale is created; order moves to Completed
Creating Repair Orders
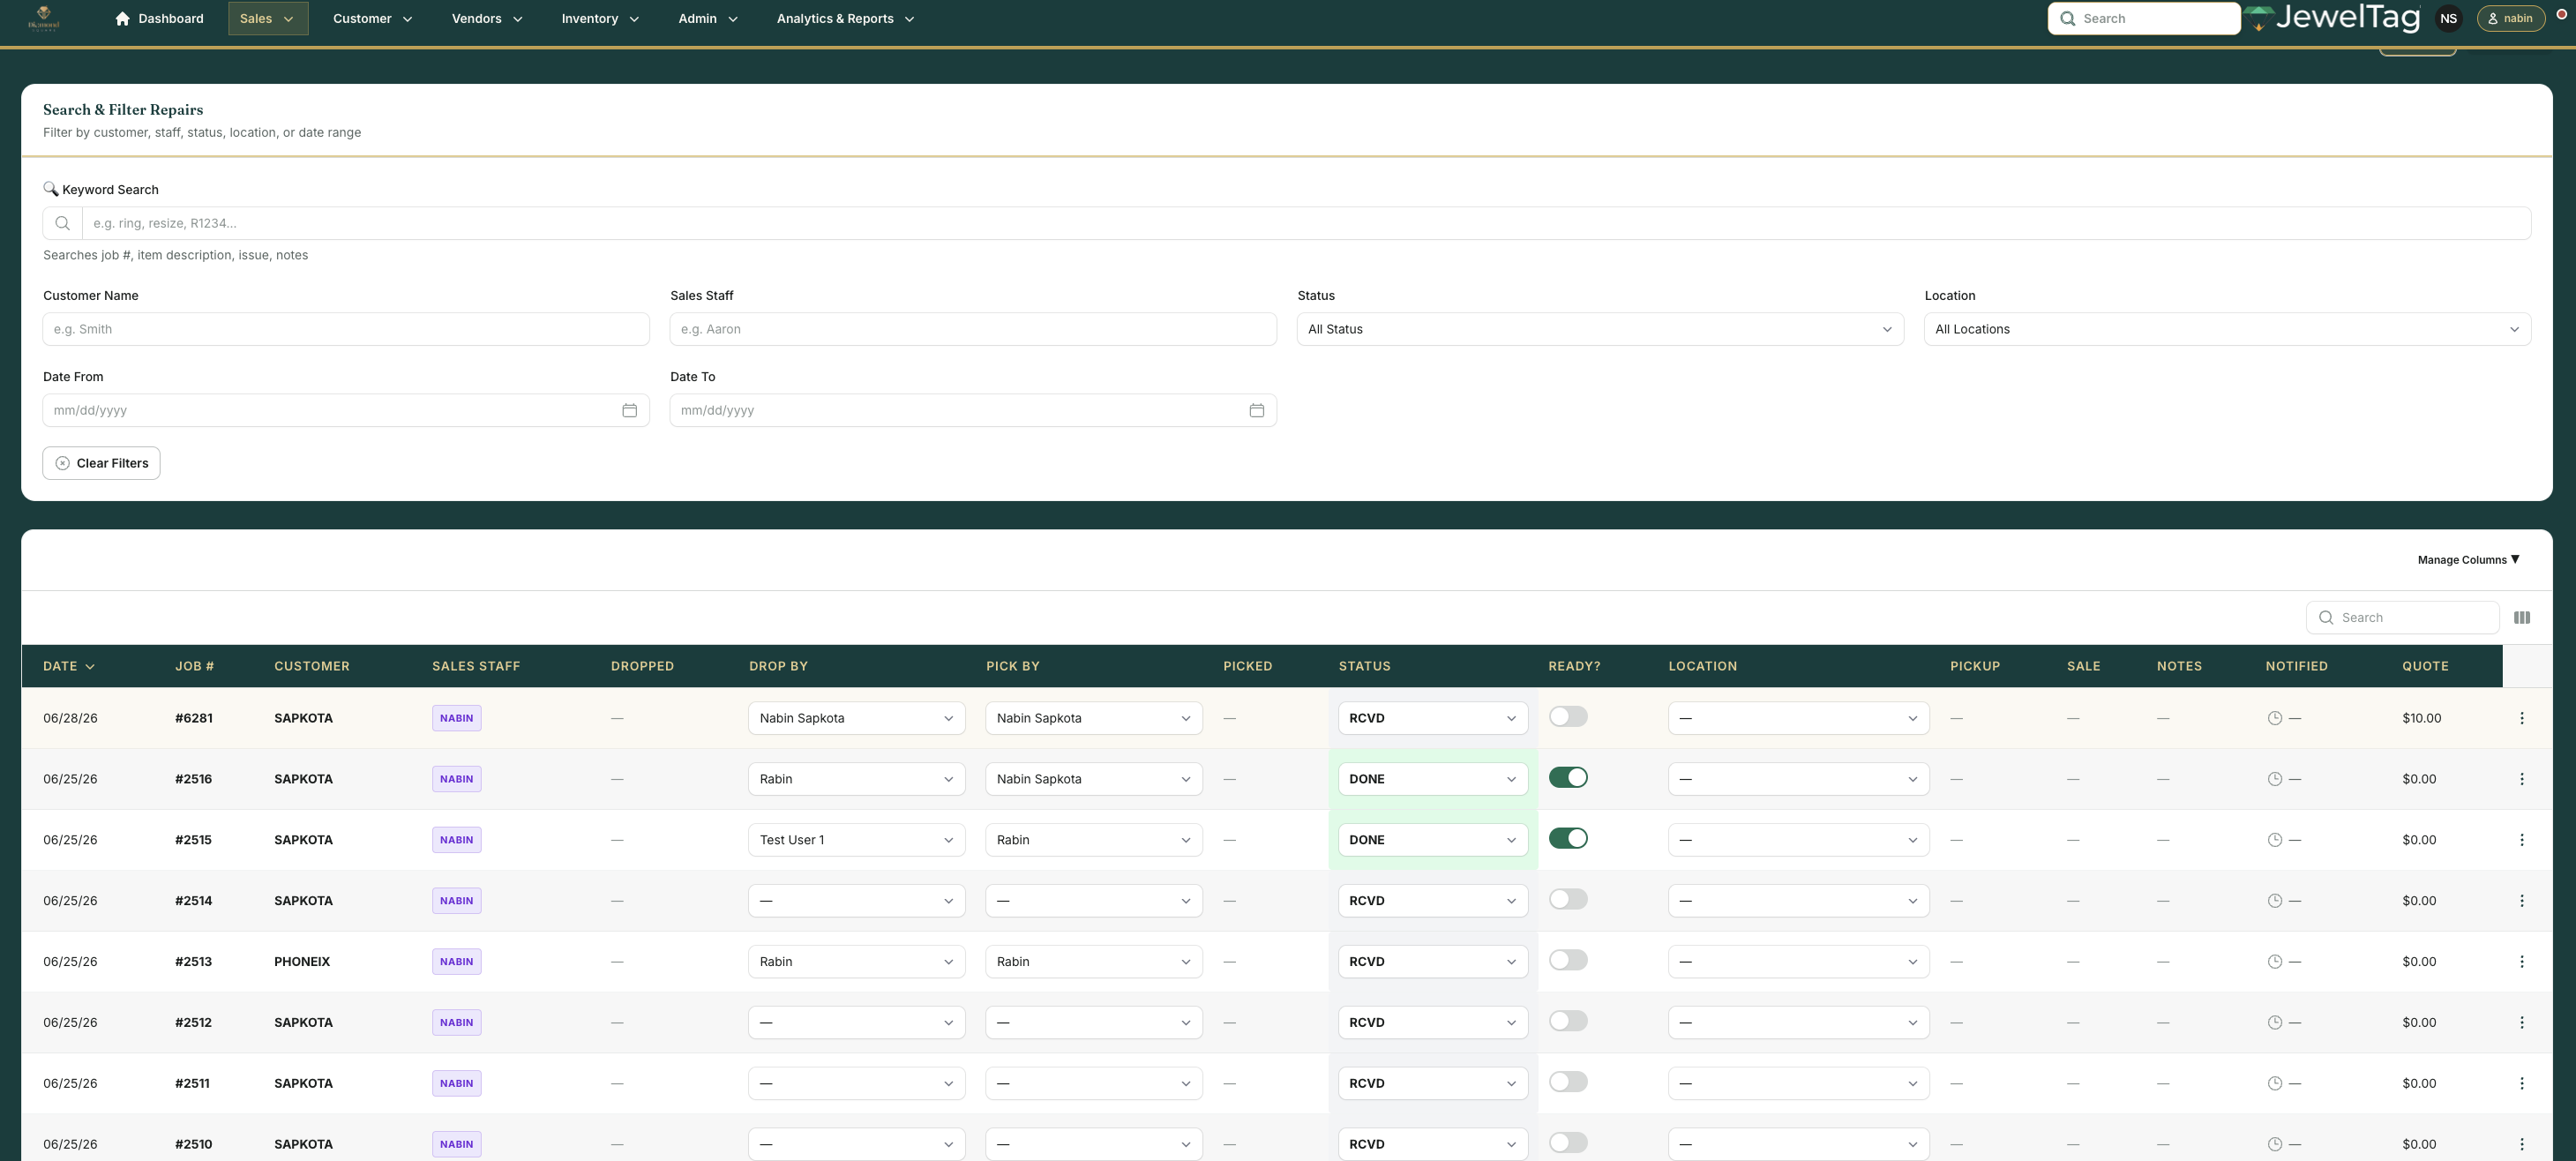
Start a repair from Repairs → New Repair or from a customer's profile. Always attach photos at intake — your proof of condition if any dispute arises.
Repair Number Format
Repairs are numbered YYMMDD-N where N resets to 1 each day.
260609-1 = first repair on June 9, 2026legacy_repair_no and are fully searchable — no need to re-number.
Status & Notifications
Move repairs through stages as work progresses. Marking Ready for Pickup triggers an automatic SMS/email to the customer (CRM_JewelTag required).
| Status | Meaning |
|---|---|
| Received | Dropped off, work order created |
| In Progress | Bench actively working |
| On Hold | Waiting on parts or customer decision |
| Ready for Pickup | Complete — customer notified |
| Completed | Collected and paid |
Analytics Dashboard
The main Dashboard shows today's at-a-glance metrics — revenue, items sold, repairs due, and layaway balances outstanding. Widgets update in real time as the day progresses.
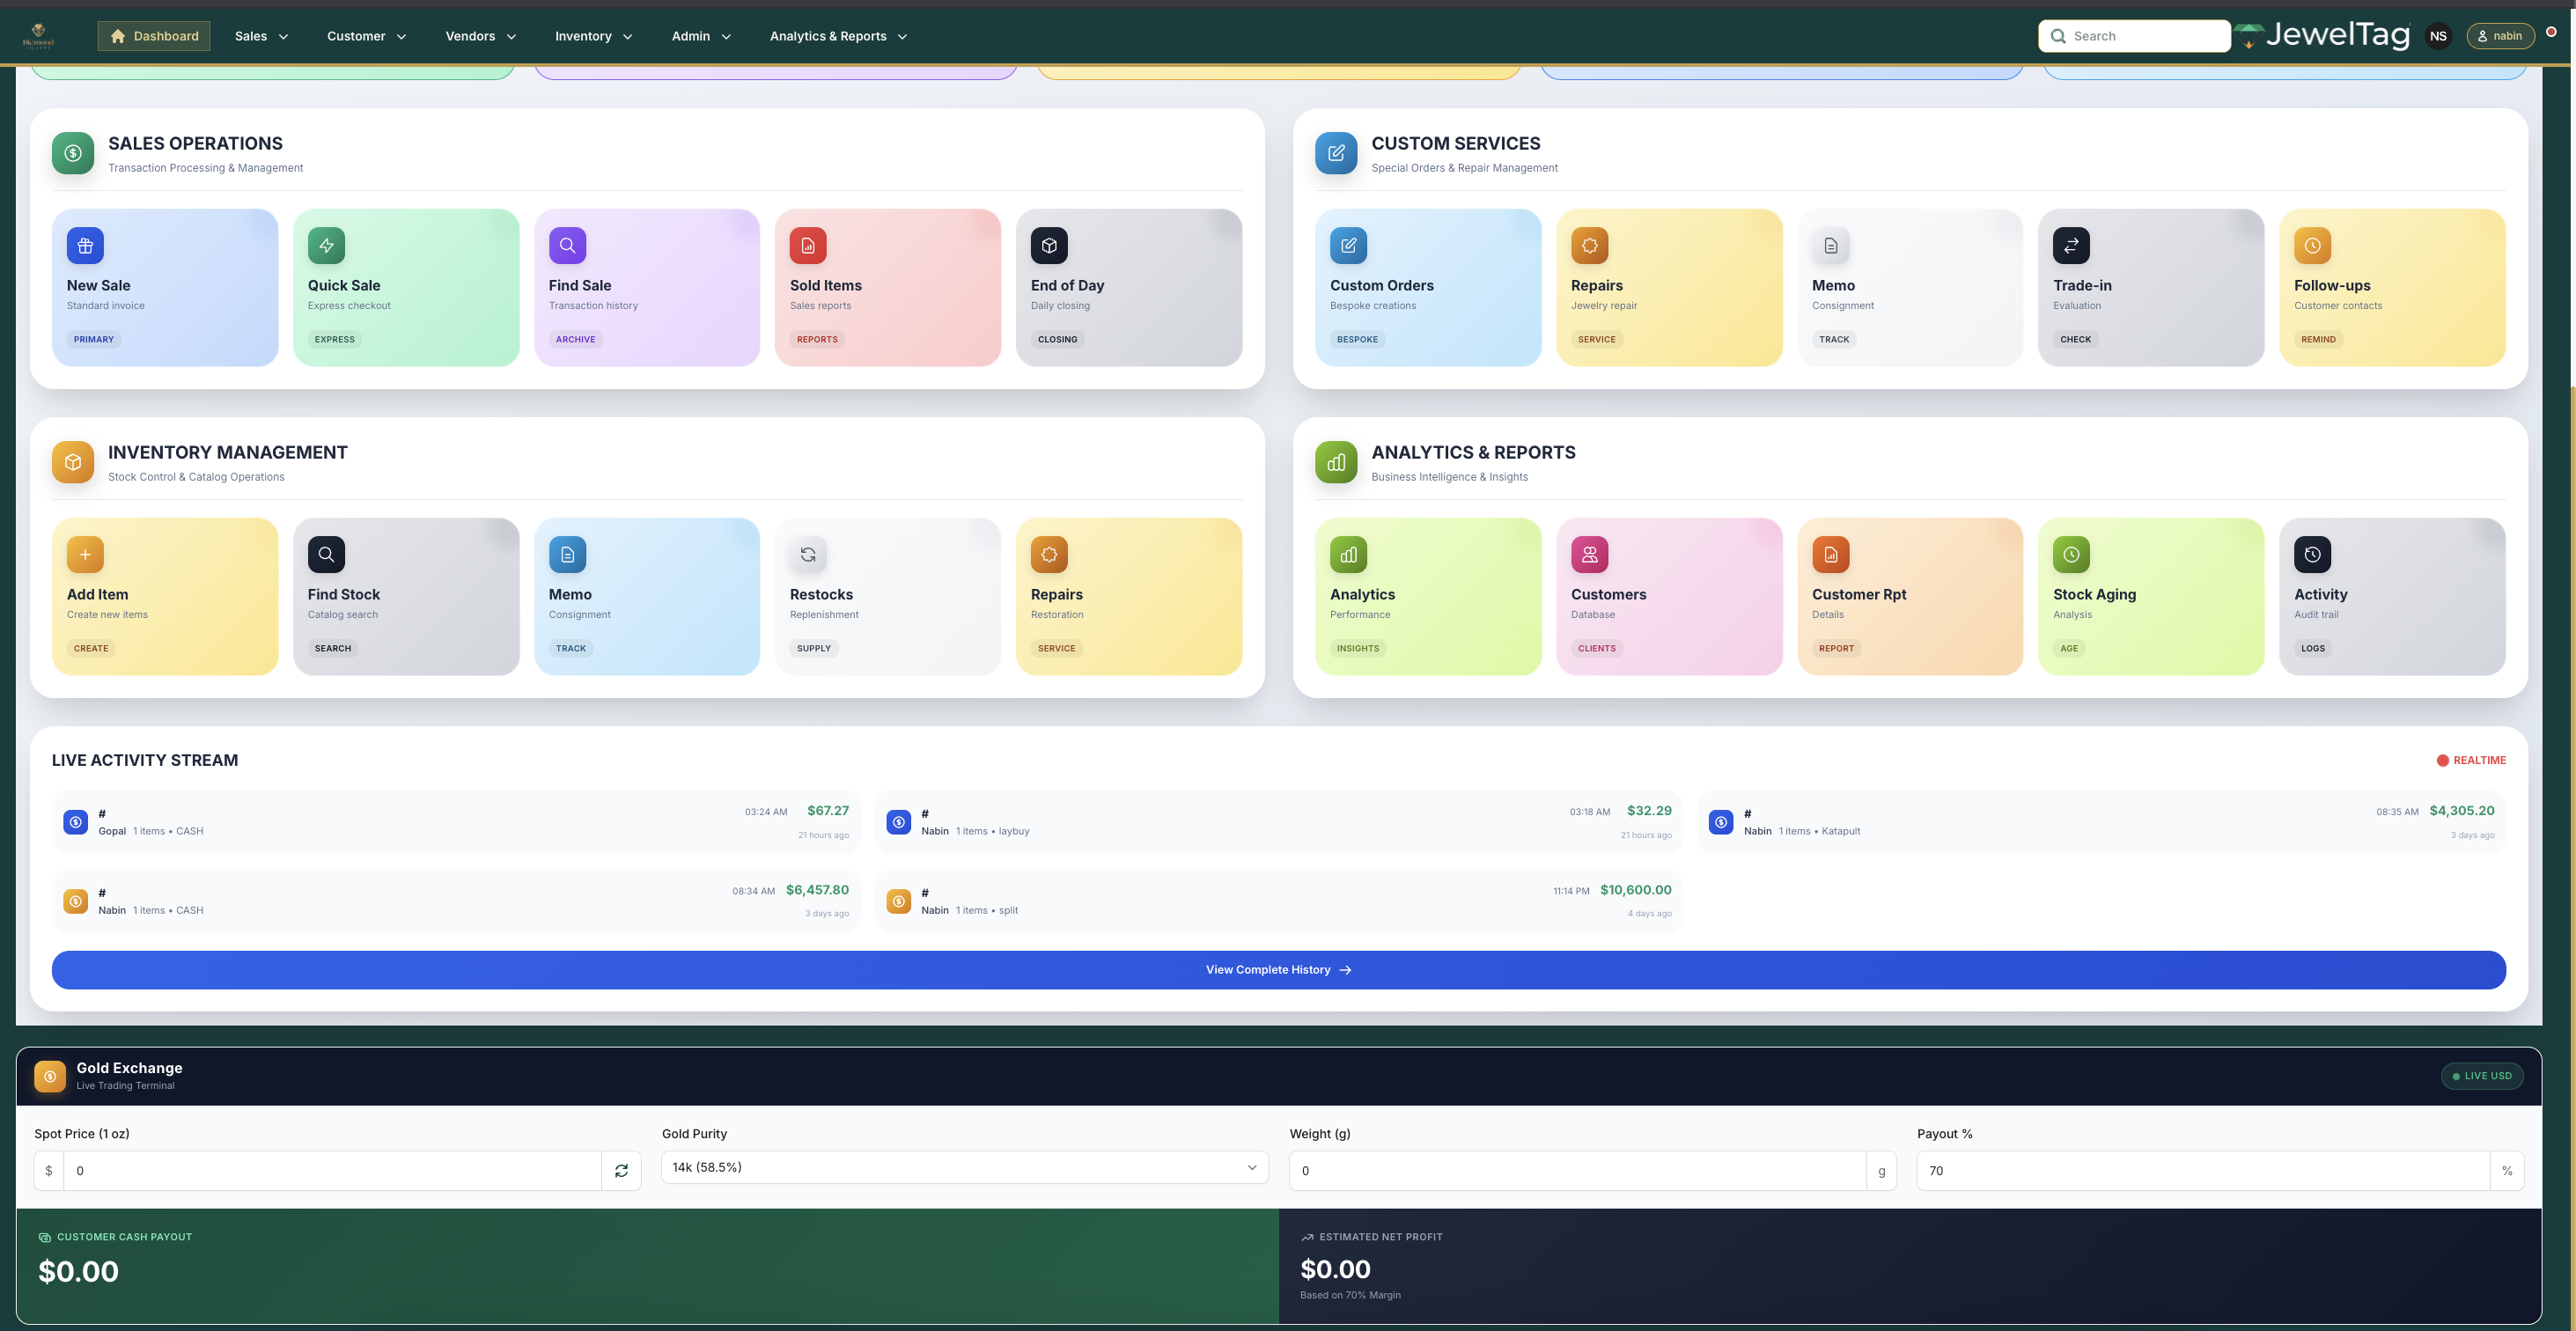
The Analytics page (separate from Dashboard) provides deeper trend charts — sales by month, category performance, and staff rankings over a chosen date range.
Sales Report & Date Logic
The Sales Report filters by effective sale date — the payment date (payments.paid_at), not the record creation date. This is critical for imported historical data.
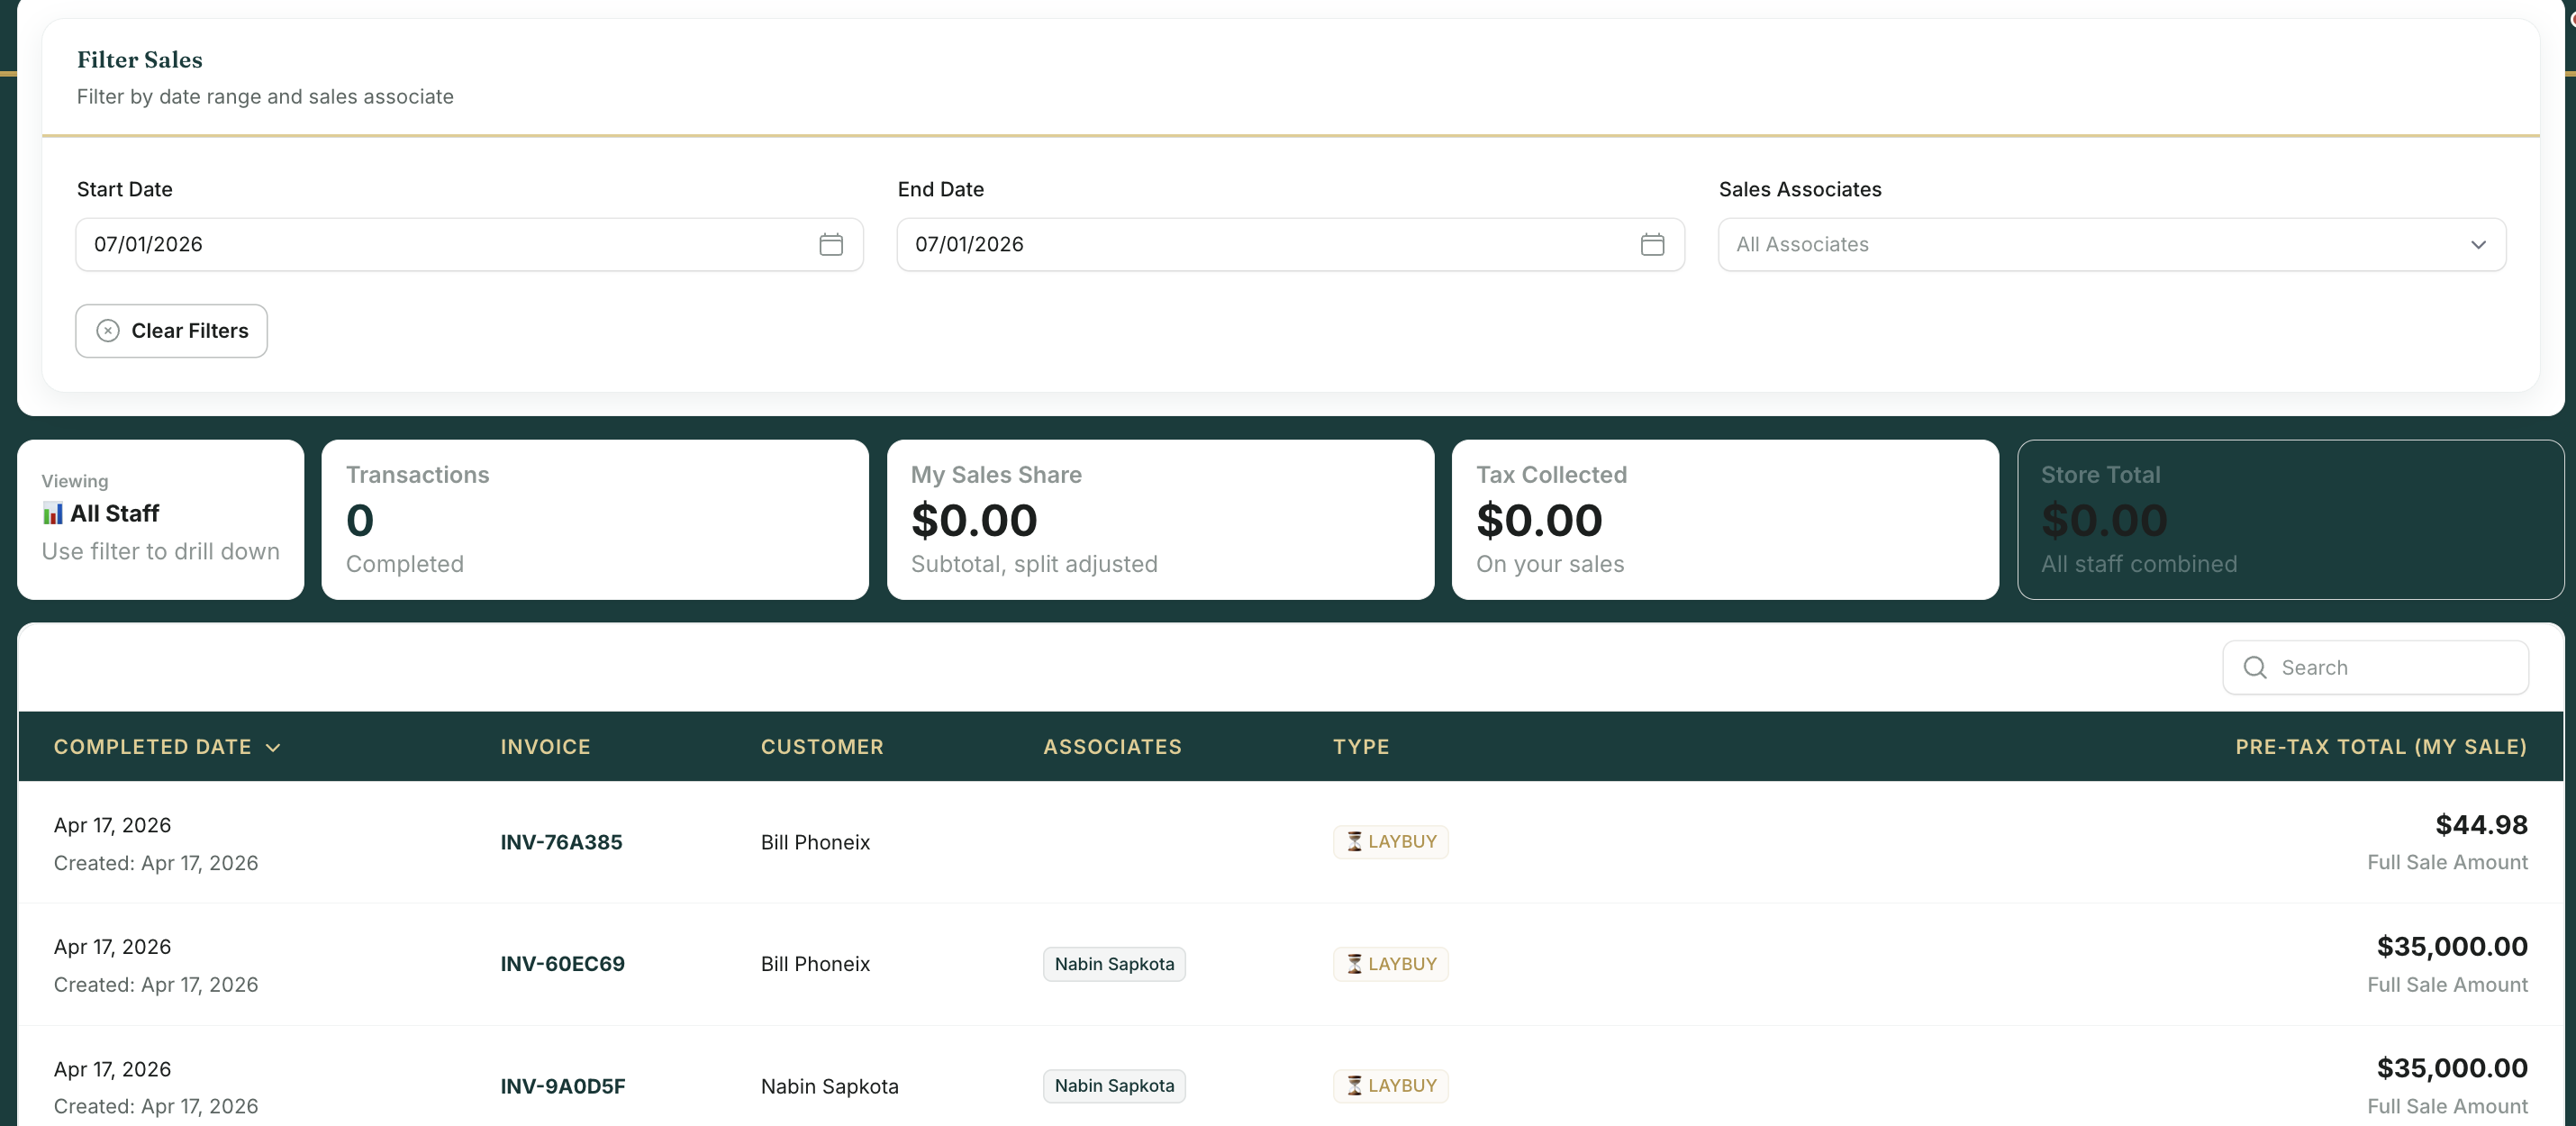
D091225-XXXX encodes the real sale date (Sep 12, 2025). The report decodes this automatically — if dates look wrong, check the invoice number format.
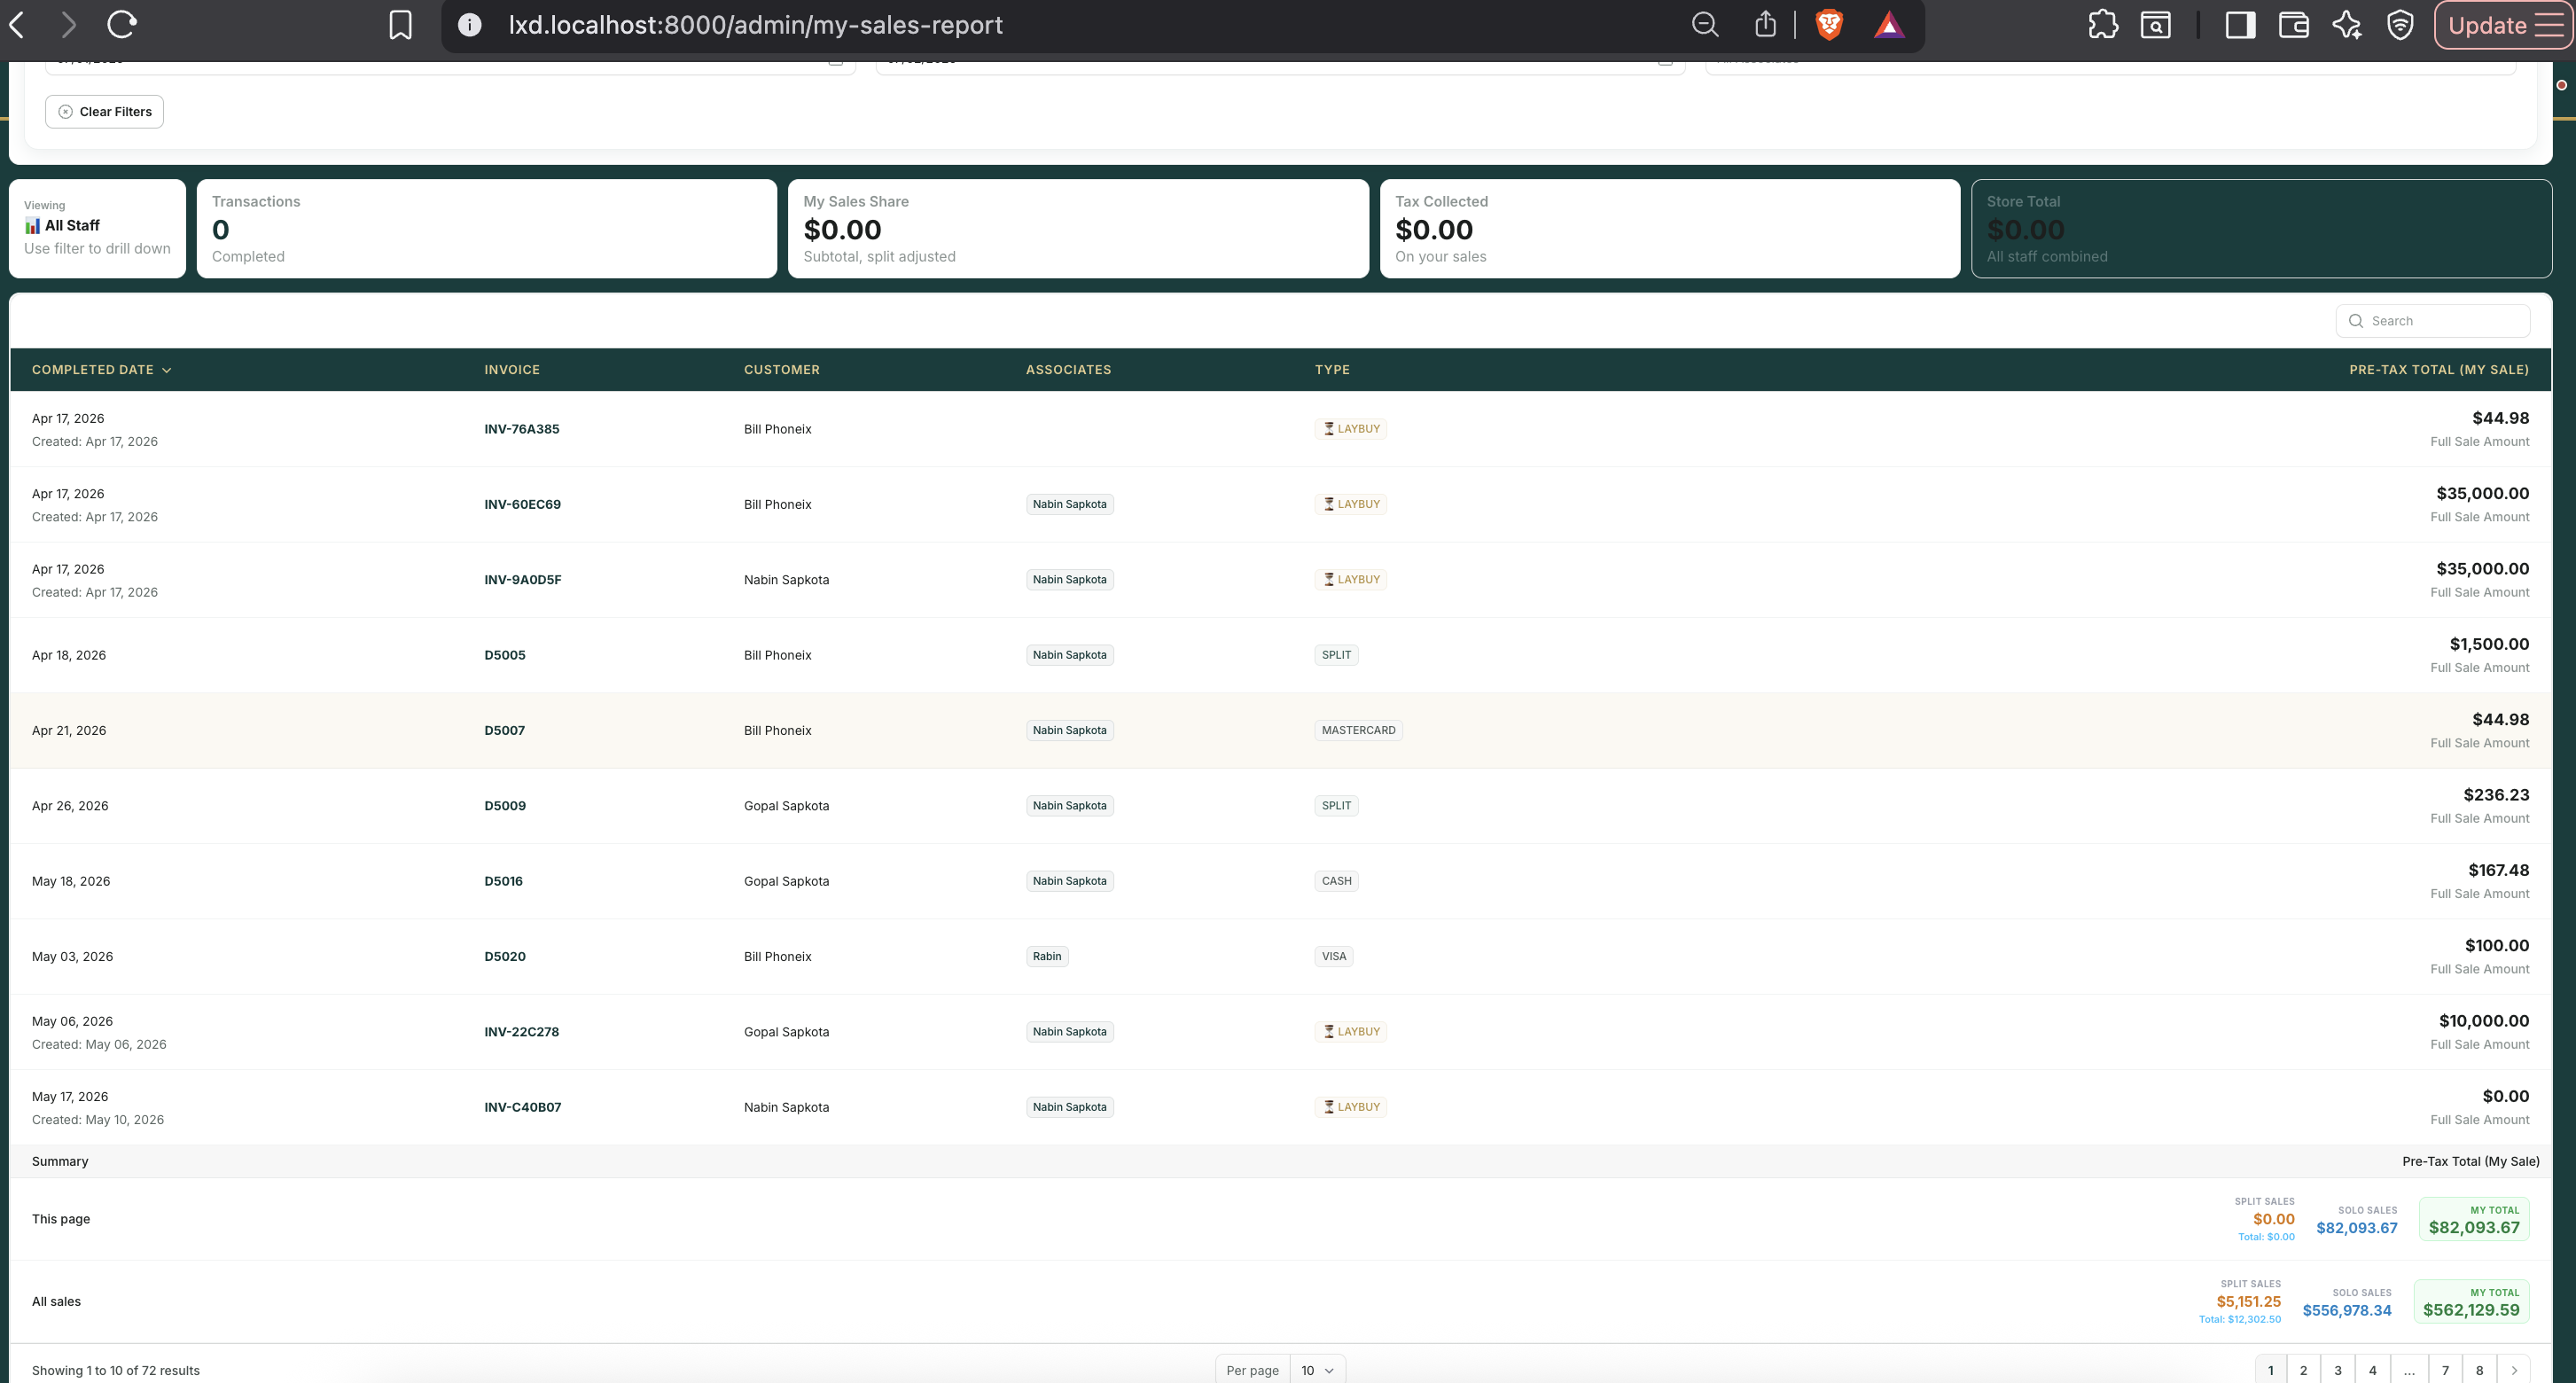
My Sales Report
The My Sales Report is a per-associate view — each staff member sees only their own sales and commission earnings. Admins can view any associate. It uses the sales_person_list JSON split to calculate each person's share correctly, even for multi-staff sales.
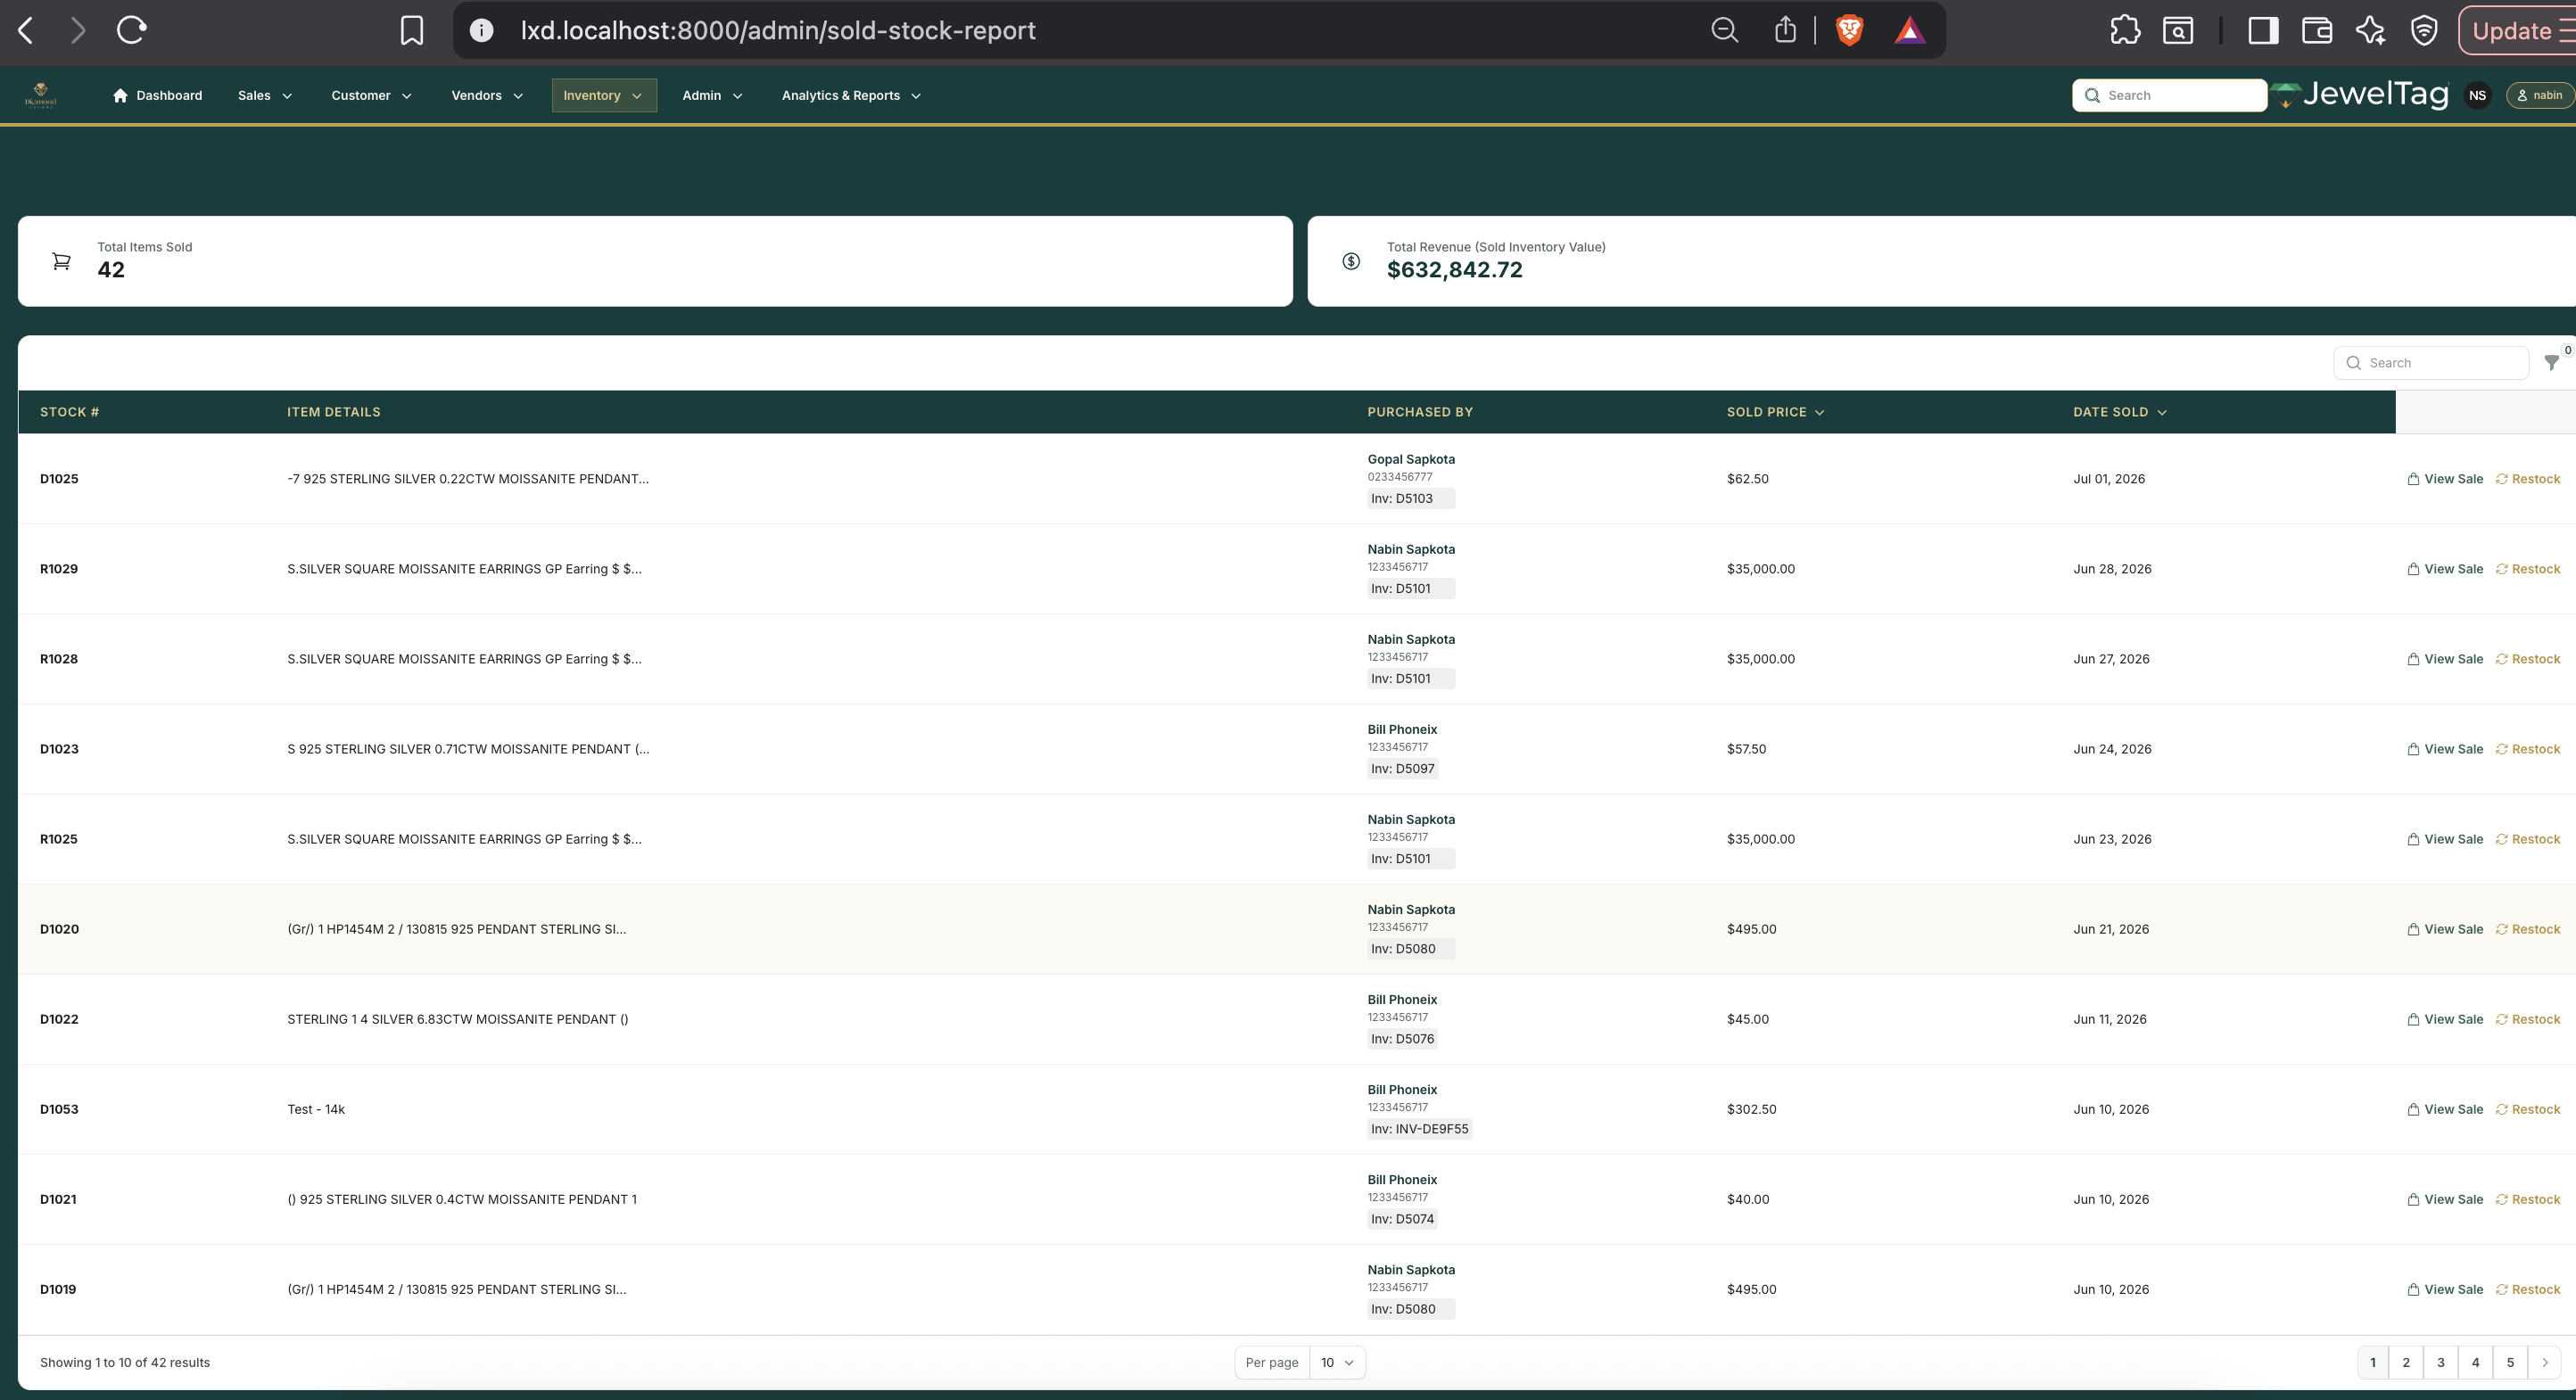
Sold Stock Report
The Sold Stock Report shows every sold item with its cost, sale price, margin, and the associate who sold it — filtered by date range, category, or department. Use this for buying decisions and to identify your highest-margin categories.
Stock Aging Report
Shows unsold inventory grouped by how long it has been in stock — 0–30 days, 31–60, 61–90, and 90+ days. Use this monthly to identify slow-moving pieces that need repricing or promotion.

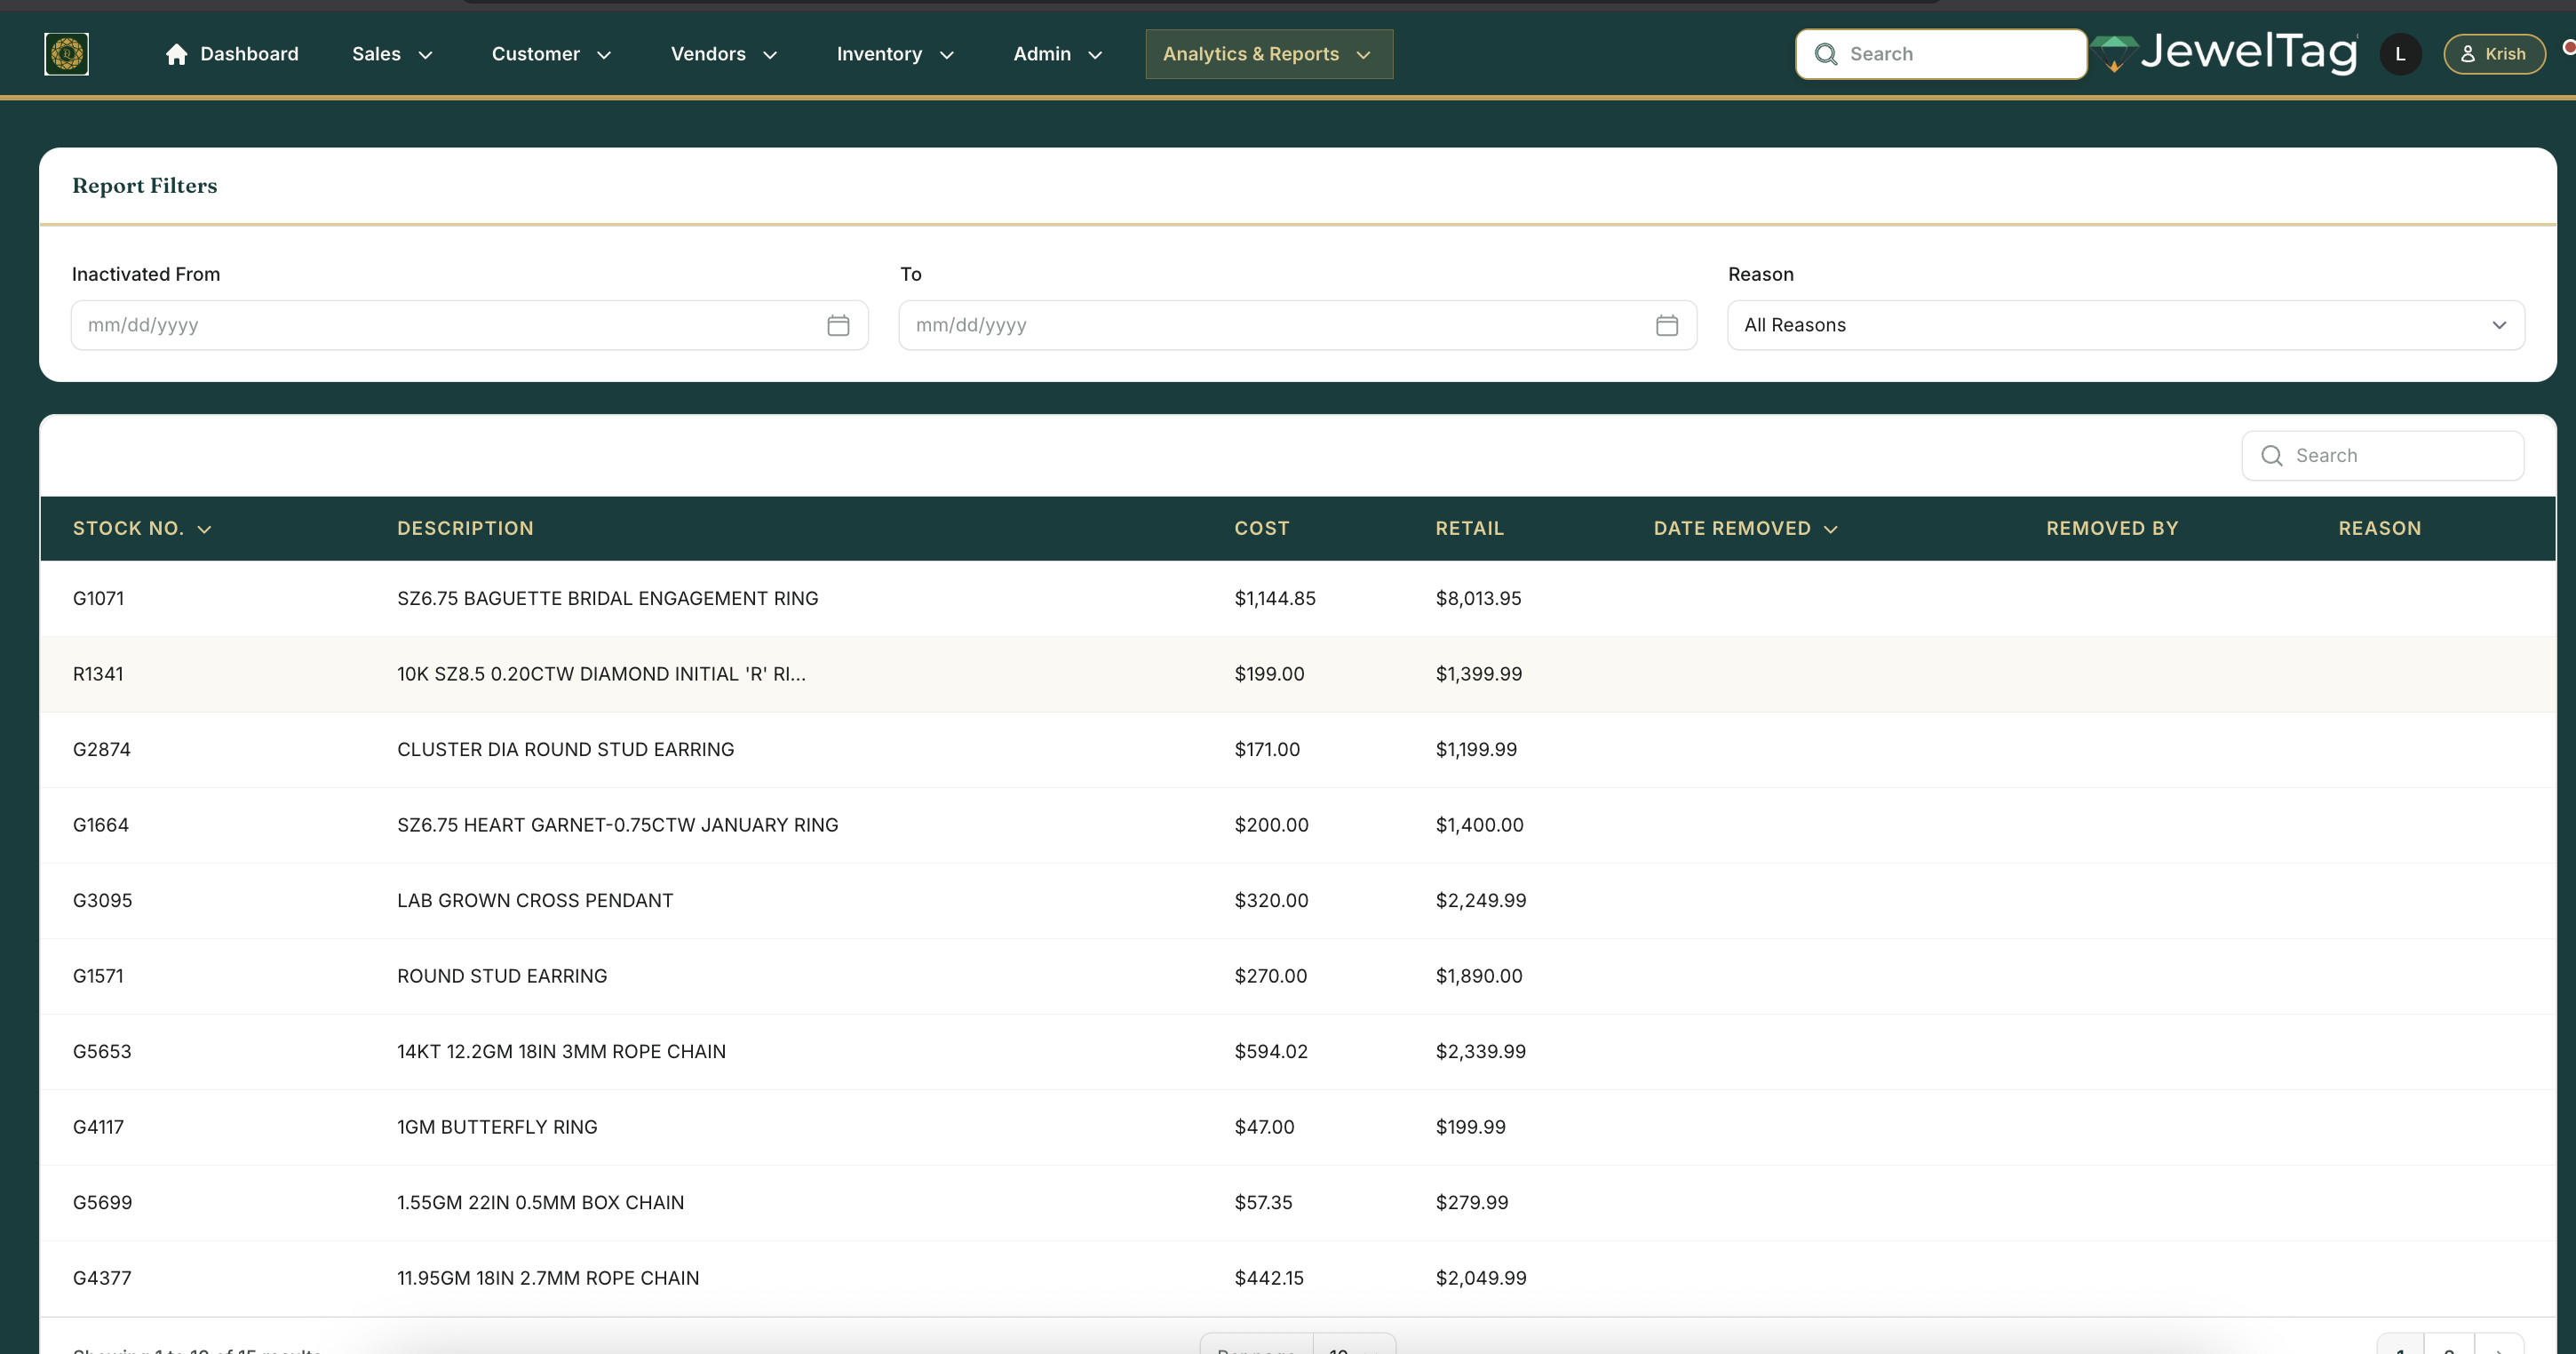
Inactive Stock Report
Lists all items with status inactive — including when they were inactivated, by whom, and the stated reason (inactivated_at, inactivated_by, inactivated_reason). Useful for audits and for tracking items sent off-site.
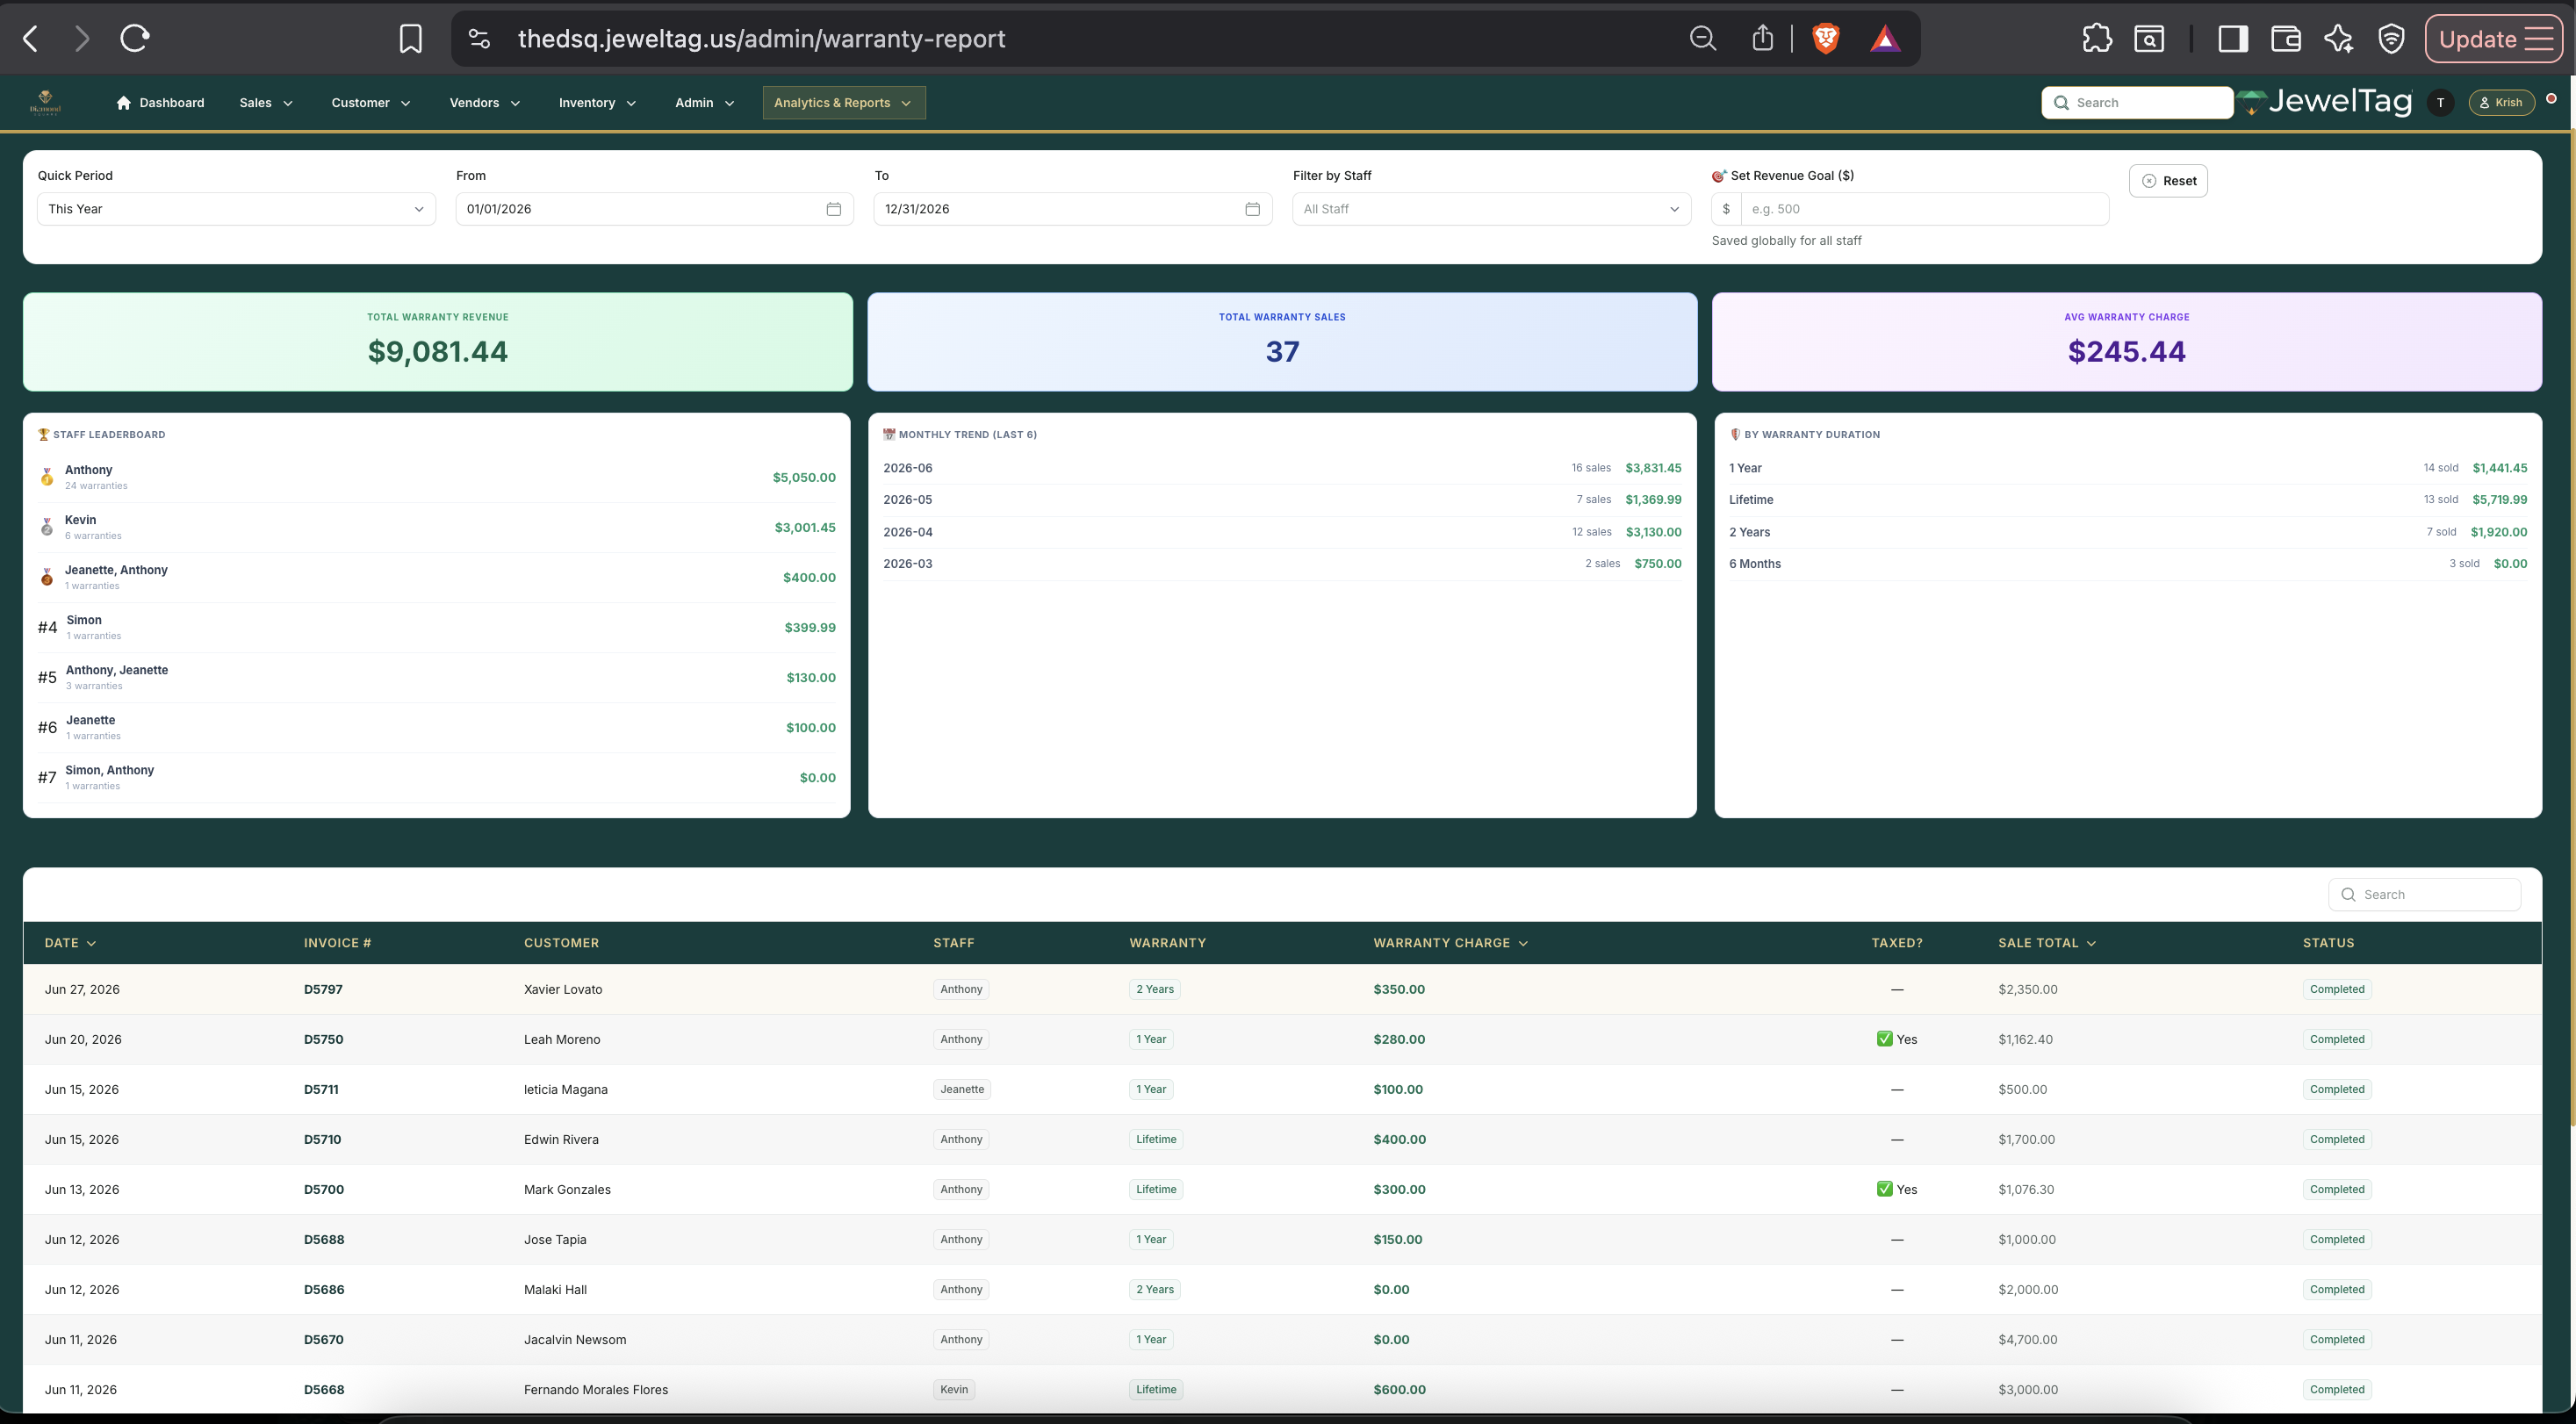
Warranty Report
Shows all items and custom orders with active warranties — including warranty_period, warranty_charge, and the original sale date. Use this when a customer returns for a warranty repair to quickly verify coverage.
Deposit Sales Report
Lists all open deposit sales — money held from customers who haven't completed their purchase yet. Shows customer, deposit amount, date collected, and how many days old the deposit is. Review this weekly to follow up on aging deposits.
Restock Logs
Full purchase history from suppliers — every restock event with date, supplier, items, quantities, and cost. Use this to track vendor delivery performance and reconcile against supplier invoices.
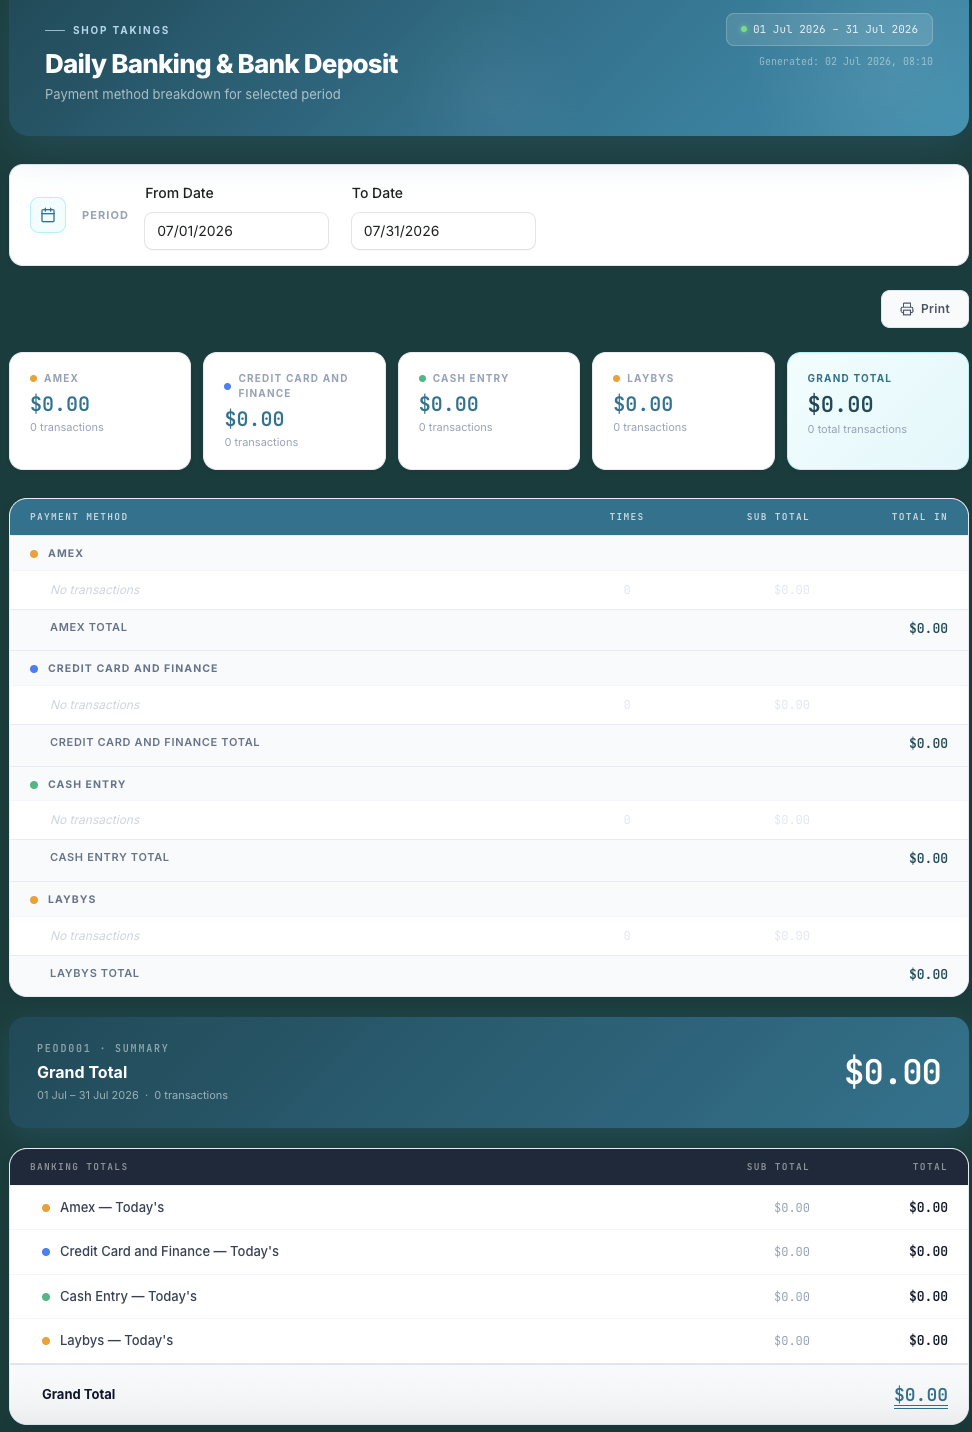
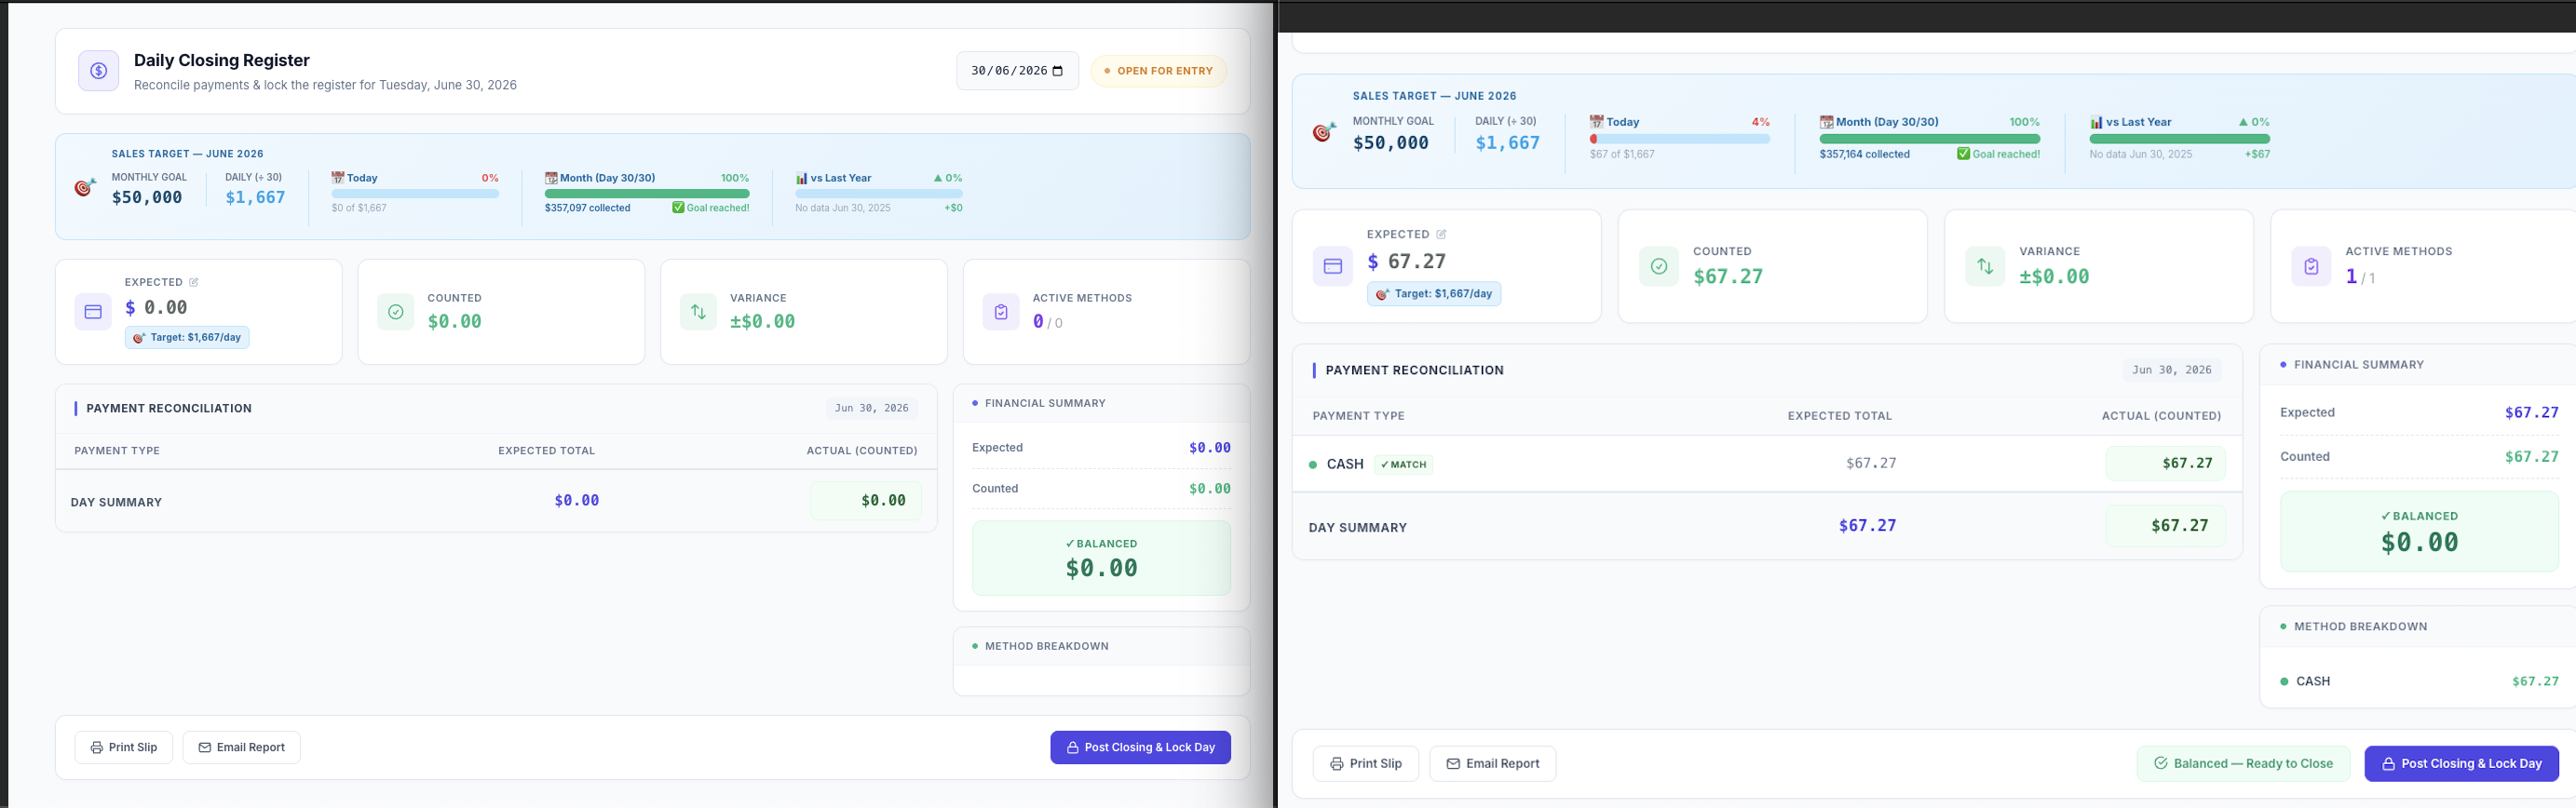
End of Day Closing
EOD Closing locks the day's transactions and produces a summary for your records. After submission, edits require an admin-approved Sale Edit Request.
Custom Order Pipeline Report
Kanban-style view of every active custom order by stage — total value per stage, average days stuck, and an overdue table at the bottom.
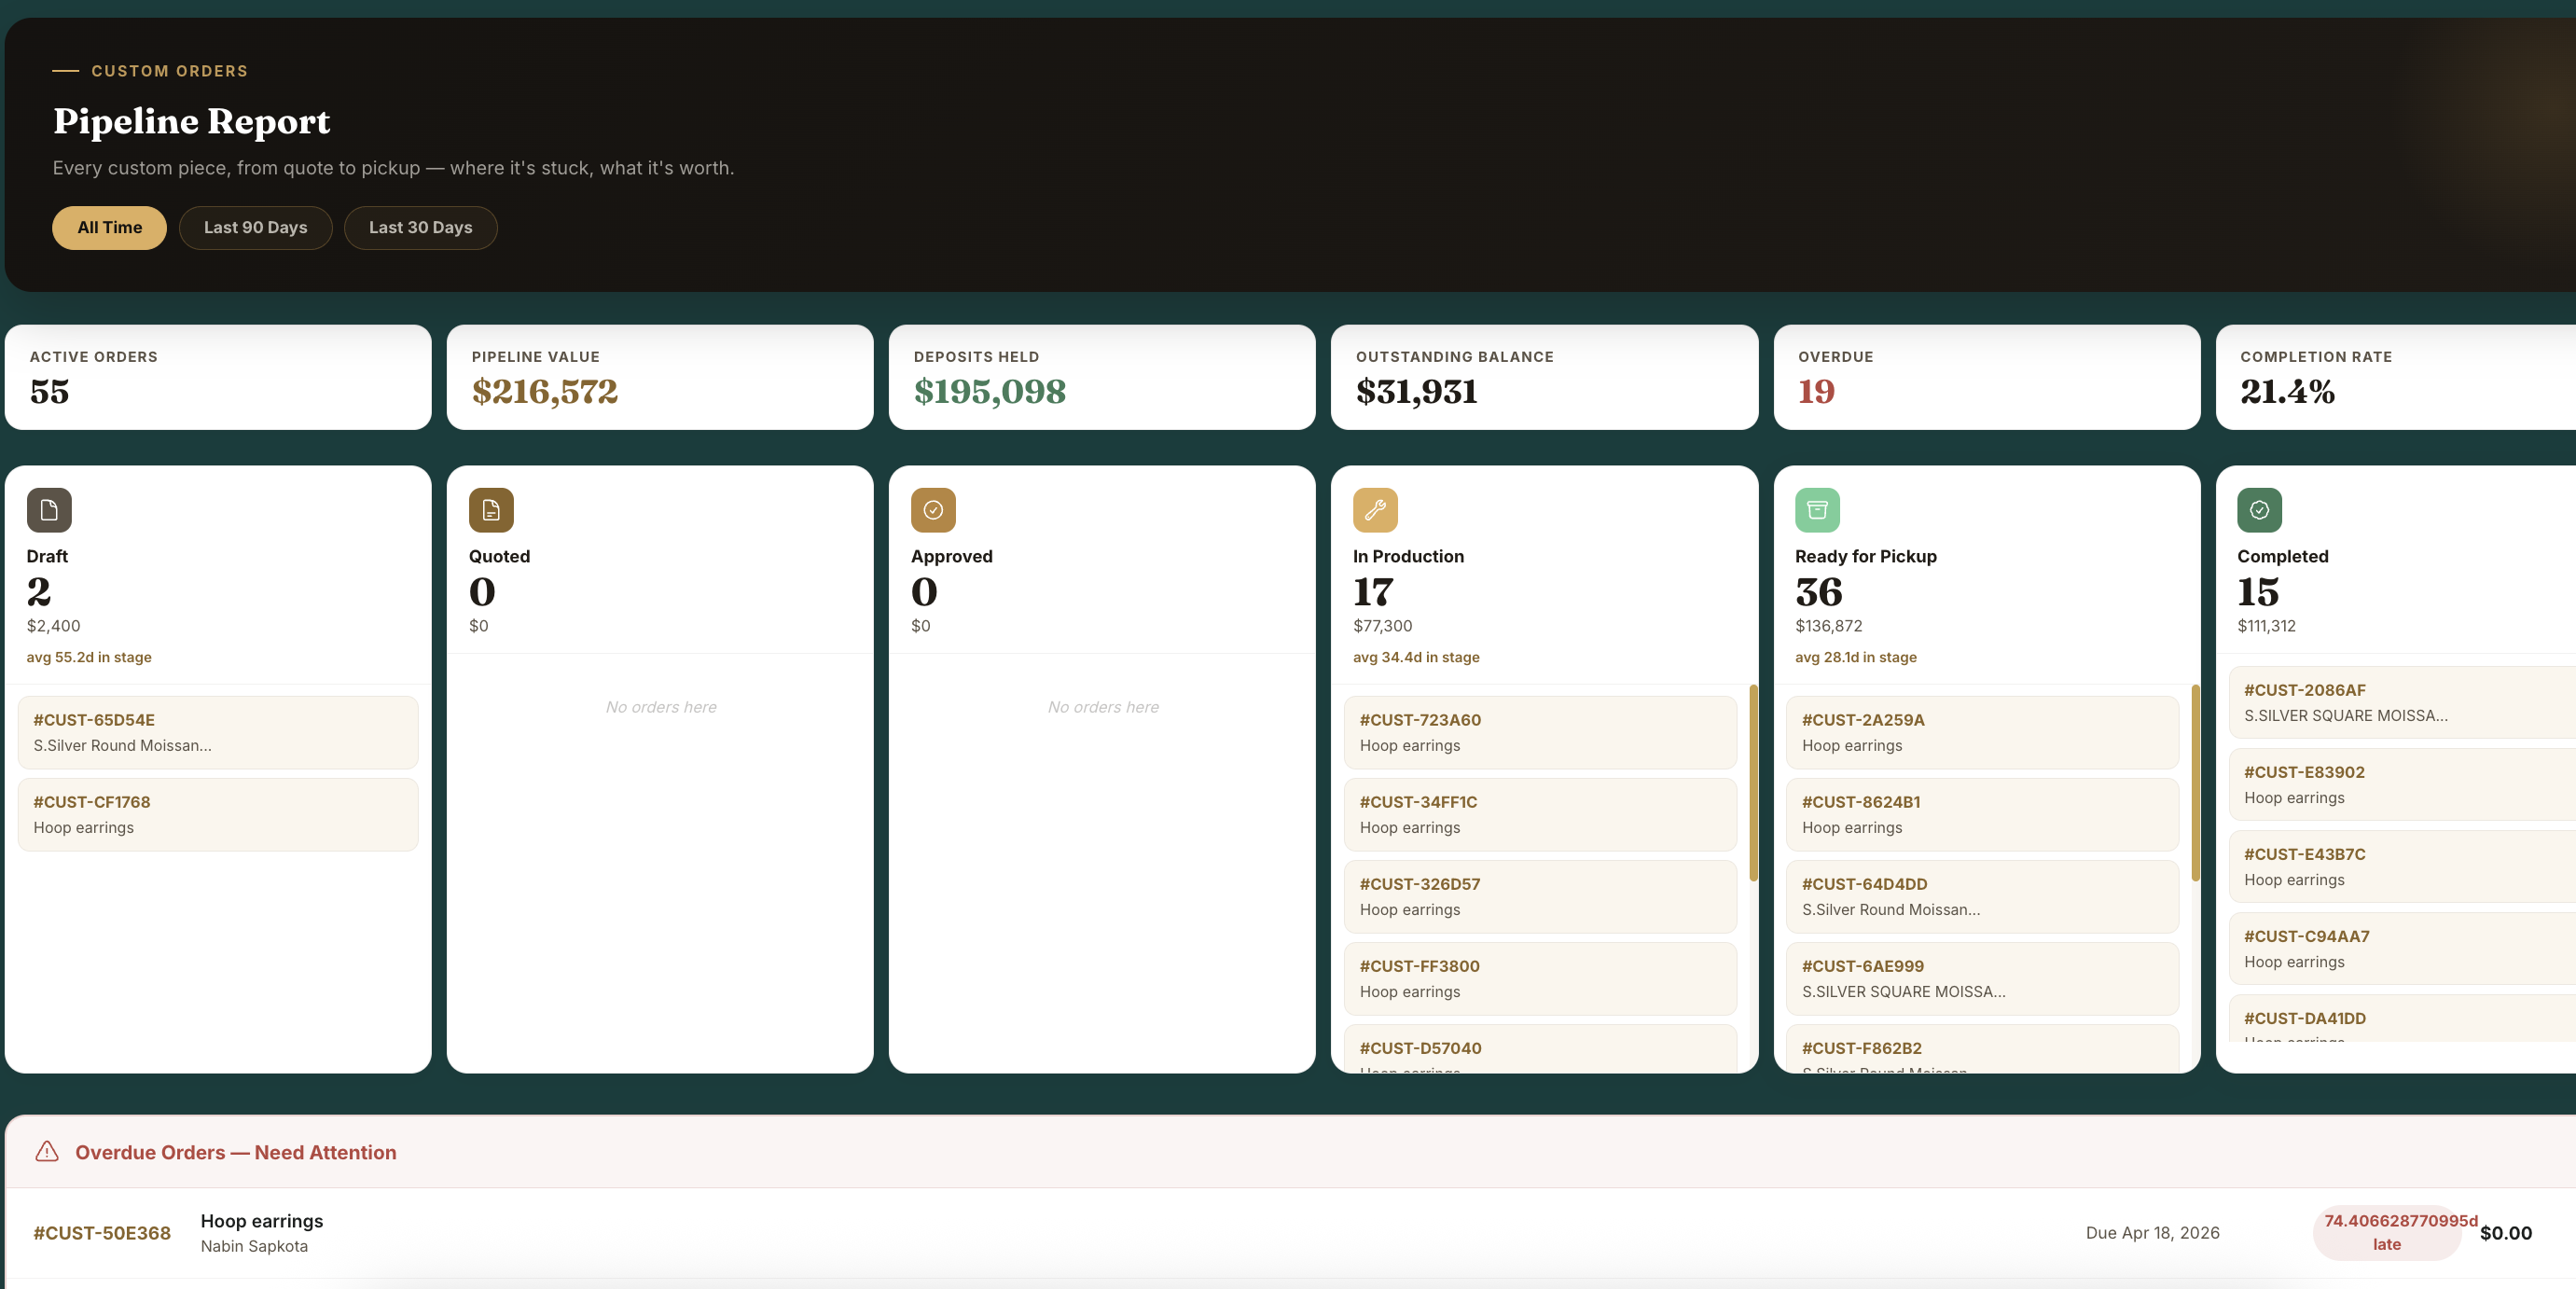
Filter pills at the top narrow to last 30 or 90 days. Click any order number to jump to its edit page.
Laybuy Health Report
Classifies every active layaway into four risk tiers based on payment pace and due date proximity.
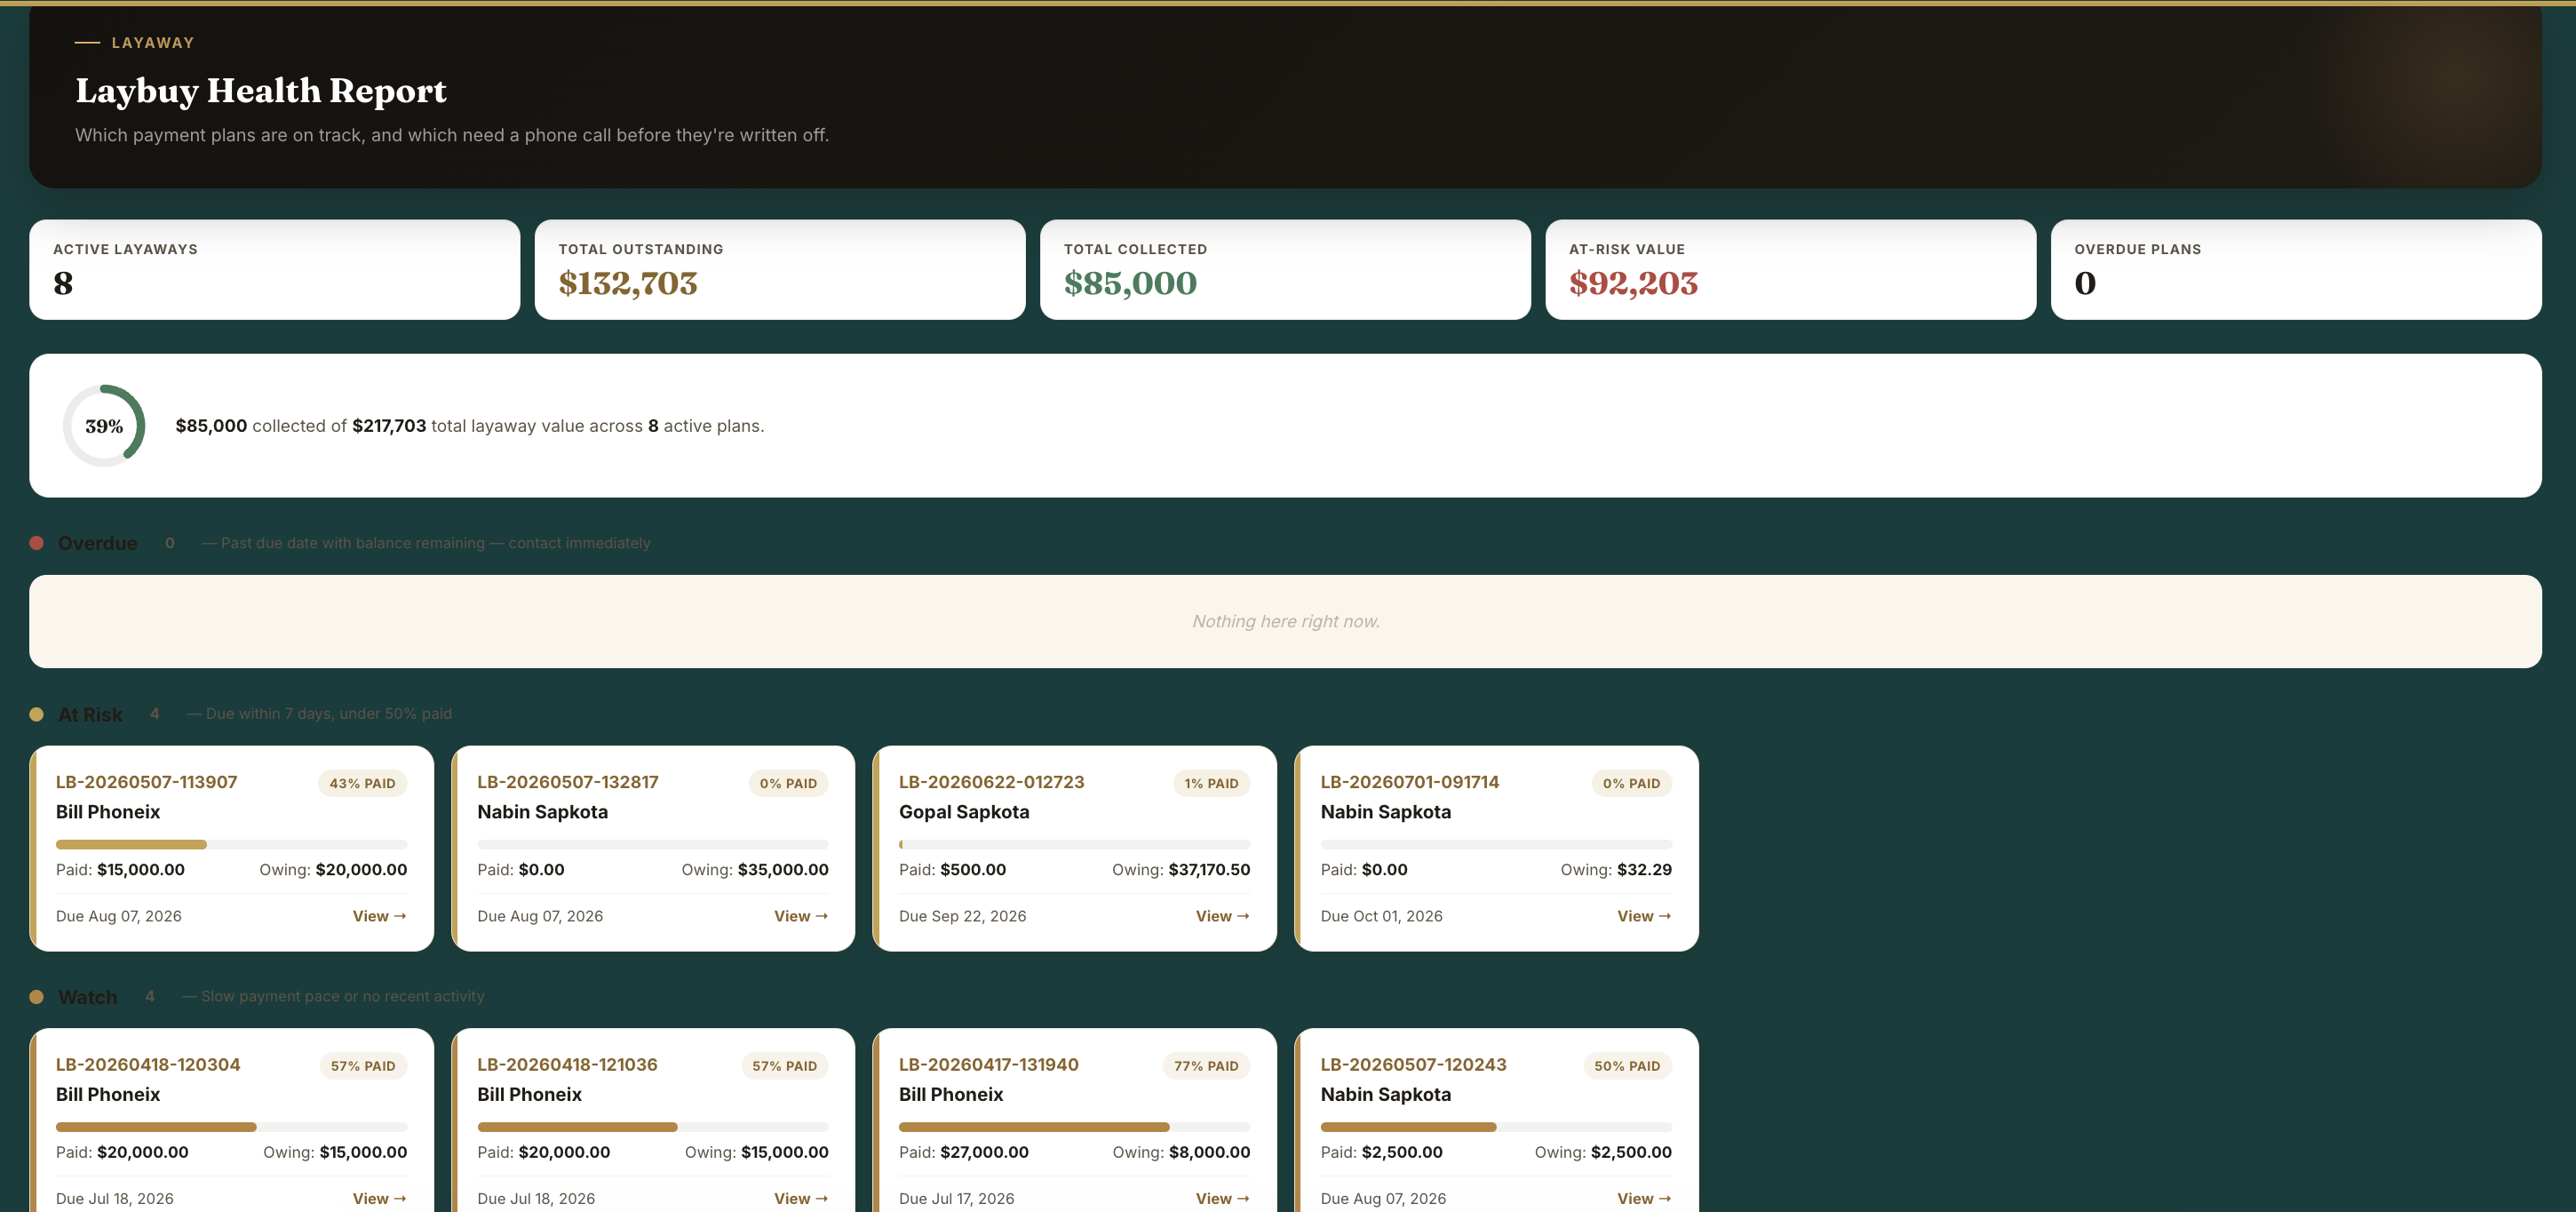
| Tier | Criteria | Action |
|---|---|---|
| Overdue | Past due_date with balance remaining | Call immediately |
| At Risk | Due within 7 days AND under 50% paid | Send reminder this week |
| Watch | Under 50% paid OR no payment in 30+ days | Monitor closely |
| On Track | Paying on schedule | No action needed |
Label Designer & Printing
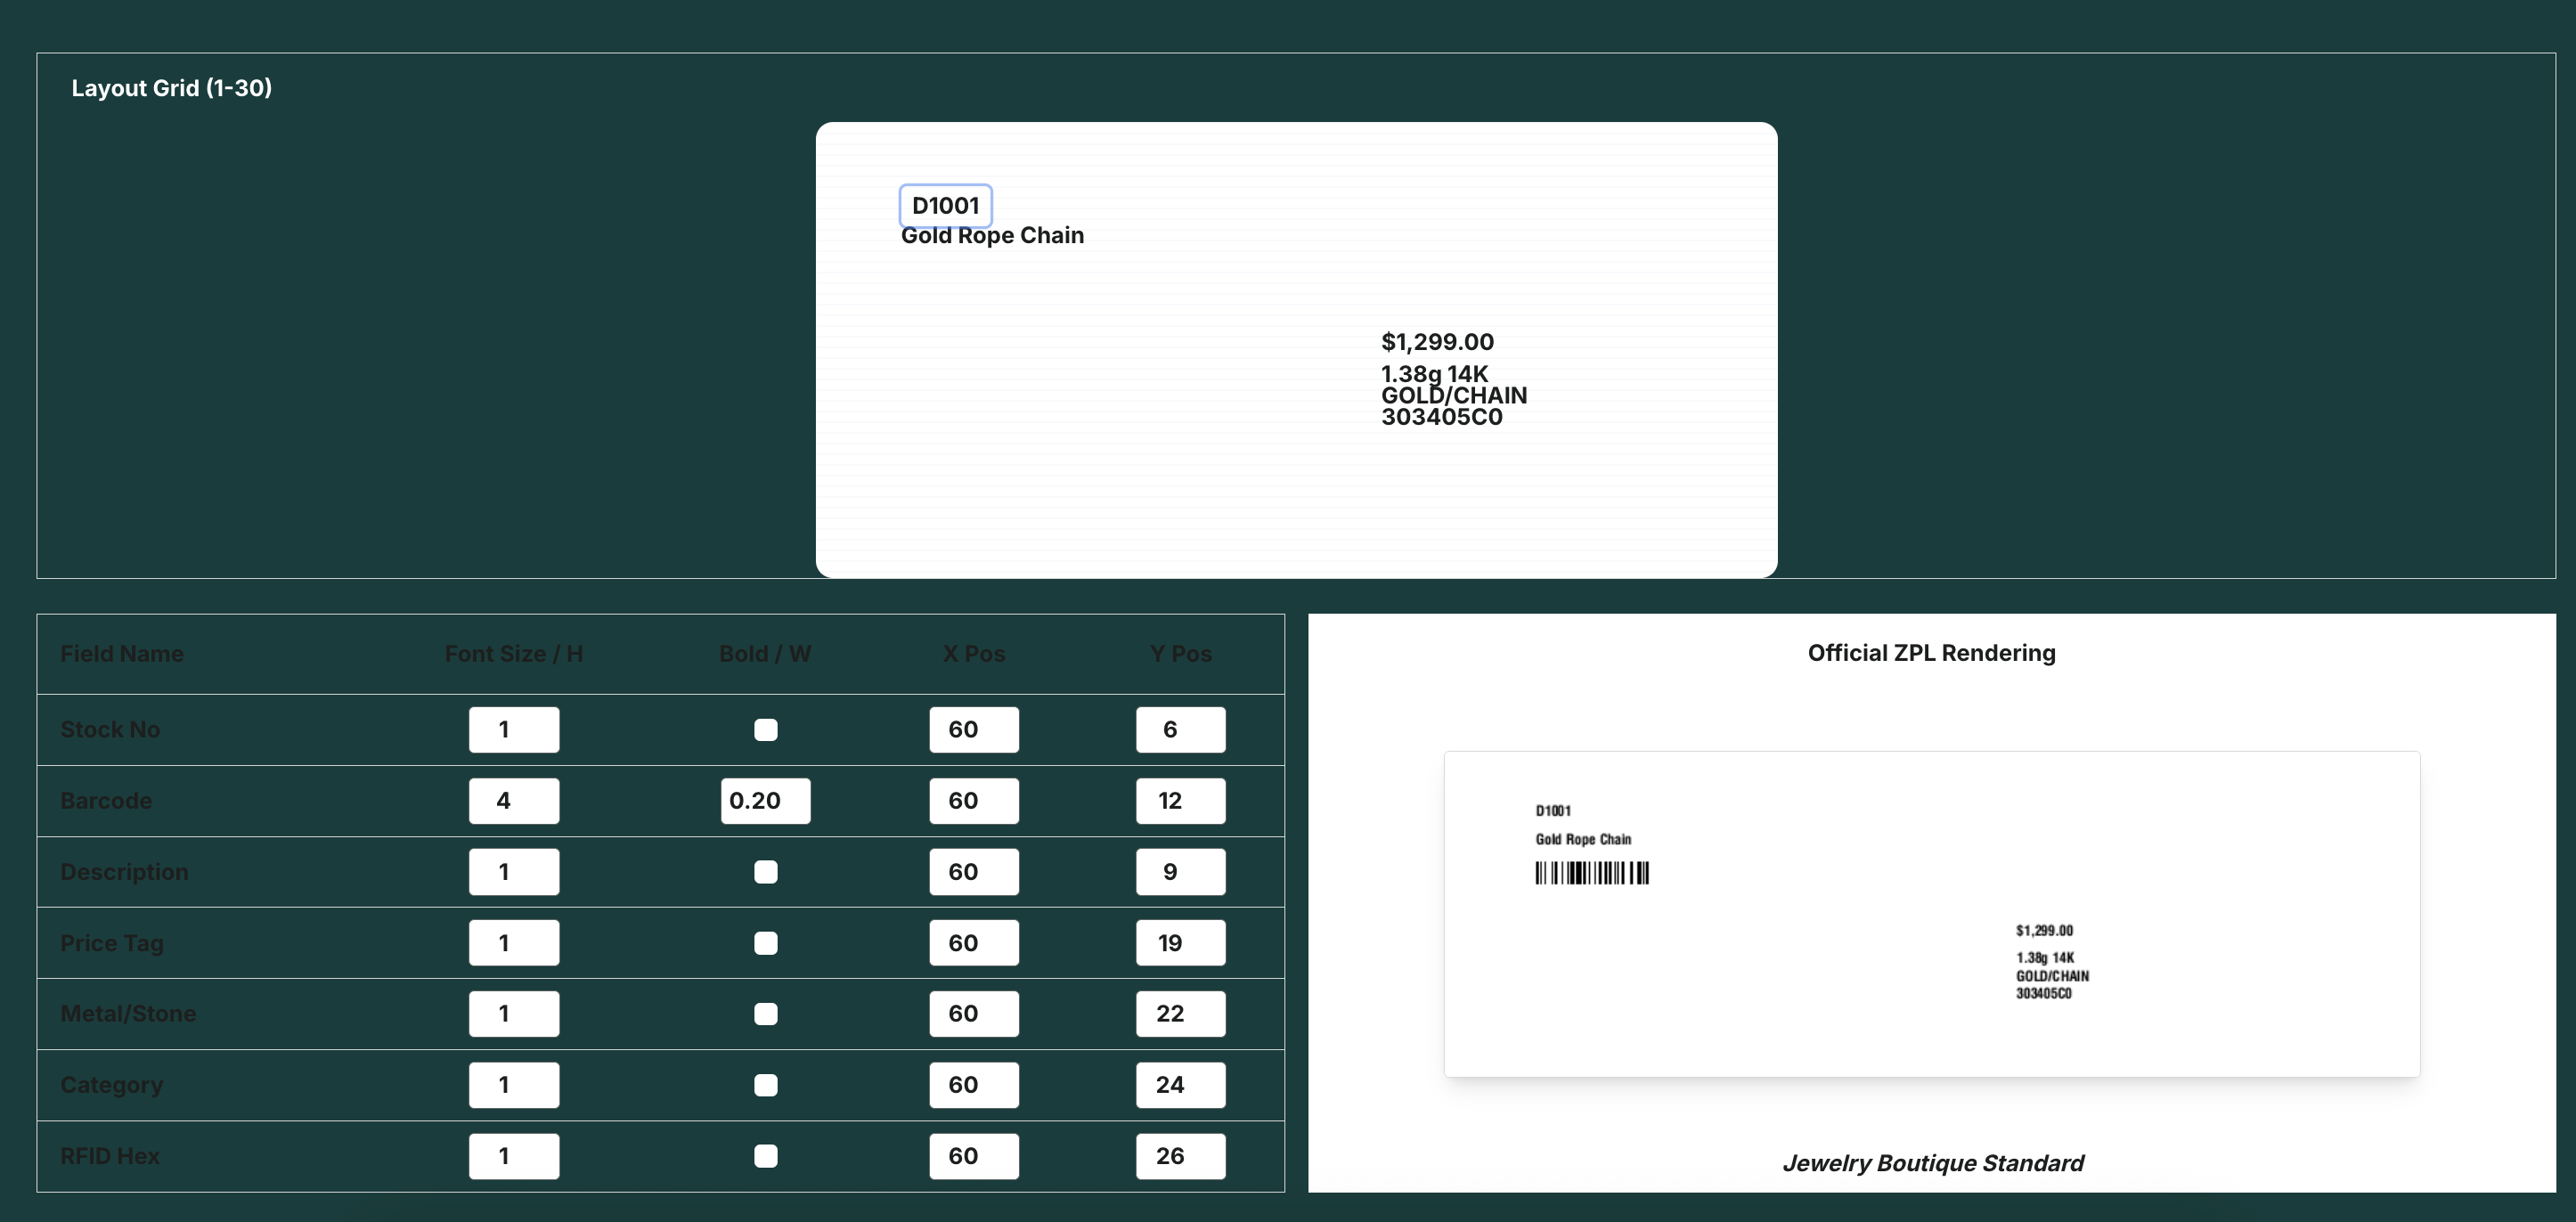
Design label layouts under Admin → Label Designer. Labels print to your Zebra ZD621R via ZPL through the Zebra Browser Print app.
Troubleshooting
| Symptom | Fix |
|---|---|
| Grey dot top-right | Start Zebra Browser Print app on this computer |
| Yellow dot | App running but no printer — check cable/IP (192.168.1.60) |
| Label prints blank | Hold Feed 2s for media calibration |
| Wrong label size | Update layout dimensions in Label Designer |
Customer Profiles
Every sale and repair logs automatically to the customer's profile — purchase history, total spend, preferred categories, and key dates. Search by name, phone, or email from the top search bar.
Wishlists & Follow-ups
Add items to a customer's wishlist from their profile or from an item page. The Upcoming Follow-Ups report surfaces customers with a follow_up_date due today or in the next 7 days — so no customer check-in falls through the cracks.
Marketing Automation
Automate birthday, anniversary, and wishlist-restock messages under CRM → Automation. SMS campaigns require 10DLC registration — contact our team if you need help completing this.
Find Stock / Sale / Customer / Payment
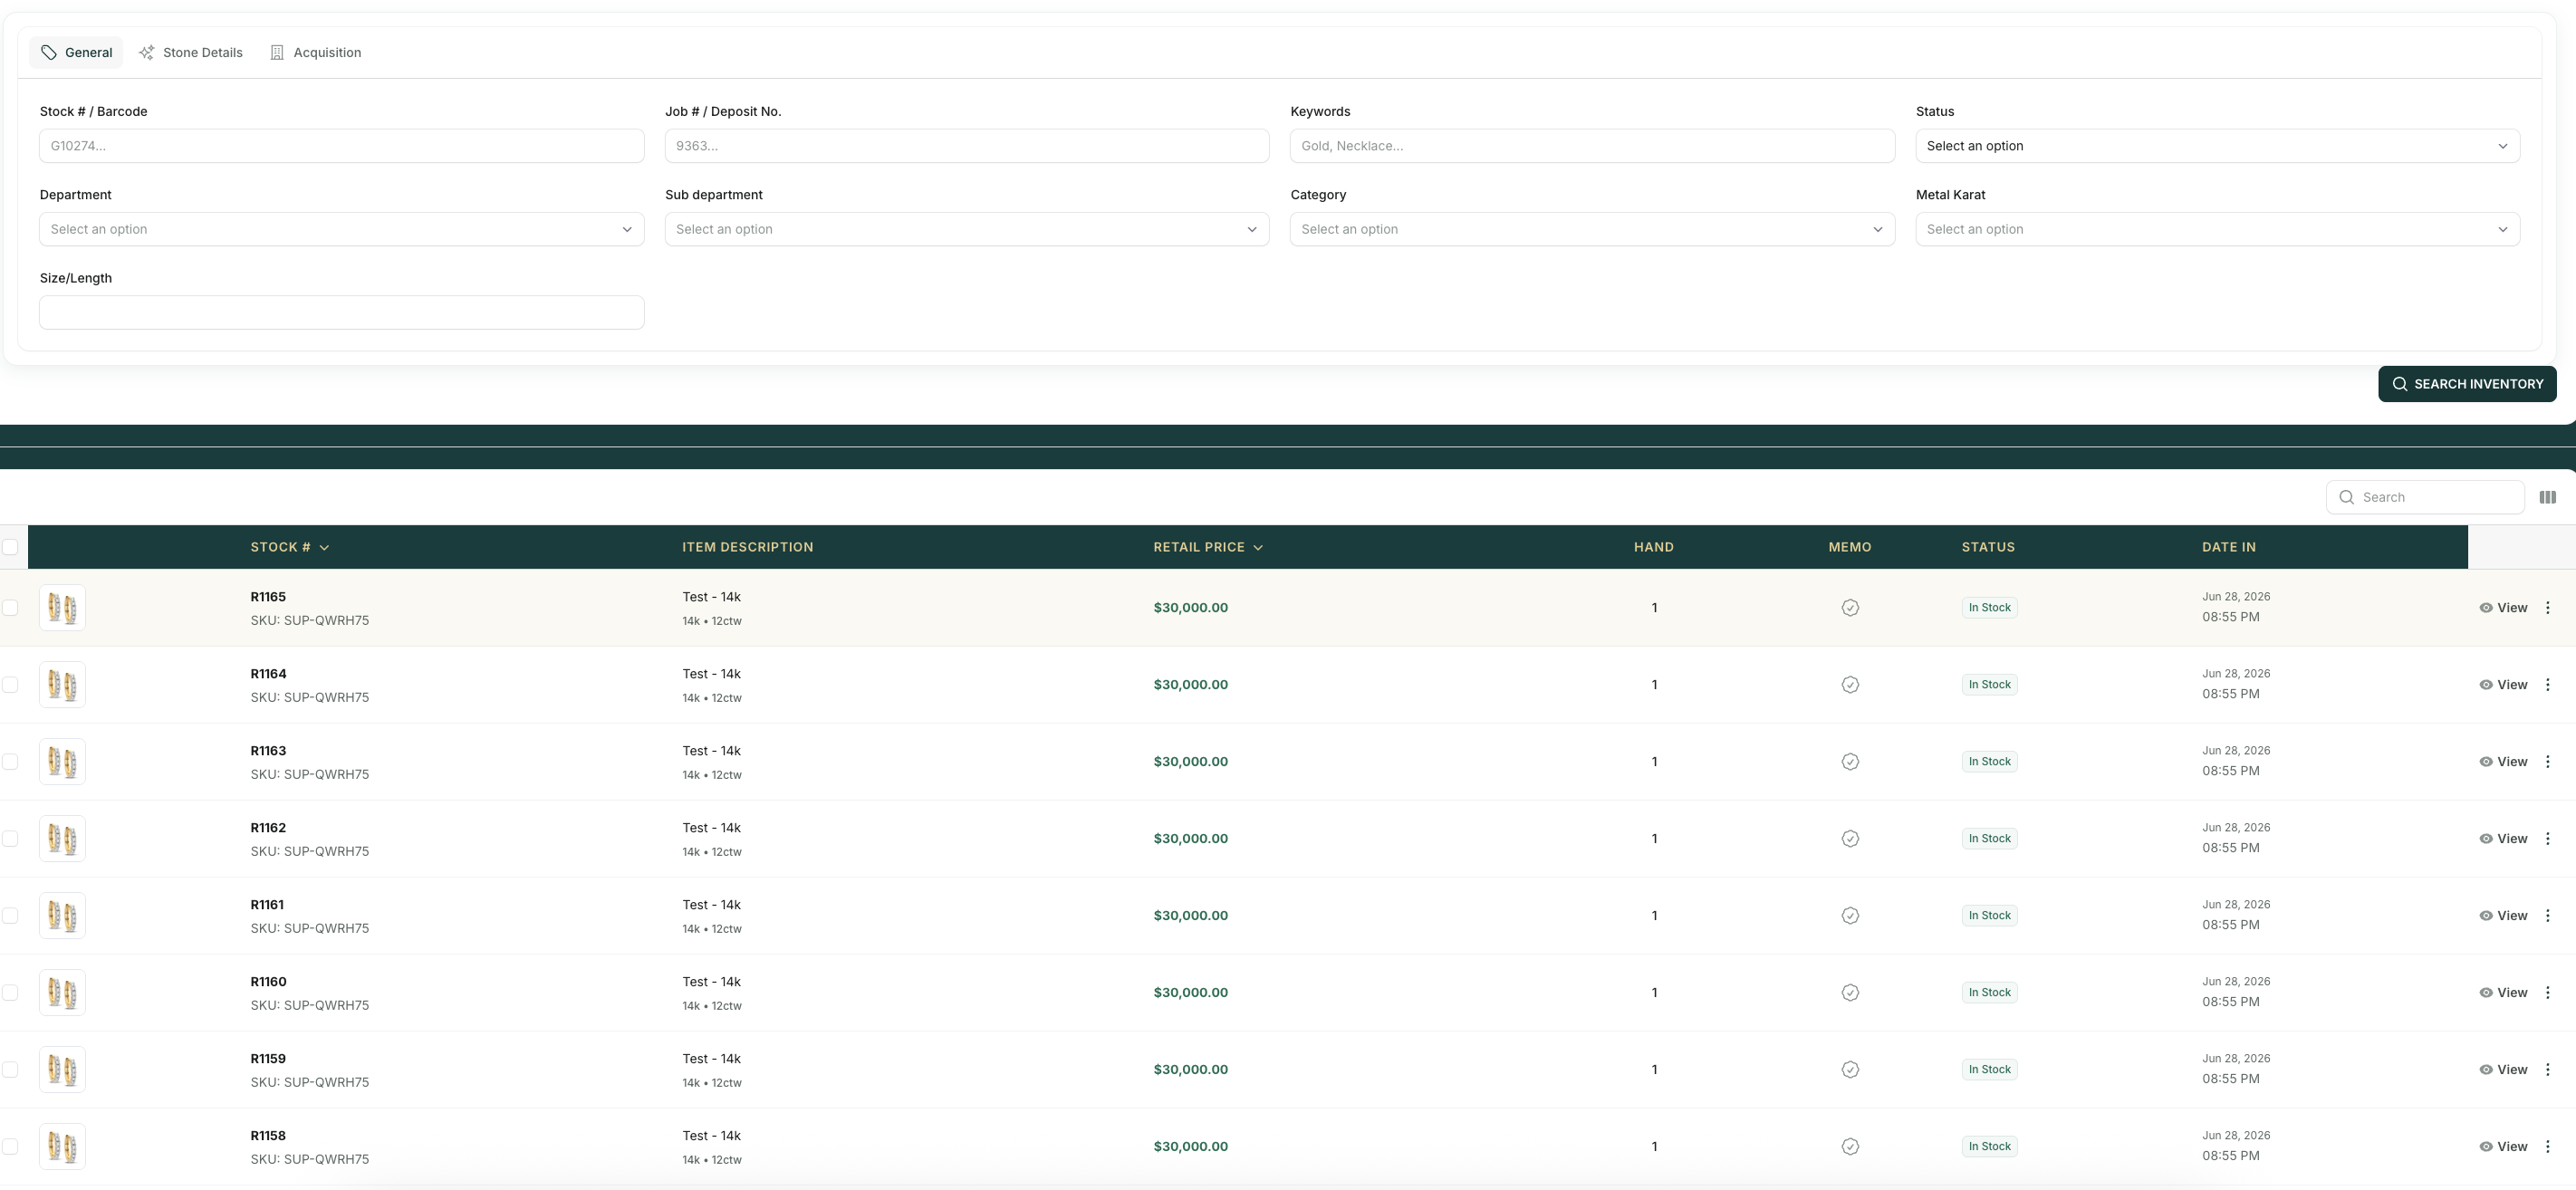
JewelTag has four dedicated quick-search pages — faster than using the main resource lists when you know what you're looking for.
| Page | Search by | Best used for |
|---|---|---|
| Find Stock | Barcode, RFID, description, cert number | Looking up a specific piece quickly at the counter |
| Find Sale | Invoice number, customer name, date | Pulling up a past sale for a customer query or reprint |
| Find Customer | Name, phone, email | Identifying a customer before starting a sale |
| Find Payment | Payment reference, amount, date | Reconciling a specific payment against bank records |
Activity Logs
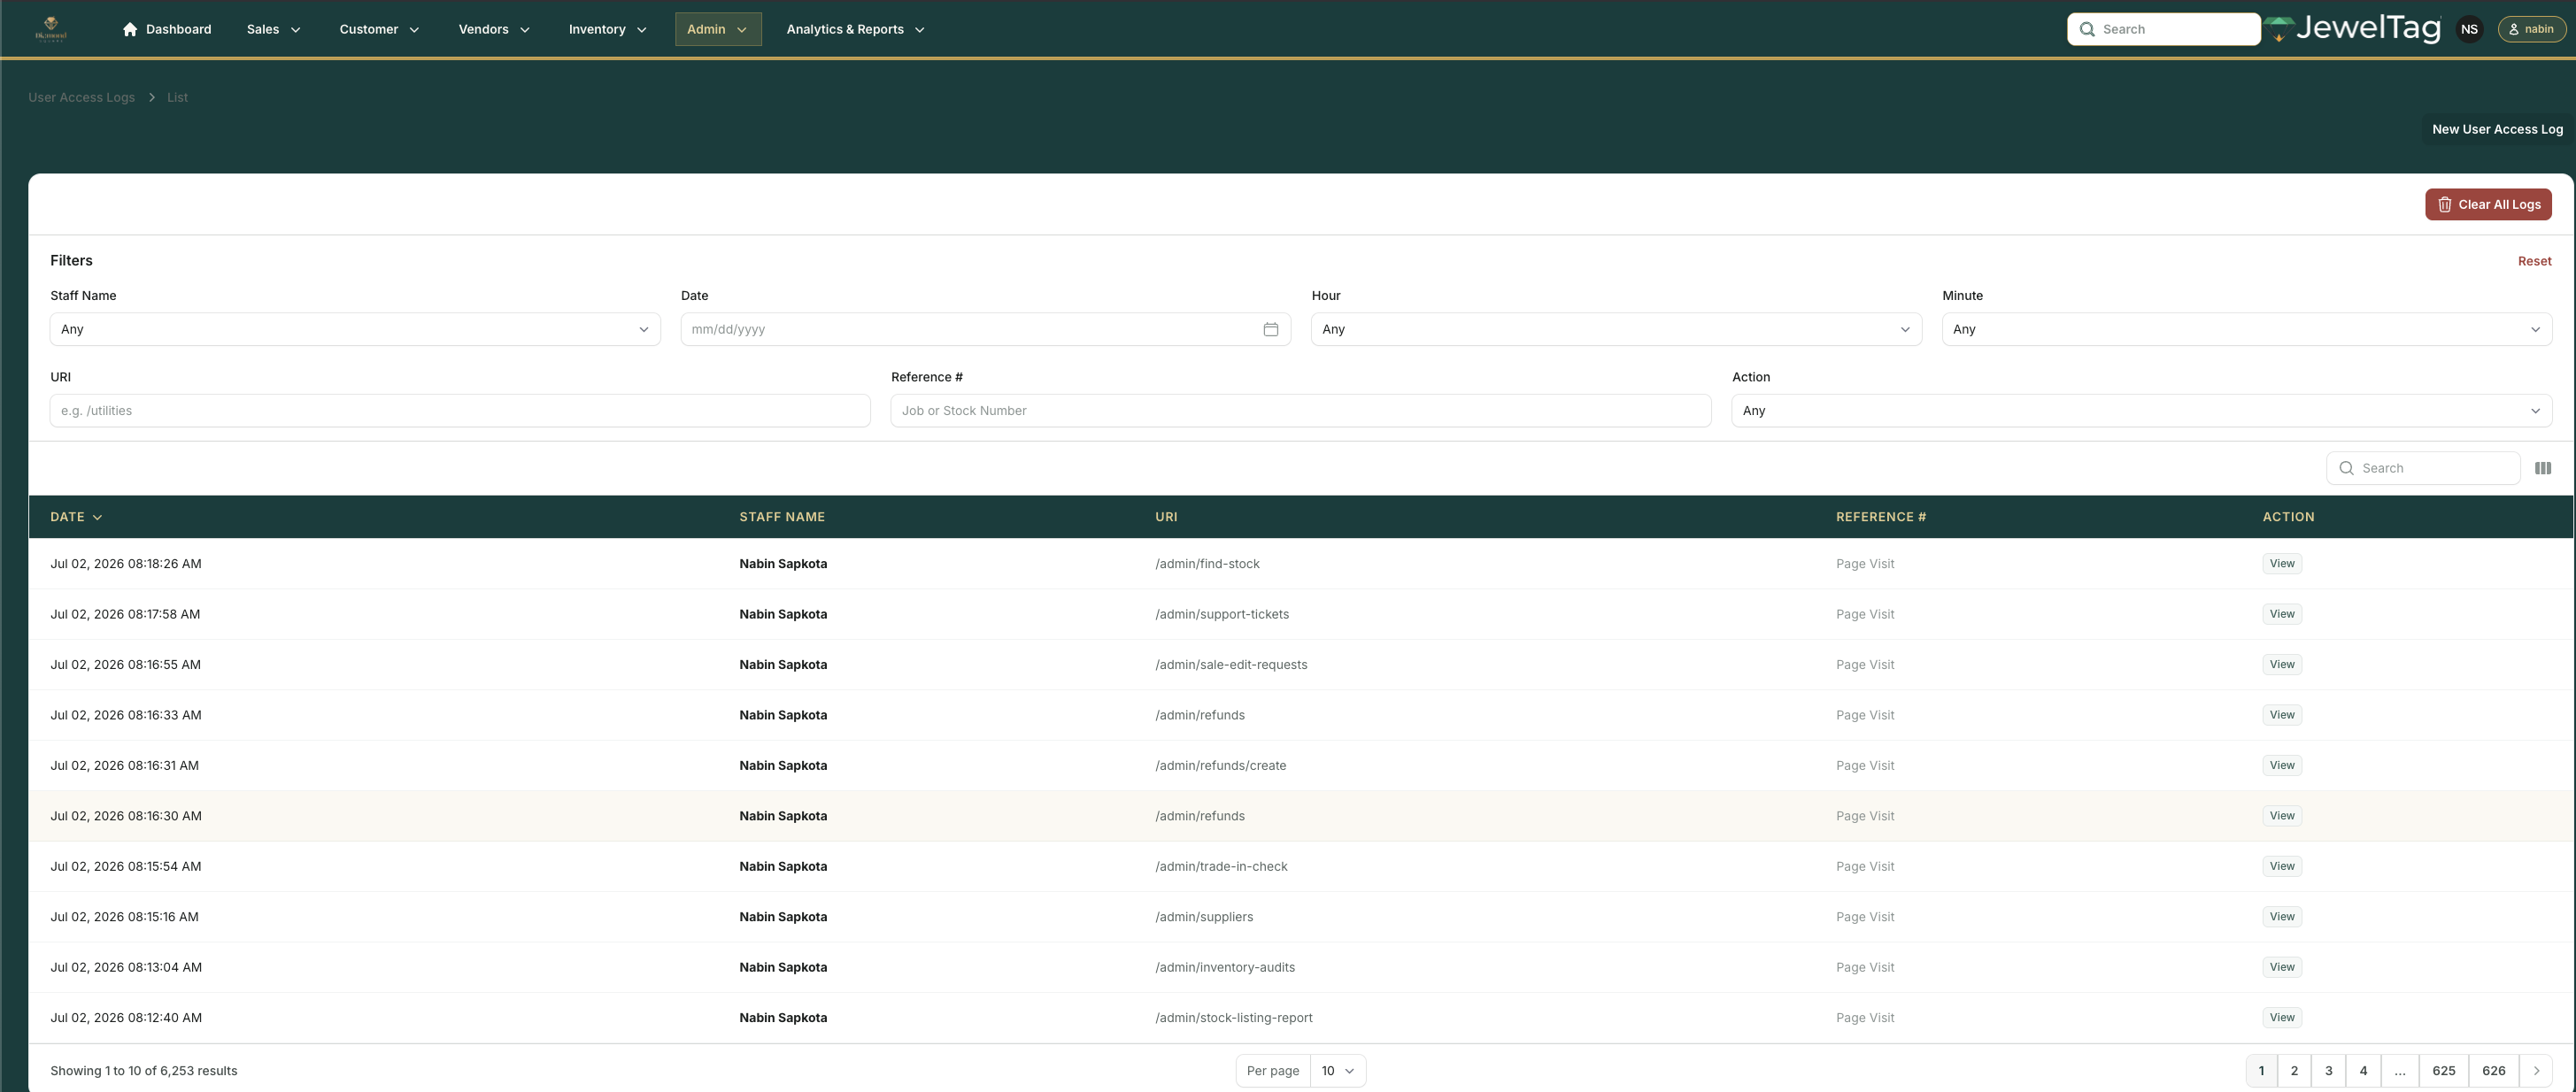
Every action in JewelTag is logged — who created, edited, or deleted what, and when. Access the full audit trail under Admin → Activity Logs. Useful for investigating discrepancies, staff disputes, or unexpected changes.
Deletion Requests
JewelTag does not allow direct deletion of sales, inventory items, or customer records by regular staff. Instead, staff submit a Deletion Request with a reason — an admin reviews and approves or rejects it.
How to submit a deletion request
- Open the record you need deleted (sale, item, or customer)
- Click the Request Deletion button (bottom of the form)
- Enter a reason — be specific
- Submit — an admin is notified
- The record is deleted only after admin approval
Support Tickets
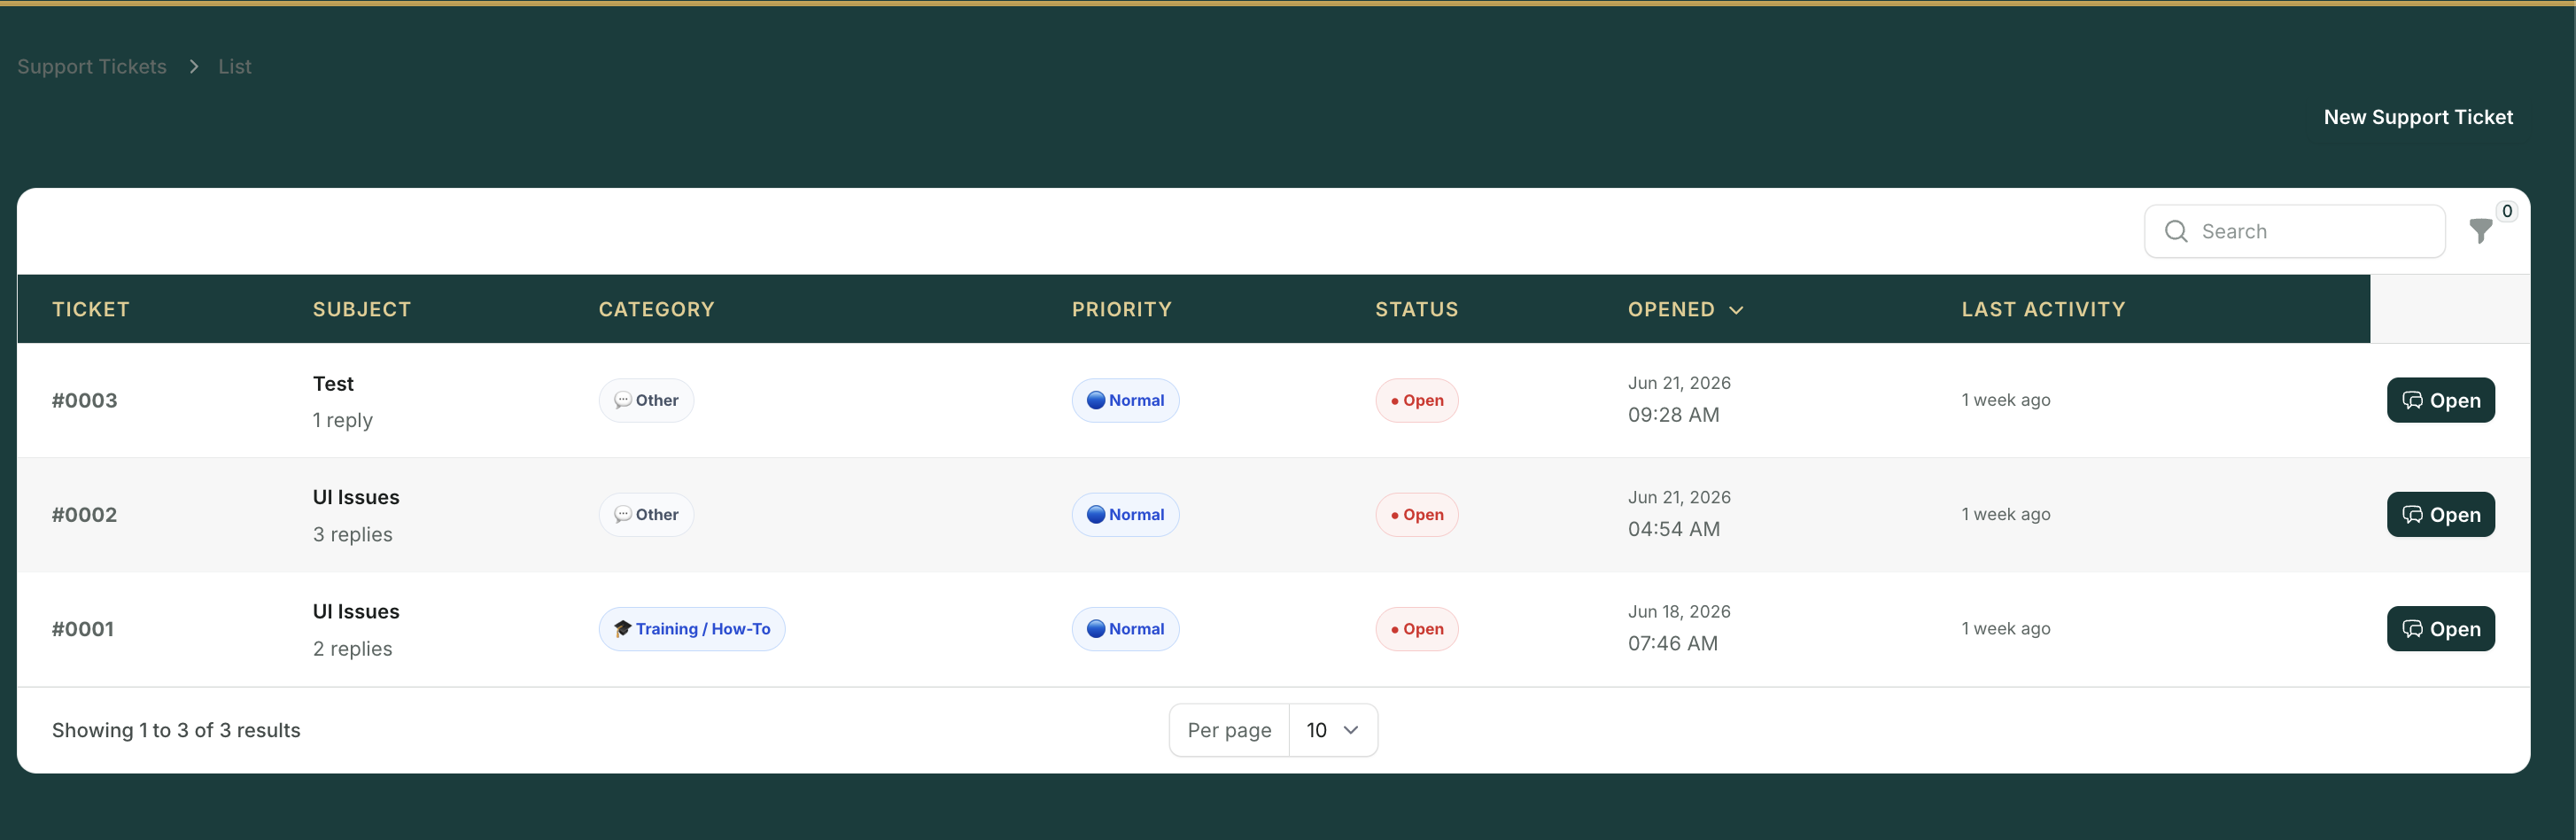
Raise a support ticket with the JewelTag team directly from within the admin panel — under Help & Support in the user menu. Every ticket is emailed to the JewelTag support team and tracked until resolved.
API Keys
Generate API keys for external integrations under Settings → API Keys. Each key can be scoped to specific endpoints — create a separate key for each integration so you can revoke one without affecting others.
Roles & Permissions
JewelTag ships with four default roles (Superadmin, Administration, Sales Associate, Bench). Custom roles can be created under Admin → Roles — assign exactly the permissions each role needs, no more.
QuickBooks Sync
Connect QuickBooks Online or Desktop to push daily sales summaries directly to your books — no manual journal entries. Connect under Settings → Integrations → QuickBooks.
API Reference
Building a custom integration? Our REST API covers inventory, transactions, and customers. Authentication uses API keys from Settings → API Keys.
View Full API ReferenceCan't find what you're looking for?
Contact Support